Air Fryer Asian Chicken Drumsticks

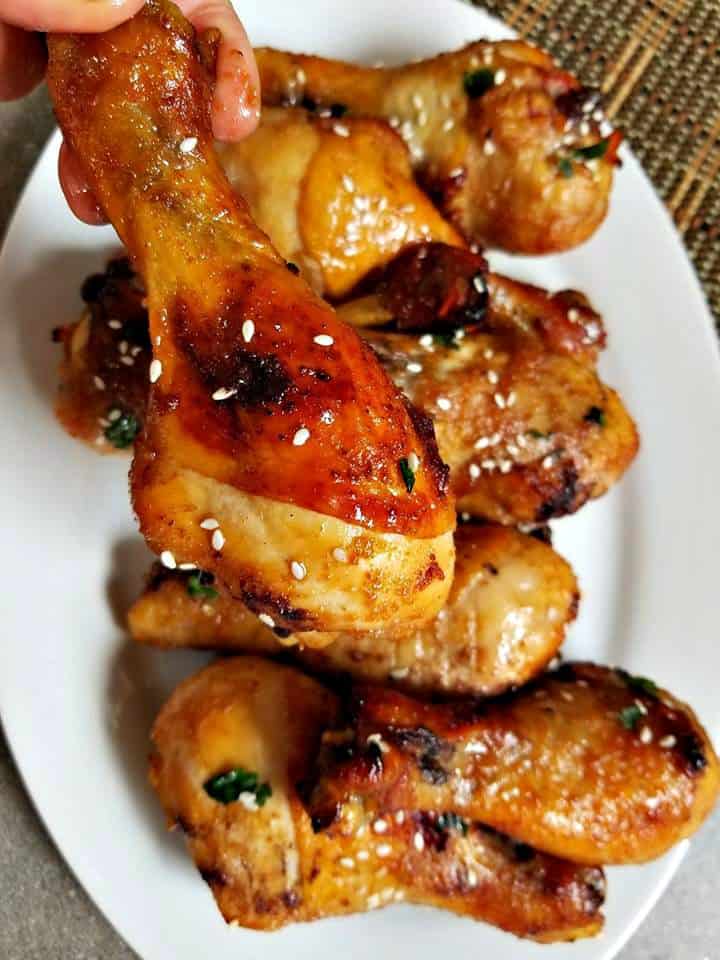
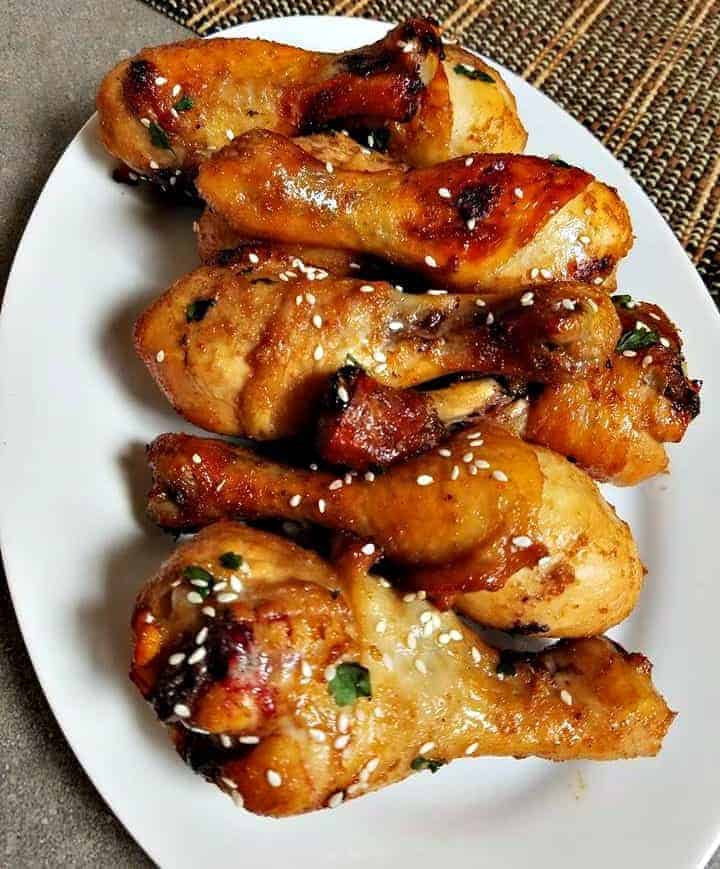
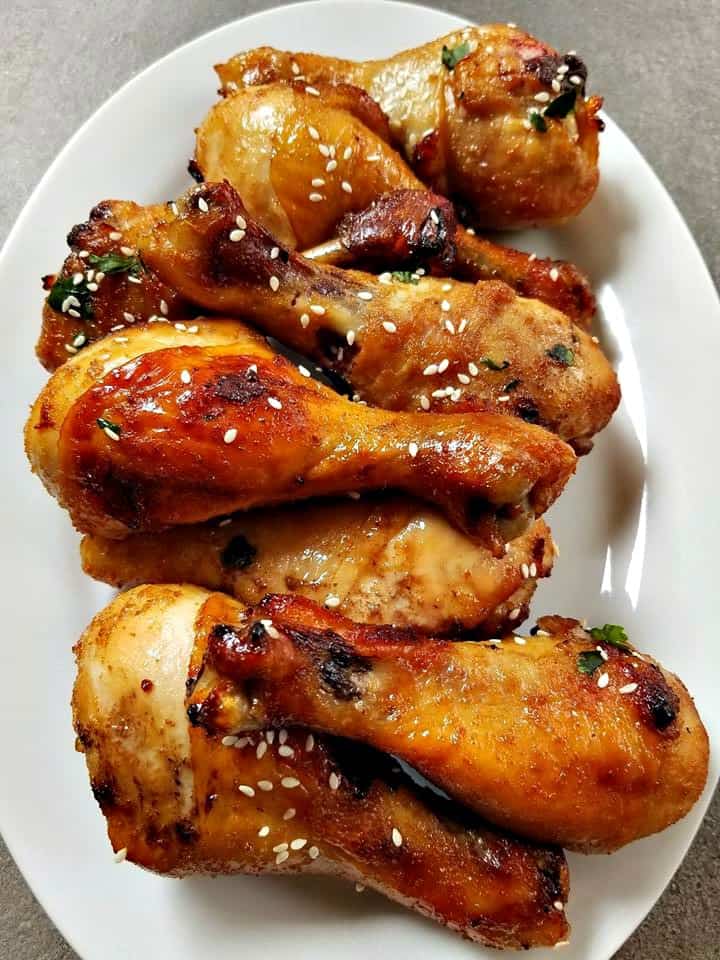
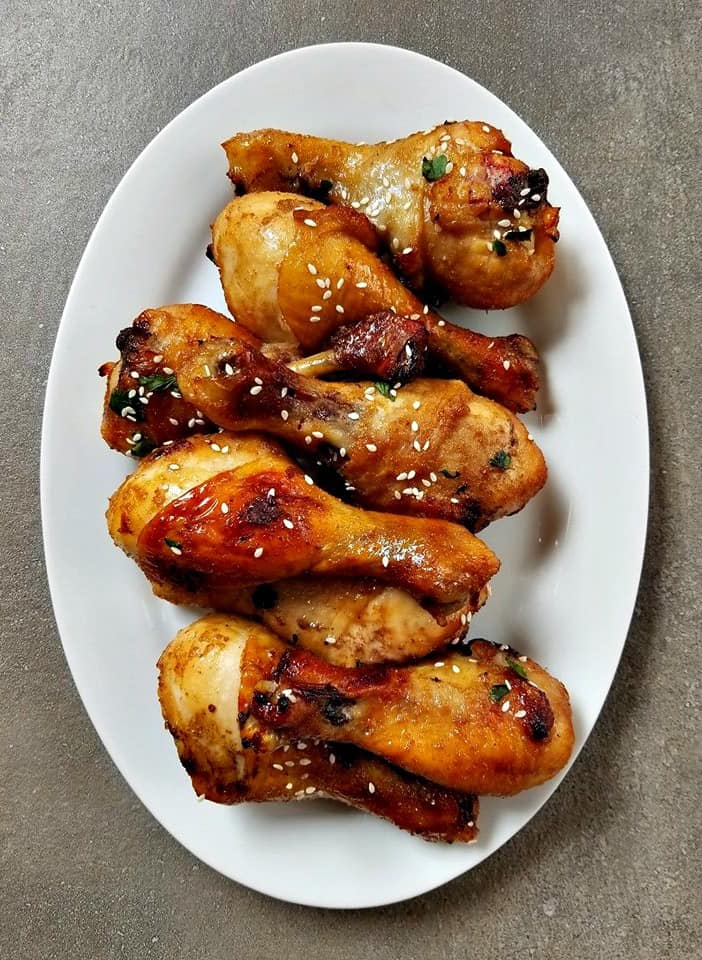
These Air Fryer Asian Chicken Drumsticks are sweet and sticky and are cooked to perfection in the air fryer.

CAN YOU PUT FOIL IN THE AIR FRYER

Iv’e been asked this question many times and the answer is yes.

I use it often when cooking sticky foods as the clean up after is that much easier. 

WHAT IS AIR FRYING

Air frying is a healthy alternative to deep frying food. And most air fryers have been marketed in a way to make you think that this cooking technique is best for those who make a lot of those at home.  

Well I am here to tell you that you do not need to just be a deep fried food lover to want to use this cooking method. RATHER if you love to bake food, then this is also a great alternative. And in most cases is much healthier than traditional baking methods. 

Because air frying mimics deep fried foods but uses little to no oil. And if your cooking something fatty, the fat will drip away and off the food.

So you can enjoy all the same deep – fried or baked foods that we have all come to know and love again but in a healthy way.

The air hot air is what cooks the food not the oil. If you have some frozen foods on hand, feel free to throw out any deep fryer you may have because the air fryer can now do the same job. 

But it is not only frozen food that can be cooked this way, pretty much any food you can think of can. 

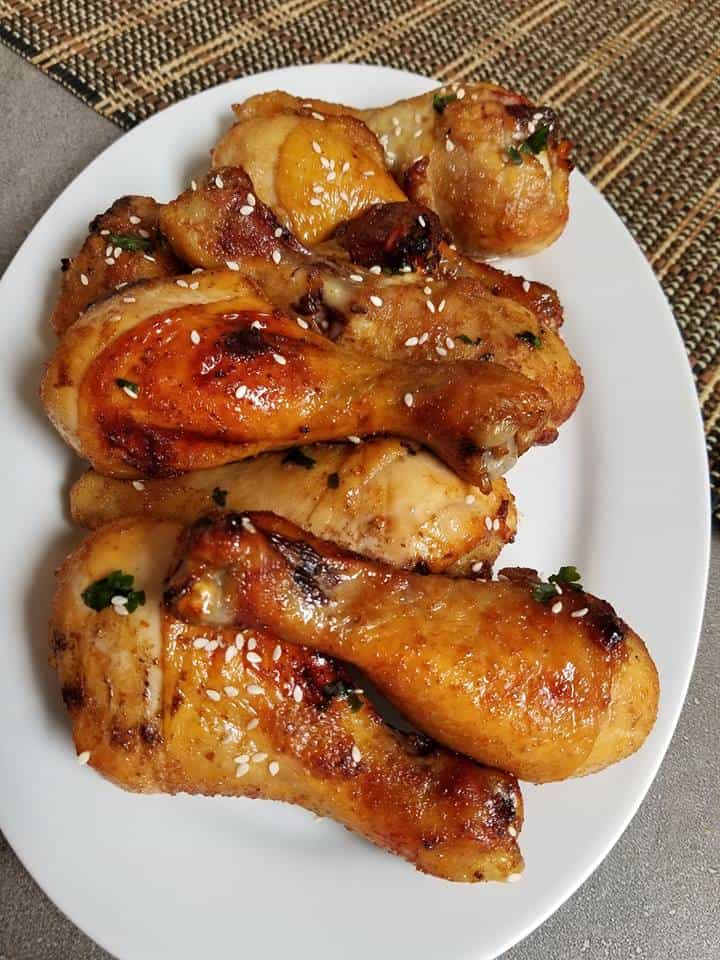
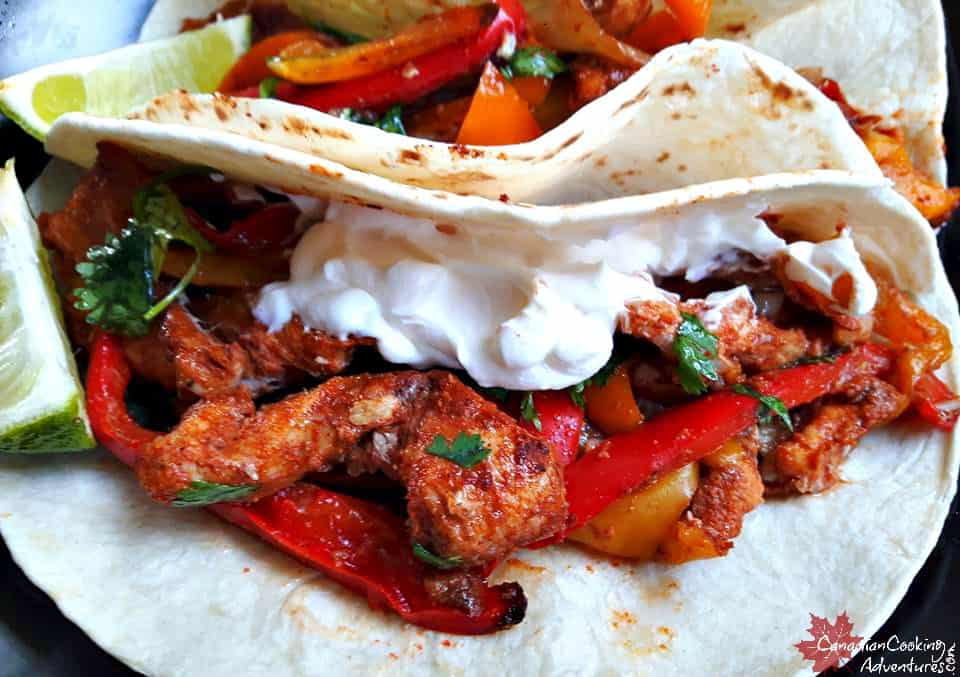
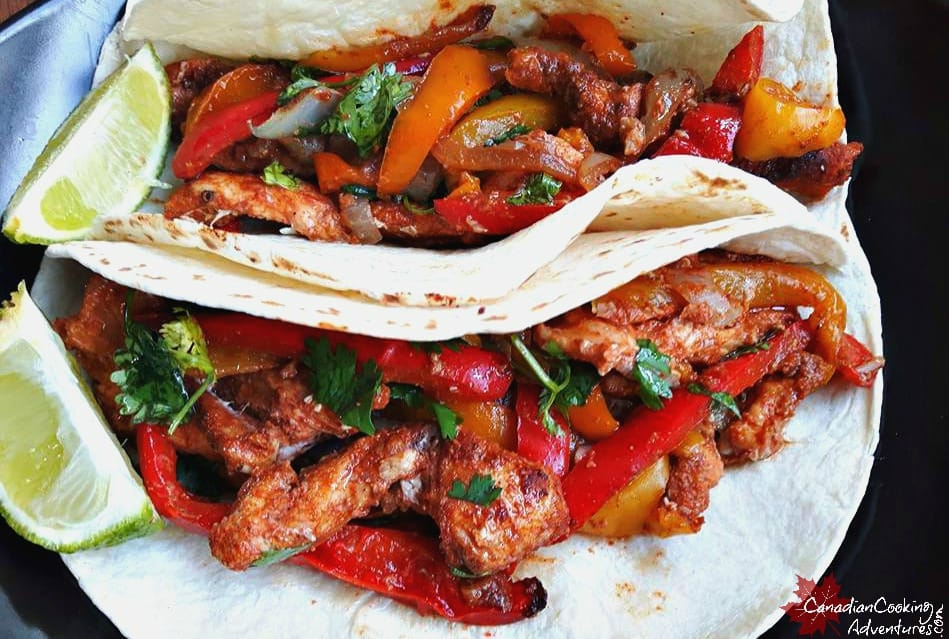
If you like sweet and savory asian inspired chicken flavors, then you’re sure to want to add this recipe to your cookbook collection. 

I’m super excited to share my first Air Fryer recipe with you all today. I have been on the fence for the past year about buying an air fryer.

Mainly because I do not eat a lot of deep fried foods and also because I could not fathom spending $200 plus for ONE.  Air fryers promise that you can get that deep fried texture without all the grease.   

So recently when I came across the Gotham air fryer, that does the exact same thing as an air fryer.

And knew that I had to try it! So I’m now starting a Air Fryer collection of recipes on this blog because I have fallen in love with this NEW kitchen tool. 

CAN I USE ANY KIND OF AIR FRYER? 

YES! 

HOW TO COOK CHICKEN IN THE AIR FRYER?

  • If your using a Kitchen Top Air Fryer, follow your Air fryers cooking instructions for chicken drumsticks.
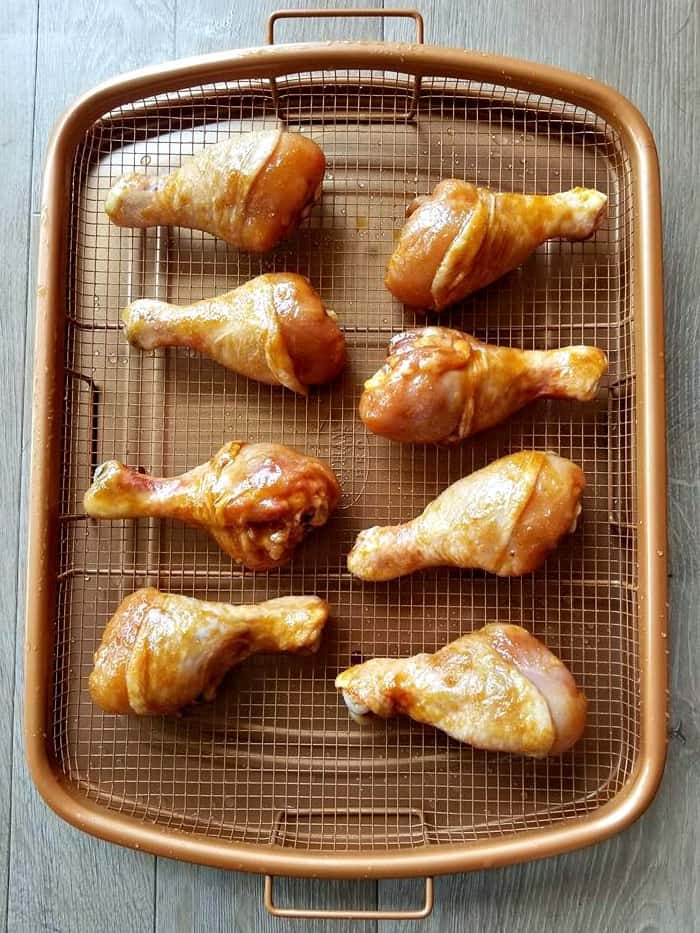
  • Then coat the Chicken in Olive Oil vs Cooking Oil = 3 tbsp per 6 legs is enough.
  • Marinated the chicken for 30 minutes before air frying.
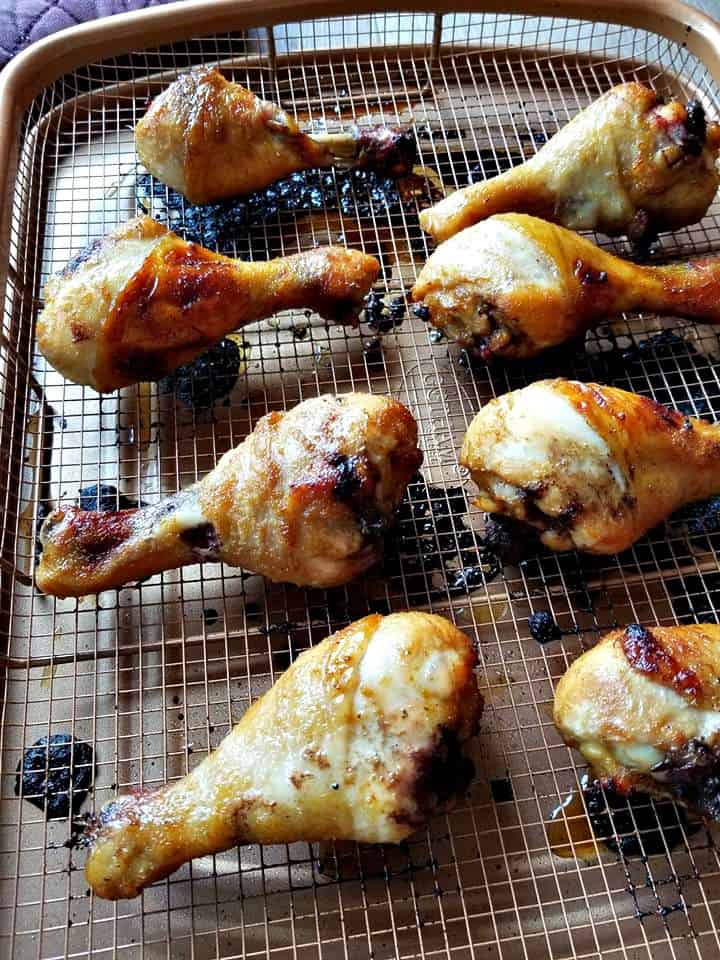
  • Place the Chicken in or on the Air Fryer and allow it to do the Cooking.

NOTE: Each air fryer has different cooking instructions based on size and model. It is best to check with your units information in regards to cooking times and temps for chicken drumsticks

HOW TO COOK CHICKEN ON THE GOTHAM STEEL AIR FRYER? 

  • If your using the Gotham Steel Crisper I would advise to turn your oven to Conventional bake, which will make the chicken extra crispy. Otherwise if your oven does not have that setting you can simply place the crisper on the middle rack, which works well too.
  • Follow the same instructions above. 

If you have a table top Air Fryer all these recipes will work the same. Because Air Fryers all use the same type of cooking techniques. 

IS AIR FRYER CHICKEN HEALTHY? 

Yes, in comparison to other methods of cooking chicken it is. If you have never used an air fryer, now is the time. They are more affordable now than ever. Plus they are also a much healthier way to cook food, since the fat drains away and it is never deep fried.

Some people think that an Air Fryer is mostly for people who eat a lot of fried food. I admit I once was apart of that group, however I soon realised that if you like to bake foods too. Like I do, then the air fryer really cuts out a lot of the unnecessary fat.

Think of it, how do you typically bake chicken drumsticks or legs? If you are anything like me. You would place it on a pan in the oven and sometimes use a baking sheet to catch the grease. However with the air fryer it elevates the food and allows all that (FAT) to drip away. 

Plus if you use the Gotham Air Fryer it is super simple to clean, I am talking hard sticky food at the bottom of the tray slides right off. No scrubbing at all is needed, it could not be more simpular guys.

Another reason I like the Gotham Air Fryer is because it cooks more food than the typical table top Air Fryers. Because it has a lot of space on that tray !

IS AIR FRYER CHICKEN KETO?

Yes!

Wanting some more AWESOME Air Fryer recipes?

Stay tuned to this blog for more “Air Fryer inspired recipes to come!

★ Did you make this recipe? Please give it a star rating below! 


Beef and Vegetable Ramen

These Beef and Vegetable Ramen Noodles are made in a delicious sauce that you’re sure to enjoy. 

You can make this dish more or less spicy according to your personal taste. 

The heat in this dish comes from the cayenne pepper, I like to use just 1/2 a tsp for this recipe.

Which gives it a touch of heat, kinda similar to the spicy ramen noodle packages you may find at the store.

Then you will want to start by chopping all your vegetables up first, this is the hardest part really.

As it can be a bit challenging if you do not have knife skills to julienne the carrots and peppers. 

However practise makes perfect and in time you will figure out the best method for you. If you really prefer a little help in that area you can always use a food processor to do those jobs for you if needed.

I like to use broccoli, carrots, red peppers and snap peas for this dish.

Although you can use whatever veggies you have on hand really.

Not a fan of beef feel free to add some shrimp, tofu or chicken to these noodles in replace if desired. 

Once the veggies are saute yet still slightly crisp.

You will then add back in the cooked ramen along with that delicious premade sauce.

Toss everything together to serve. 

DELICIOUS! Feel free to try other vegetables such as broccoli, kale or even asparagus. 

This dish also works well with chicken and tofu!

This recipe proves that you don’t have to put a lot of effort into making this type of takeout dish.

I just know your going to love it as much as we do!

Serve some “Spicy chili sauce” on the side for some extra heat or add more cayenne during the cooking process.

Also you can add beef bouillon cubes in replace of the beef stock, just make sure your using equal amounts of water/liquid

I am so thrilled you are reading one of my recipes, if you made this recipe i’d love to hear about it! Thank you very much for reading and until next time see ya in the kitchen. Don’t want to miss a recipe? Sign up for our NEWSLETTER delivered right to your inbox every Month!

Dill Pickle & Black Forest Pasta Salad

This Dill Pickle and Black Forest Pasta Salad is a fantastic and easy recipe for any of those upcoming summer gatherings! 

I hope you give this light and tasty Summer pasta salad a try!

This is best served slightly chilled the day of vs the next day, because if it’s left in the fridge for to long it can become dry.

So if there is just the two of you please use the recipe adjuster here and make just enough for what you need.

Other than that this recipe is a winner as it’s not laddled with any high fat dressing.

Rather we are using a creamy plain yogurt and then adding some pickle juice, a touch of mayo, olive oil and spices that make it all come together very well.

What kind of Dill Pickle ? Pasta Salads have you tried in the past? Why not give this lighter version a try  this time.

This one is creamy enough to satisfy pretty much anyone, however is made lighter than the average pickle pasta salad you may find out there.

Since it’s mostly made with plain yogurt, dill pickle juice and just 1 tbsp of mayonnaise.

I much prefer using more yogurt over mayonnaise as it lightens up the dish and keeps me in better shape. 

Pickle Salad Perfection!

Notes: The colder the salad the better it taste, so try to chill it in the fridge for one at least one hour prior to serving.

LOOKING FOR OTHER SUMMER SALAD RECIPES?


I am so thrilled you are reading one of my recipes, if you made this recipe i’d love to hear about it!Thank you very much for reading and until next time see ya in the kitchen. Don’t want to miss a recipe? Sign up for our NEWSLETTER delivered right to your inbox every month!


Indian Chicken Curry

This Indian Chicken Curry also known as (Murgh Kari) is super quick and easy to prepare and has a great authentic taste. You can make it in your pressure cooker or on your stovetop in under 30 minutes making it a great weeknight meal or a great dish for meal prep throughout the week!

Looking for another great curry recipe? Try my Chickpea Spinach Curry or my Lamb and Chickpea Curry recipes.

Whether you’re feeding a large crowd, or cooking for yourself, this Indian Chicken Curry is a flavorful dish and is sure to earn rave reviews.

Serve it over white rice, brown rice or even riced cauliflower for a flavorful low carb curry. 

What You’ll Need

To make this curry the easy way, your going to want to purchase a pre-made spice mix. Such as MDH Chicken Masala as seen below. You can purchase it through my AMAZON link if you’d like too.


Marinating the Chicken

Is a tip to help the recipe taste more authentic as it enables all the flavors to merge into it. This can be done the night prior, by simply dicing the chicken and placing it into a plastic bag along with a bit of oil and the spice mixture.

I tend to choose a more spicy curry goat or lamb dish, however, when it comes to Curry Chicken, this recipe is definitely high up on my favorite list. I learned this dish from  “Chef Vikram Vij” when he was on the food network some time ago and I’ve been making it ever since!

Why You’ll Love This Recipe

  • You can make this dish more spicy, by simply adding more cayenne pepper if desired. 
  • I like to make this recipe at home often because it’s super simple and healthy and doesn’t contain any MSG or preservatives.
  • You can make it in large batches which makes it a great budget friendly dinner option.
  • Add in your favorite vegetables to boost the nutrition. 
  • You can easily make it on the stovetop or in a pressure cooker. 
  • It can easily be made vegetarian by adding in tofu or chickpeas instead of chicken.

Ingredients You’ll Need

  • Cooking Oil or Ghee – This is what you’ll use to saute the chicken, onion, garlic and ginger. It will help brown them and bring out the flavors. 
  • Boneless Chicken Breasts – Chicken is the main protein source of this dish, but feel free to use any protein you enjoy. 
  • Onion & Garlic – These two aromatic vegetables add a great layer of flavor to chicken curry. 
  • Raw & Canned Tomato – You’ll need a mix of raw tomatoes, canned tomatoes and tomato paste for this recipe. Tomatoes add a great color and acidity to curry dishes. 
  • Ginger – Ginger helps give a spicy flavor that pairs well with any curry recipe. 
  • Full Fat Yogurt & Cream – These two ingredients help give the curry a nice creamy tomato sauce. 

Homemade Indian Curry Spice Blend

You can use a premade spice blend or a curry spice blend made from scratch! 

  • 1 1/2 tbsp Garam masala
  • 2 tbsp Curry powder
  • 1 tbsp Turmeric powder
  • 1 tbsp Sugar
  • 1 tsp Coriander
  • 1 tsp Cumin
  • 1 tsp Cayenne pepper
  • 1 tsp Salt
  • 2 tbsp Dried fenugreek leaves

You can also buy a pre – made Spice Mix as seen below. 


How To Make Easy Indian Chicken Curry

  1. In a large pot or into a slow cooker pot add the cooking oil/ghee and turn on the heat. Next add in a large diced onion and sauté for 2 minutes before adding in the diced chicken. Sauté another 7 minutes or until the chicken is no longer pink and the onion is tender.
  2. Next toss in the curry and remaining spices and sauté another 2 minutes before adding in the minced garlic and ginger. Sauté for 1 minute till fragrant.
  3. Add in the tomatoes and along with the tomato paste.
  4. Next add in the yogurt, cream and stir everything to combine.
  5. Serve hot on top of your favorite rice. 

Pressure Cooker Indian Chicken Curry

If you’d like to make this recipe in your instant pot or pressure cooker, follow these steps:

  • Add cooking oil/ghee into the pot and turn it to SAUTE mode. 
  • Next add diced onion and sauté for 2-5  minutes or until veggies begin to soften.
  • Add in diced chicken breast and sauté for another 2-5 minutes or until chicken is no longer pink.
  • Toss in the curry and spices along with garlic and ginger. 
  • Add in the tomatoes and tomato paste, cream and yogurt.
  • Close the lid and seal. Cook on manual high pressure for 10 minutes. 
  • Release naturally or quickly, stir then serve hot over rice.

Slow Cooker Indian Chicken Curry

You can also make this recipe in your crockpot or slow cooker by following the instructions below:

  • Sauté all ingredients except tomatoes, cream and yogurt in a skillet over medium high heat for 5-8 minutes or until vegetables begin to soften and chicken is no longer pink.
  • Add everything to a slow cooker including the tomatoes, tomato paste, canned tomatoes, cream and yogurt and stir until fully combined.
  • Cook on low for 8-10 hours or on high for 5-6 hours or until chicken is fully cooked through. 
  • Stir everything together and serve hot on top of your favorite rice. 

FAQ

CAN I USE COCONUT MILK IN CURRY CHICKEN?

Yes, you can subsite the yogurt for a thick coconut milk if desired. Check out my popular Coconut Chicken Curry Recipe if you are looking for a creamy and dairy free curry. 

HOW DOES CHICKEN CURRY TASTE?

It’s pretty similar in taste to traditional Butter Chicken with a little more spice. It is creamy and has a great balance of flavors from the acidity of the tomatoes and the deep flavors of onion, garlic and ginger. 

CAN I USE FRESH TOMATOES?

Yes! But you’ll also want to be sure to use tomato paste as it helps thicken the sauce. 

WHAT IS A GOOD LOW FAT OPTION FOR CHICKEN CURRY?

Instead of using cream or yogurt, you can use Greek yogurt or sour cream to help bring down the fat content in this recipe. 

Try out making my easy Garlic Naan Bread Recipe to pair with any of my curry recipes! 

You’ll Love My Easy Curry Recipes

I am so thrilled you are reading one of my recipes, if you made this, I want to see! Follow Canadian Cooking Adventures Instagram, snap a photo, and tag and hashtag it with @canadiancookingadventures and #canadiancookingadventures

Stay connected and follow along on FacebookPinterest, and Instagram for all of my latest recipes

Notes: If you don’t have “Greek Yogurt” feel free to use “Sour Cream” and skip the actual cream in the recipe if desired for a low fat option.

Also you can use, fresh tomatoes or canned for this recipe. 


Easy Tilapia Fish Tacos

These Easy Tilapia Fish Tacos are one of my all time favorite Mexican recipes.

Not only are they absolutely delicious! They take less than 15 minutes to make. I like to serve these tacos with all types of salsa, such as the one you see here for my Pico de gallo . Also you can serve it with my award winning Jalapeno Peach Salsa as seen below.

ARRIBA MEXICO!

It’s that good guys, amo los tacos mexicanos! We make this in our house at least once a week.

Just make sure you have some either high quality fresh fillets or frozen always on hand and you can too.

ARE FISH TACOS HEALTHY

Yes, white fish is a lean protein then the taco shell itself is low in calories as well as the added ingredients and spices.

HOW TO MAKE TILAPIA FISH TACOS

  • You can use a high quality frozen fish for this recipe. Otherwise fresh fillets are always my top choice.
  • This type of fish can also be served in burritos, hard tacos or over rice with beans.

TYPE OF FISH TACOS

  • You can also substitute the tilapia for another white fish such as halibut or cod.
  • Shrimp too is also a popular option. 

WHERE DID FISH TACOS ORIGINATE

In Baja, California. Some say that the roots come from Japanese immigrants that made there way to Mexico in the 1950s – 1960 who brought them in.  Either way they this is a very MEXICAN recipe to most of us today!

TILAPIA FISH TACO SEASONING

  • Chili Powder
  • Cayenne pepper
  • Garlic Powder
  • Cumin Powder
  • Salt and pepper, to taste

These tasty tacos can be pulled together in less than 15 minutes.

Making for a super quick and tasty dinner option.

Just make sure to make the “pico de gallo” ahead of time.

But not to ahead of time as the tomatoes won’t be as fresh past a day!

WHAT TO SERVE WITH TILAPIA

  • Sour cream
  • Cheese
  • Avocado

WHAT IS PICO DE GALLO

These fish tacos are so darn delicious, pair them with fresh homemade “pico de gallo” and you can’t get a tastier or healthier fish tacos if you ask me.

It’s Mexican salsa y’all and it goes great with just about any type of Mexican food.

See below for the recipe!

Also don’t forget to squeeze some fresh lime juice over top the fish at the end.

This really helps the flavors to pop!

FISH TACOS FOR A CROWD

You can feed roughly 4 people with this recipe.

So if it’s just the two of you dining tonight then there certainly will be some leftovers.

If your wanting to feed more people, simply MAKE more by doubling the ingredients! 

Super easy to prepare too, all you are doing is a little prep work that takes less than 15 minutes.

If your wanting to serve this with the same  “pico de gallo” salsa you see in the picture here.

Be sure to make the salsa one hour ahead of time, as it’s best to let the salsa marinate which enhances it’s flavors. 

Check out my two favorite recipes for Pico De Gallo you will serious love them! 

  1. Pico De Gallo this goes great with these tacos.
  2. Cabbage Pico De Gallo this also goes great with these tacos.

DID YOU MAKE THIS RECIPE?

If you make this recipe, I would love to hear about it! You can leave a 5 star review in the comments below! Thank you very much for reading and until next time see ya in the kitchen. Don’t want to miss a recipe? Sign up for our NEWSLETTER delivered right to your inbox!

Looking for another way to make Fish Tacos? Try my Blackened Tilapia Fish Tacos

Traditional Beef and Cheese Lasagna

This Traditional Beef and Cheese Lasagna reminds me of something my Mother use to make me. 

This is more of a traditional recipe for Italian lasagna and is my all time favorite way to make homemade lasagna hands down. 

Good food that lasts until next day was always something my Mother aims for. 

And this recipe is one of those dishes!

HOW TO MAKE LASAGNA RECIPE

  • First you will want to get your hands on some fresh basil for this lasagna, along with the right types of cheeses.
  • All which is very important in making a traditional lasagna.
  • For the cheeses you will want are Ricotta, Fresh Mozzarella and some Edam cheese. 
  • The Edam cheese will give this lasagna it’s nice crust.
  • Also Ricotta cheese for the inside works so good.

CAN LASAGNA BE MADE WITHOUTH RICOTTA CHEESE

Yes, you can substitute for cottage cheese if you like. It is just not as traditional! 

WILL LASAGNA NOODLES COOK IN THE OVEN

Yes, but you must pre cook them on the stove top first in boiling water. 

Then lay place them in layers between the sauce and cheese and hamburger before baking. 

This will in turn leave you will a moist yet firm and perfectly browned lasagna.

That is sure to impress even the pickets of lasagna eaters.

Give it a try and let me know what you think 🙂

Check out how perfect this Lasagna turned out.

The crust is browned to perfection!

And the cheese is oozing from everywhere, that is a perfect Lasagna to me.

Serve this Lasagna alongside a Homemade Cesar Salad with Dressing.

And you will be eating like the Italians in Provence! 

LOVE ITLAIAN FOOD? Try some of my other favorites below!

I am so thrilled you are reading one of my recipes, if you made this recipe id love to hear about it! Thank you very much for reading and until next time see ya in the kitchen. Don’t want to miss a recipe? Sign up for our NEWSLETTER delivered right to your inbox!

This post may contain affiliate links. This means if you click on a link and make a purchase, even if it isn’t the item I mentioned, I receive a small percentage (at no extra cost to you). This helps support this blog, and makes it possible for me to bring you new recipes! I only share links to items I personally use or would recommend, and I have no outside incentive to promote a particular item or product all opinions are my own.


Bok Choy Chicken Garlic (Flu-Fighter) Soup

This Bok Choy Chicken Garlic Soup is my go to soup for whenever I’m feeling run down and that is why I call it a flu fighter soup!

This Bok Choy Chicken Garlic Soup is made with chicken breasts, chicken broth, bok choy, garlic, onions and ginger. Which is sure to help you feel better after slurping a few bowls of this throughout the day! Looking for another healing soup recipe? Try my Healthy Celery Soup

There is two ways to serve this soup!

The first picture is my updated recipe and the one below is my older.

The differences are: 

  • I chopped the chicken into smaller pieces along with the mushrooms, bok choy, garlic and onions.
  • Then served it with a lemon wedge for added vitamin C.

The way you prepare it is completely up to you, both are delicious! 

IS SOUP GOOD FOR THE FLU

Yes, chicken soup is good for soothing both cold and flu symptoms.

The hot chicken broth helps break up the congestion and the salt can sooth a sore throat.  

Then with the addition of garlic, ginger, onions and spices you are going to be consuming a lot of feel good nutrients.

So if you are wanting to fight off an impending cold or flu?

Keep yourself hydrated with a hot pot of soup is good to help cleanse and clear out the gunk from your system naturally.

This is the stuff you are going to want to make, feel free to add more garlic and ginger if you can handle it as well.

Which will amp up the nutrients as the onion, garlic and ginger all have amazing antibacterials properties.

The more you have the better your sure to feel during the dreaded cold and flu season.

Also in combination of this soup, be sure to add a Vitamin D supplement to your daily regime as well.

All these little yet big things can be of much help to getting you on the road to feeling better. 

NOODLES THAT CAN GO INTO THIS SOUP

  • RAMEN
  • VERMICELLI
  • EGGNOODLES
  • NOODLES
  • RICE

HOW TO MAKE BOK CHOY CHICKEN GARLIC SOUP

I will prepare this on the stove top in a large batch and eat it all day long.

  • You can make this soup with chicken breasts, or you can also pick up a Rotisserie chicken and shred the chicken off the bird and boil the carcass to get the benefits from a bone broth soup.
  • For this soup, I just used the breasts however both methods are good to fight off a cold. 
  • Keep in mind if you are using a whole bird, you won’t need any extra chicken stock since you will be making a bone broth from the bird. 

If you are using chicken breasts then you will definitely want to use chicken stock. I believe this soup can prevent colds and the flu and heal the body, because every time I prepare this soup I feel so much better the next day. See recipe below for all the ingredients and full instructions!! 

Now, I do not know about you but whenever I travel I tend to catch a cold!

Sucks I know, so beforehand I do my best to boost my immune system with supplements and eating healthy.

But sometimes no matter what you do, that pesky cold still comes on.

So a soup like this is sure to help the body to heal and feel better!

Ever since I started to incorporate this soup in my diet right around the time I travel, I manage to minimize or avoid the symptoms of the cold and for me that is great because I would rather be sick 24 hours versus 2 weeks.

Packed with immune boosting ingredients and nutrients, this soup is something you will definitely enjoy even when you’re not under the weather.

Feel free to add some egg noodles to it if you like. I hope you give it a try, and If you are not feeling well I hope this soup makes you feel a whole lot better.

HOW TO MAKE BOK CHOY SOUP

  • Start by slicing your mushrooms and chopping the baby bok choy into bite size pieces.
  • Next chop your onion, crush your garlic and peel and finely chop your your ginger root into tiny pieces. You can use powders if you prefer.
  • If you are using chicken breasts: dice them into bite size pieces and set aside.
  • If you are using a Rotisserie chicken: remove all the meat from your bird and then place the chicken carcass into a large stock pot and add cover with 8 cups of water. Simmer the carcass on low heat for 45 minutes turning a few times to allow the stock to develop.
  • Once the stock has developed, discard the carcass and place the remaining stock aside in a bowl.
  • Next, in your stock pot heat the olive oil and sauteed your onion, garlic and ginger for 2 minutes till fragrant.
  • Now, add in your shredded chicken, chicken stock along with all your bok choy
  • Add in all the spices and simmer on medium – low for 20 minutes.
  • Serve and allow your body to heal itself. Enjoy!

CAN YOU FREEZE BOK CHOY SOUP

Yes, it freezes well. Up to 3 months max though, you do not want a freezer burnt soup.

I have plenty of soup of other soups on this site that would help anyone to feel better. One of which is my Vegetable Egg drop soup. It is absolutely delicious and healthy for you as well.

And my Duck Pho Soup

Rotisserie Chicken Soup

Healthy Chicken Noodle Soup

Note: You can add egg noodles during the last 7 minutes of cooking if desired. And more chicken stock if your wanting more broth to the soup. Add more garlic and onion for more of an antibacterial boost.

DID YOU MAKE THIS RECIPE?

If you make this recipe, I would love to hear about it! You can leave a 5 star review in the comments below! Thank you very much for reading and until next time see ya in the kitchen. Don’t want to miss a recipe? Sign up for our NEWSLETTER delivered right to your inbox!

Photos updated: Nov 2021

Easy One Pan Chicken Fajitas

Check out this Delicious recipe for “Easy One Pan Chicken Fajitas”. Takes less than 30 minutes to prepare and clean up is QUICK! Today is the first day of fall and if summer was not busy enough, fall is going to be just as busy. So I’m starting the season off by making some easy one pan meals. Think easy clean up, BIG flavor all with the ability to feed a crowd. Think Chicken Fajitas! The only thing pre – made you will want to buy here is the flour tortillas, doing this will save you a ton of time in the kitchen.  And don’t even think of buying pre made fajita seasoning, because I am certain you have all the right spices in your kitchen. Fajita seasoning is a combination of cumin, coriander, chili powder, paprika, cayenne pepper, garlic powder, onion powder with salt and black pepper. Then all you need is some fresh chicken breasts, and sweet red peppers, lime and your ready to rock and roll. With very little prep, you can have this dinner on the table in under 30 minutes. If you liked this recipe, check back soon for more one pan recipes that will  help you to get good dinner on the table in  jiffy, enjoy!

Kitchen Essentials:


To make the Easy One Pan Chicken Fajitas:

  1. Start by making your fajita seasoning. Mix together cumin powder, coriander powder, chili powder, paprika, onion powder, garlic powder, and pepper in a small bowl. Set aside.
  2. Next wash and slice your sweet bell peppers into thin strips, then your onions then placing them onto one side of your baking sheet.
  3. Next, slice your chicken breasts into strips and place on the other side of your baking sheet.
  4. Crush the garlic and place on-top of the chicken and onions.
  5. Prepare your fajita mix, stir everything together and pour over your fajita pan and stir so everything is covered with the mix.
  6. Bake in the over at 400 f for 25 minutes.
  7. Warm your tortillas up in the oven or microwave and serve  your chicken mixture directly from the pan onto your tortillas.
  8. Garnishes with sliced lemon wedges and chopped up cilantro.

Note: You can serve these fajitas with sour cream or a Mexican salsa called “Pic de gallo“, see recipe for that here.


I am so thrilled you are reading one of my recipes, if you made this recipe id love to hear about it!You can post a review, picture below or via Instagram and let me know how it turned out. And by doing so you will be automatically entered into our seasonal CONTEST to win one of our great prizes. Winner will be notified via email within a week after the contest closes. Thank you very much for reading and until next time see ya in the kitchen. Don’t want to miss a recipe? Sign up for our NEWSLETTER delivered right to your inbox every Month!