West Coast Cedar Plank Salmon

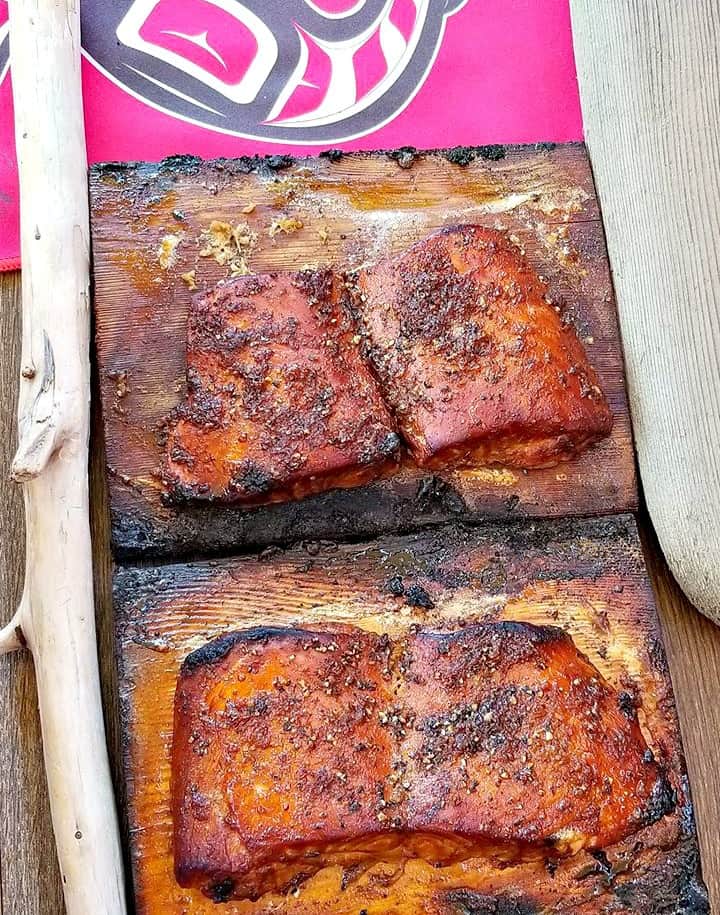
I’m finally ready to reveal my family’s favorite recipe for my grilled “West Coast Cedar Plank Salmon”. 

CAN CEDAR PLANK SALMON BE COOKED IN OVEN

Yes, as long as you soak the plank in water for a minute of two hours prior. Just make sure you keep an eye on it!

ARE CEDAR PLANKS FOR SALMON REUSABLE

Yes, if you properly care for them. Then you can get a couple uses out of the planks, which will save you money in the long run. Care for them buy always soaking in water for a minimum of two hours prior to cooking and washing off well at the end. 

This recipe has been a secret in my family for sometime and I had to get a couple people’s approval to reveal it here.

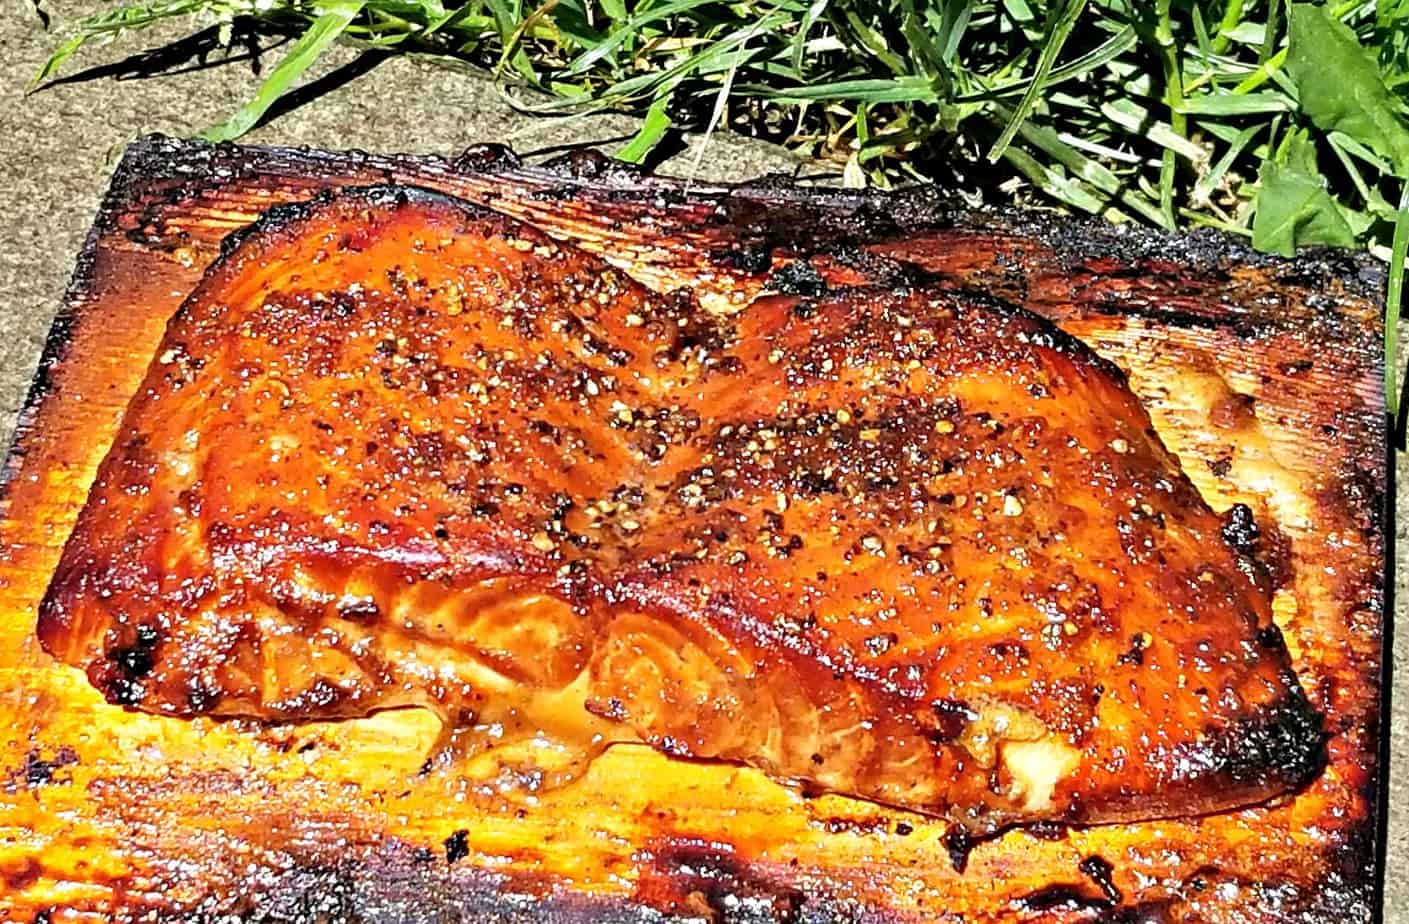
If you have ever tried fresh smoked salmon which tastes like salmon and a candy all in one.

Then you are sure to taste the resemblance here.

One of my favorite cooking shows just started and we are now in Season 5. Can you guess what it is?

It’s MasterChef Canada, where 21 home cooks are completing for title of Canada’s best home chef.

I just love this show because it highlights the home cook and gives them the chance to complete to becomes Canada’s next master chef. 

Proving you do not have to go to school to become a chef! 

The first challenge was for each chef to create a signature dish that represents them.

Some people choose ingredient that represent there home town/province.

While others choose ingredients that represented their roots and then some went beyond their own roots and cooked something totally unexpected.

One lady was from Nova Scotia, Canada used blueberries because Nova Scotia has been named the wild blueberry capital of Canada. 

While another lady made the oh so popular peruvian ceviche, but failed to cook it throughout and was sent home in the first round.


The dish that interested me the most was cooked by a man named Jonathan. He made a “Ghost Pepper Stew Chicken” with rice and peas along with a mange apple slaw.

A dish that reminded him of Trinidad where he was from. I definitely want to find the recipe for that, so if anyone knows of one please send it my way 🙂

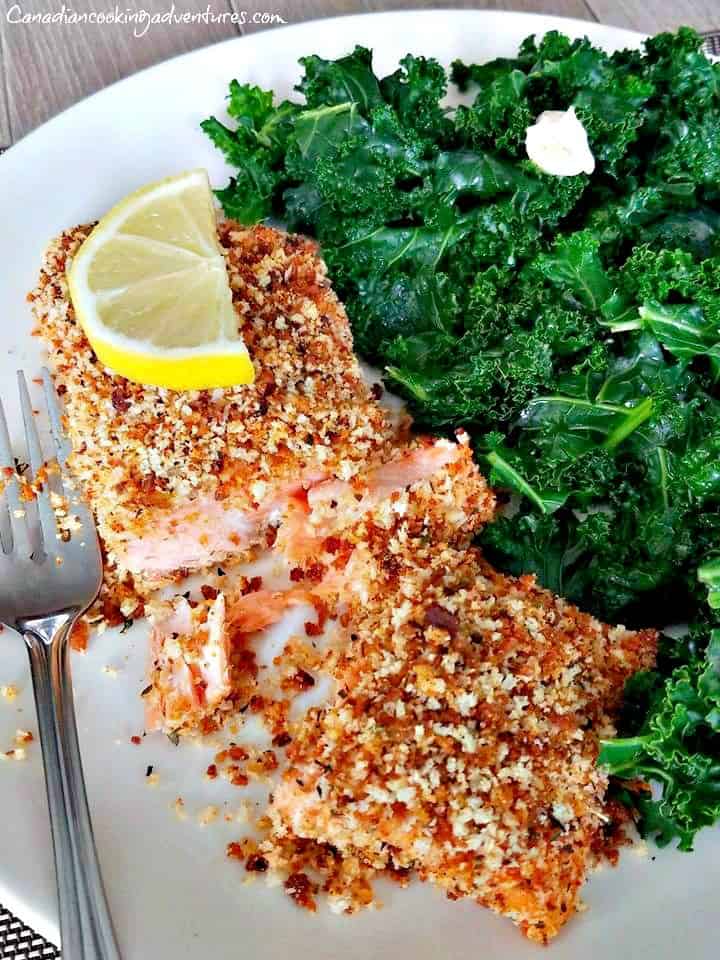
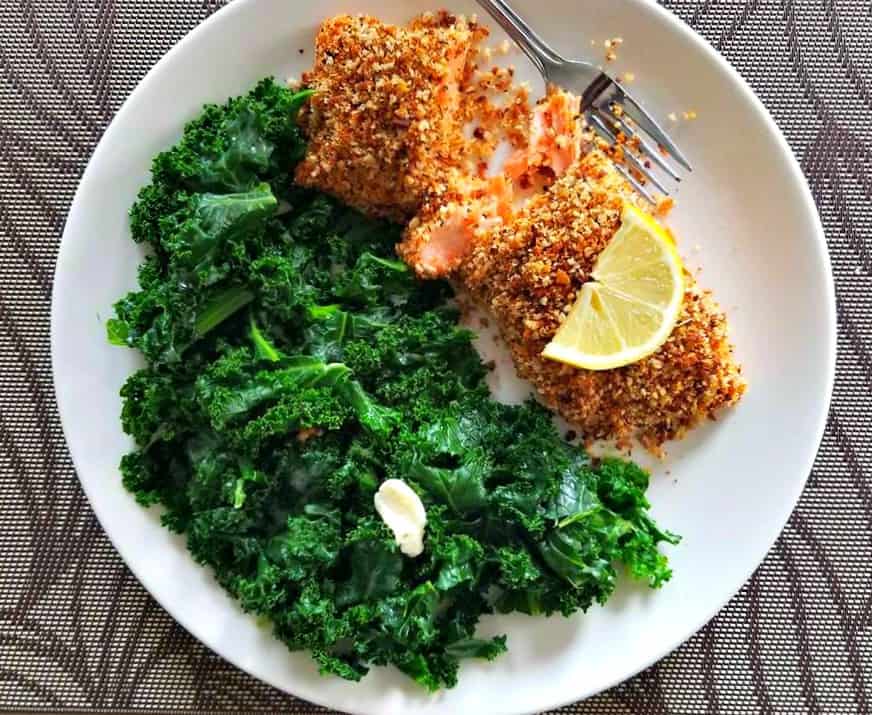
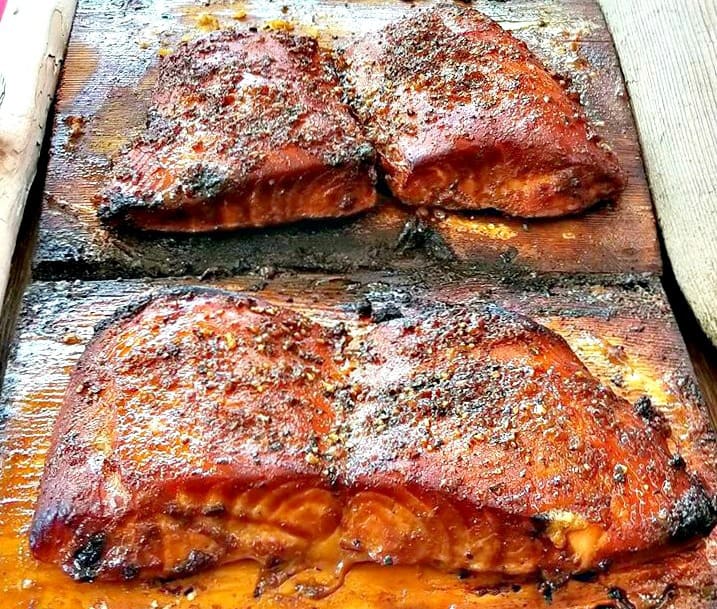
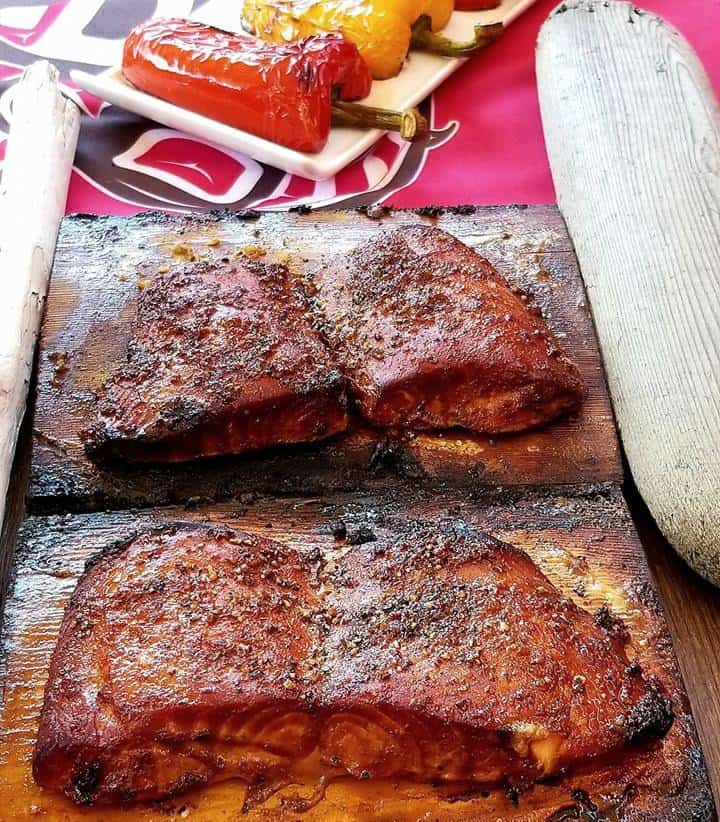
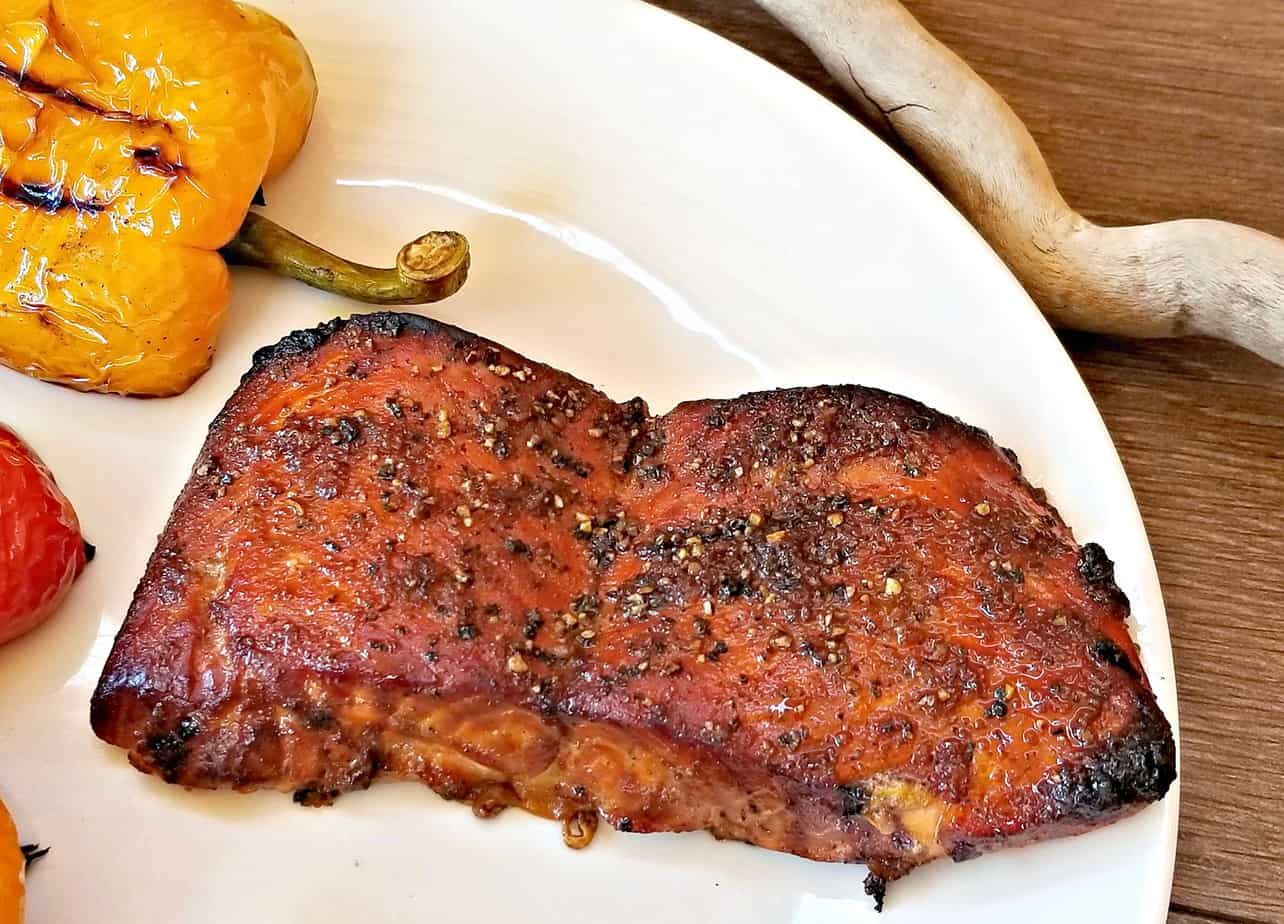
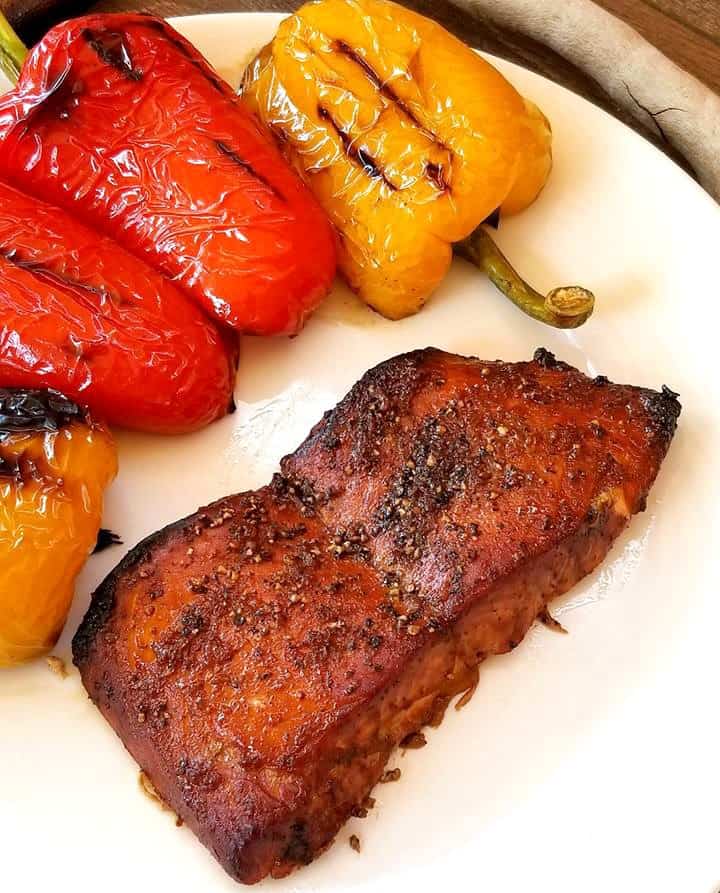
So this got me thinking if i was in this competition what would I make? Well being from British Columbia, I would definitely use fresh Salmon and make my all time favorite “Cedar Planked Salmon”.

Lucky everyone in my family understands my passion for blogging and cooking. So here it is, my family’s secret recipe for the most mouth watering Cedar Salmon.

Made with just a few simple ingredients of fresh garlic, powdered garlic, pepper, medium soya sauce, worcestershire sauce, olive oil and brown sugar.

Your soon to see why this recipe has been kept a secret this long.

HOW TO CEDAR PLANK SALMON

Truthfully though the secret is in the marinade.

So be sure to marinade this fish in a ziplock bag or in a sealed contactor for a minimum of 30 minutes to lock in maximum flavor.

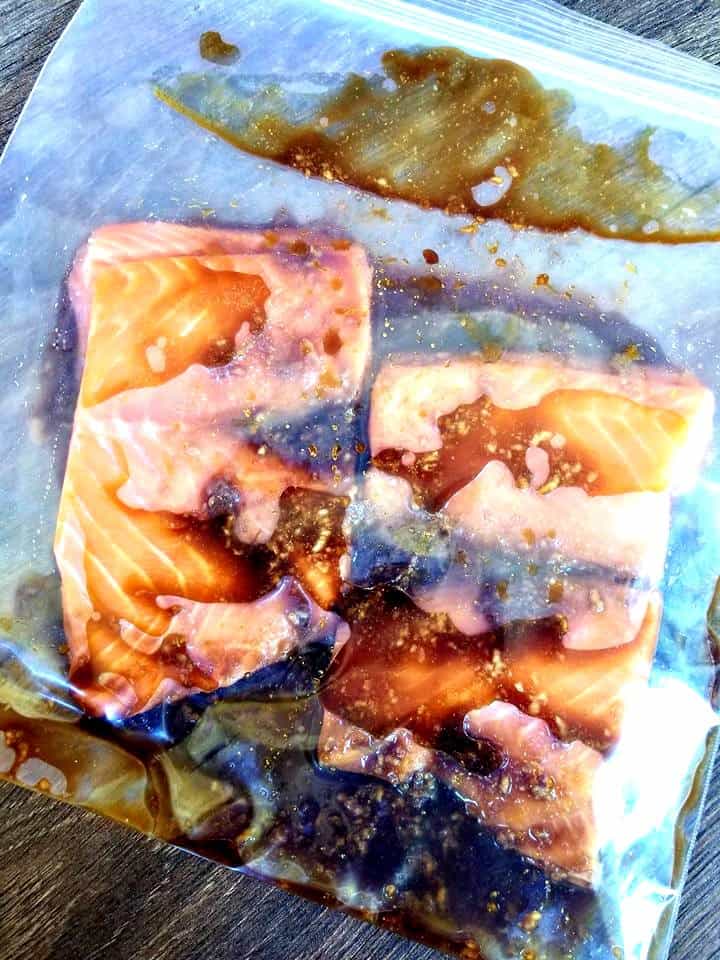
Once that part is done the rest is a cinch to pull together, simply remove the fish from the marinade and sprinkle it with a pinch of salt “less is best” because the soya sauce has enough.

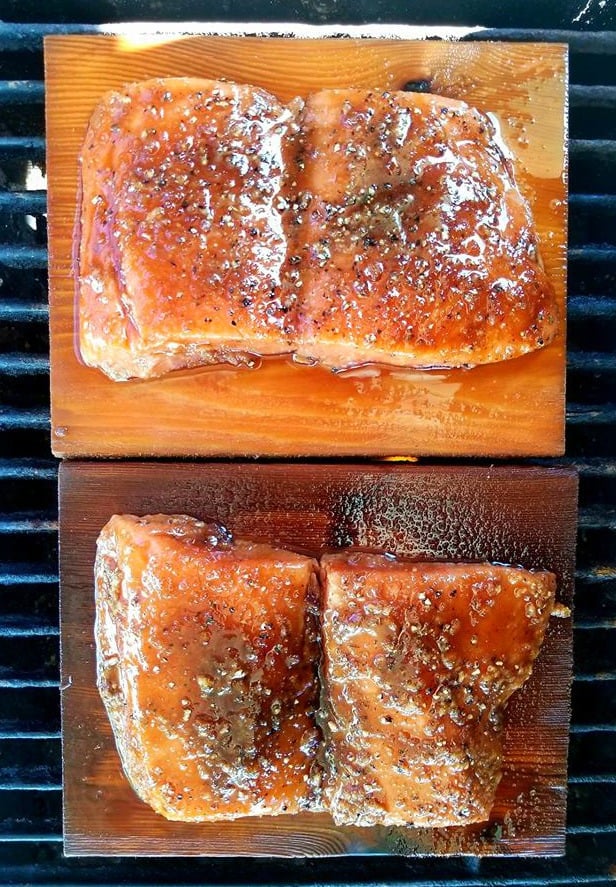
Then season with pepper and cover generously with brown sugar.

Do not skip any of these steps, the brown sugar is critical to giving it that caramelized candy flavor.

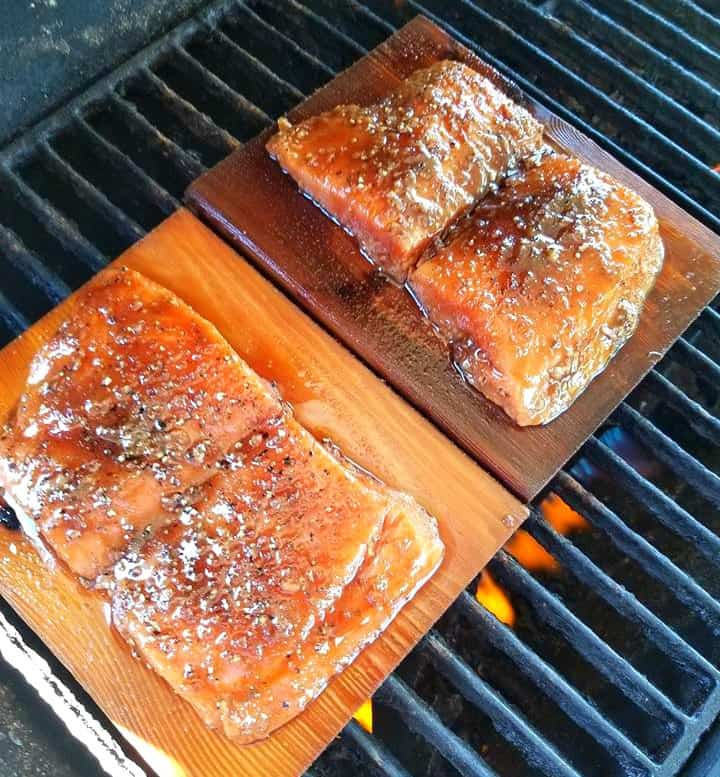
I will throw a few peppers on the grill around the same time and sometime asparagus. Just make sure you brush everything entirely with olive oil to prevent from burning and then flipping once.

Also the veggies will need to be removed before the salmon so keep an eye on them.

Now let me ask you, if you were on Masterchef Canada. What ingredient would you bring that represents where you are from? And what dish would you have made? I would love to hear about it in the comments below.

LOOKING FOR MORE SALMON RECIPES?

Be sure to try these tasty recipes below!

LOOKING FOR SOME SIDE DISHES?

  1. Instant Pot Honey Glazed Carrots
  2. Simple Sauteed Asparagus
  3. Air Fryer Beets
  4. Honey Mustard Brussel Sprouts

I am so thrilled you are reading one of my recipes, if you made this, I want to see! Follow Canadian Cooking Adventures Instagram, snap a photo, and tag and hashtag it with @canadiancookingadventures and #canadiancookingadventures

Stay connected and follow along on FacebookPinterest, and Instagram for all of my latest recipes!

Vegan Thai Coconut Green Curry

This Vegan Thai Coconut Green Curry is definitely on my list of all time favorite vegan meals. It’s super simple to make and is absolutely delicious. 

Now of course you can add some chicken or shrimp to this if you’d like.

But why would you? when you have this amount of flavors coming from an already AMAZING dish.

You can make it more like a soup, like I do or you can make it more of a dry dish. To make it more like a soup you will want to add in more liquid than just the coconut milk.

I stuck with vegetable stock to keep with the vegan theme. Also if you want to keep it purley vegan, be sure to omit the fish sauce, but keep in mind the taste will be slightly different from most Green Thai tastes. 

The amazing flavors in this dish come from the Green Thai Curry paste which has the traditional ingredient of “Lemongrass”, “Galangal” and “Kaffir lime leaves” in it.

You can add a few Thai bird’s eye chili slices into this also if your wanting additional heat.

However that is something I don’t always recommended because they are very hot and if not handled correctly can burn the hands and eyes.

So instead, I would recommend just a pinch of some Red Chili Paste instead. The Thai basil and cilantro is used at the end for a garnish and added flavor.

Even though we use the premade “Green Thai Curry paste” in this recipe, which has crushed Kaffir lime leaves, I also like to add a few kaffir leaves too.

Plus I always have them on hand in my freezer for when I am cooking anything Thai.

I find they really enhances the dish, however you do not have to add any kaffir lime leaves if you don’t have them. Because like I said before the s“Green thai curry paste” already has them crushed inside.

Oh and be sure not to forget to squeeze  some lime juice in at the end. It will adds that extra element of tang that is needed to create an authentic thai dish.

Once you get familiar with the basic ingredients of thai cooking, you will be shocked at how easy it is to prepare these Thai dishes at home.

Literally you can have almost any thai recipe on the table in under 30 minutes.

Our favorite “Green Thai Curry paste”.

One of our favorite Coconut Milks or look for an Organic Kind

Keep in mind a good coconut milk, will be half solid a half watery. One that is all watery does not work as well for this dish, typically organic varieties or Thai have the best products.

Notes: 

  • “Lemongrass”, “Galangal” and “Kaffir lime leaves” can be found in most Asian stores. “Thai Green Curry Paste” can be found in most Supermarkets, Thai Green Curry paste has all the above ingredients in it needed to make this dish.
  • Add in the lime last, you do not want to cook the lime because it will ruin the flavor.
  • If your wanting to use fresh “Lemongrass”, “Galangal” and “Kaffir lime leaves” do not eat them. There just for flavoring, if you’re going to use these for added flavor, make sure to bruise each item before adding to the pot.
  • Want more heat, simply add in some Thai Bird’s eye chilies or Thai Chili Paste. Caution when preparing Bird’s Eye Chilies, these chilies are very hot and can burn the eyes so proceed with caution.

If you love Thai food as much as me, then you will want to try my other thai dishes! All are AMAZING and really are some of the best ways to make Thai at home in a fraction of the time. 


I’m thrilled you are reading one of my recipes, if you made this recipe i’d love to hear about it! You can post a review, picture below or via Instagram and by doing so you will be automatically entered into our seasonal CONTEST to win one of our great prizes. Winner will be notified via email within a week after the contest closes. Thank you and until next time see ya in the kitchen. Don’t want to miss a recipe? Sign up for our NEWSLETTER delivered right to your inbox!

Kung Pao Chicken with Brussel Sprouts

This is my take on Kung Pao Chicken, traditionally peanuts are used in this dish and most definitely you can use those instead of the cashews.

Personally I much prefer cashews so that is why I have used them here. Kung Pao Chicken with Brussel Sprouts work so well together, and it’s a nice way to get in some extra fiber.

For this recipe today, I am using a skinless chicken breasts along with brussel sprouts, green onions and cashews.

You can use whatever vegetables you have on hand, such as red or green peppers, snow peas, broccoli etc.

If your wanting to serve more than 4 people, simply adjust the recipe with our easy to use serving adjuster.

An easy and healthy stir fry that anyone can make in under 30 minutes, the hardest part is washing and chopping the ingredients.

Serve over a bed of jasmine rice if desired I hope you enjoy this healthier version of Kung Pao.

MEAL PREP IDEA: Make enough to create a few meal preps bowls for the week ahead. Or have dinner for two with this recipe, and then create two meal prep bowls for the week ahead.

To make the bowls, simply place jasmine rice on the bottom and top with the Kung Pao Chicken with Brussel Sprouts. Want more preps? Simply double up the recipe with my easy to use recipe adjuster above.


I am so thrilled you are reading one of my recipes, if you made this recipe i’d love to hear about it! Thank you very much for reading and until next time see ya in the kitchen. Don’t want to miss a recipe? Sign up for our NEWSLETTER delivered right to your inbox every Month!

Cherry Cheesecake

This No Bake Cherry Cheesecake is simply my favorite way to eat a Cherry cheesecake. 

I have brought this cheesecake over to a few friends and family, and everyone says the same thing = YUM! 

I have had people begging me for the recipe, and believe me when I say.

There is no other Cherry Cheesecake that I have tried, that even compares to this nothing.

Maybe I am bias because I do love fresh cherries so much or maybe it’s true, I’ll let you be the judge of your creation.

Because you don’t live near a bakery doesn’t mean you have to go without cheesecake. ~ Hedy Lamarr

But let me tell you, no store bought or restaurant made has ever impressed me like this recipes does.

It probably has a whole lot to do with those cherries you see on top, as they do not come from a tin can.

That would be just wrong!

WHAT IS CHERRY CHEESECAKE

  • It is a basic cheescake that is topped with fresh cooked cherries. 

IS CHERRY CHEESECAKE GLUTEN FREE

No, the Graham Cracker crust has gluten. 

These cherries are fresh, making every bite unbelievably decadent.

Some people like a lot of cherries on their cheesecake, while others like very little.

I am on the “like a lot side”, I mean a lot!

HOW TO MAKE CHERRY CHEESECAKE 

If you are using frozen cherries, keep in mind that you will need to drain them well so you don’t get an overly watery topping.

As for the crust you can bake it or allow it to chill in the fridge prior to filling, both methods will be provided to you below in the recipe card. 

  • I use 3 cups of cherries for a 8 inch cheesecake.
  • if you’re wanting less cherries, then use 2 cups or you can use a 9 inch cake pan for a larger cake.
  • First, you will start by making the crust.
  • Then the cream cheese filling
  • Lastly, you will cook the cherries on the stovetop. Then allow it to cool down before topping the cheesecake with them. 

I hope you enjoy this dessert as much as we do.

Note: Place your cake back in the freezer or it will melt,this cheesecake is best chilled frozen.

I am so thrilled you are reading one of my recipes, if you made this recipe i’d love to hear about it! Thank you very much for reading and until next time see ya in the kitchen. Don’t want to miss a recipe? Sign up for our NEWSLETTER delivered right to your inbox!


Chocolate Chunk Nut Banana Bread

I have been told on numerous occasions that my Chocolate Chunk Nut Banana bread is Amazing. I will let you be the decider on that though!

This bread is kind of like eating a cake and a cookie all at once, but way more healthier than a cake or cookie.

Because are omitting the oil and using 3 ripe Bananas (the riper the better) + Macadamia & Walnut pieces that makes this a very nutritious and satisfying snack.

Soft and Moist on the inside, and slightly crunchy on the outside. This is the stuff dreams are made of if you ask me 🙂 I hope you give it a try!

Note: You can substitute chopped pecans, hazelnuts or almonds if you prefer.


I am so thrilled you are reading one of my recipes, if you made this recipe i’d love to hear about it! You can post a review/picture below or tag us on social media at #canadiancookingadventures and let me know how it turned out. And by doing so you will be automatically entered into our seasonal CONTEST to win one of our great prizes. Winner will be notified via email within a week after the contest closes. Thank you very much for reading and until next time see ya in the kitchen. Don’t want to miss a recipe? Sign up for our NEWSLETTER delivered right to your inbox!

PIN IT FOR LATER


Crispy Herb Crusted Salmon

I just love these crispy herb crusted salmon fillets, not only are they super delicious there also super healthy for you and easy to make. 

That is why I love home cooking, because you can make healthy home cooked meals from scratch.

Such as this tasty fish and feel satisfied knowing exactly what is going into your meal.

I used to occasional buy those pre boxed fish, you know what I’m talking about?

Those frozen battered kinds in the freezer section at every grocery store. 

Well those days are over.., and i think if you try this recipe. You will feel the same way too!

Even though I am a food blogger, I can admit that their is some recipes that do intimate me. 

And i guess it is because I have never tried to make them. But being a food blogger I get to have a few trial and errors before I share my winning recipe with you all.

And that is how this recipe, came to be. 

Over the years though, I have developed much more confidence to tackle almost any type of recipes. Such as homemade breaded fish!

Doesn’t this look 100% better than any store bought or boxed breaded fish?

And so much healthier too I bet. 

HOW TO BREAD FISH

It’s as simple as emptying 1 package of extra crispy shake and bake into a shallow bowl.

Along with 1 cup of panko bread crumbs, brown sugar and seasonings.

Then coat the salmon fillets before baking at 400 degrees f for 15 minutes then that is it. 

This super flaky and moist salmon dinner is ready to be served with your favorite vegetable such as sauteed kale and a fresh lemon wedge of course.


This is the kind of shake n bake that I use for this recipe!

Place onto a non stick pan and your good to GO!

Serve alongside your favorite vegetable and you will will have one healthy and tasty meal!

You can’t go wrong with this simple yet flavorful dish that is sure to make you a salmon lover for life. 

As with any of my recipes, you can adjust the serving size above to reflect the number of people you are cooking for.

I’m thrilled you are reading one of my recipes, if you made this recipe i’d love to hear about it! Thank you and until next time see ya in the kitchen. Don’t want to miss a recipe? Sign up for our NEWSLETTER delivered right to your inbox!

Slow Cooker Mexican Chipotle Fajitas

Are you looking for a authentic tasting Mexican recipe, that is sure to knock the socks off. Well look no further, we make this in our house pretty often and it’s absolutely AMAZING! Plus there really is nothing to it, you just need a few chicken breasts, some Mexican chilies in adobo sauce (see can picture below) and a few spices. Then you and whoever is lucky enough to be dining with you will be saying Sabroso = Tasty! And please don’t let the time frame scare you, this is all done in the crock pot so you’re just going to prep it and forget it until later. Now this is a spicy recipe, so if you can’t handle the heat then please get out of my kitchen! Sorry that is not very nice of me, but I do love spice and so I have to be honest with you. 

This recipe calls for 4 whole chicken breasts, so if you’re wanting to feed a larger crowd then simply add in more. Once cooked, shred the chicken, warm your tortillas and simply fill with rice and some guacamole or better yet make some cabbage pico de gallo, see my recipe here for Pico De Gallo and use this as a filling. I really hope you give it a go and let me know how you liked it. 

To make the Slow Cooker Mexican Chipotle Fajitas:

  1. In your food processor puree 1/2 can of your Chipotles in Adobo sauce.
  2. Then dice up 4 chicken breasts, and place in your crock pot and set to brown, add in 1 tsp of cooking oil and brown lightly.
  3. Once your chicken is browned lightly, add in your chopped tomatoes, onion, garlic and spices.
  4. Then add in your pureed Chipotles in Adobo sauce.
  5. Follow cooking instructions below.
  6. Once cooked, shred in your pot with a fork.
  7. Serve in warm tortilla shells and add in guacamole or better yet pico de gallo, see recipe above or below.
  8. Enjoy!


Cooking Instructions:

Pressure cooker: READ your units instructions mine says 10 mins for chicken.

Slow cooker: 5 hours on low

Stove Top: Simmer covered on low heat for 3 hours.


These are what Mexican Chipotles look like 

This is what you will be looking for, same stuff just in a can with some sauce.


Note: If you want less sauce, remove the seeds from the tomatoes. Want more heat add the whole can of chiles in adobo sauce

Looking for an awesome Pico De Gallo recipe, look no further.

Pico De Gallo Salsa

Putting this in the crock pot early in the morning enabled us to spend the day running errands! Don’t you just love crock pot recipes 🙂


I am so thrilled you are reading one of my recipes, if you made this recipe i’d love to hear about it!You can post a review, picture below or via Instagram and let me know how it turned out. And by doing so you will be automatically entered into our seasonal CONTEST to win one of our great prizes. Winner will be notified via email within a week after the contest closes. Thank you very much for reading and until next time see ya in the kitchen. Don’t want to miss a recipe? Sign up for our NEWSLETTER delivered right to your inbox every Month!


PIN IT FOR LATER

White Chocolate Macadamia Nut Cookies

T’was the night before Christmas, when all through the house, not a creature was stirring, not even a mouse. And that’s because the mice know that these cookies are for Santa and his reindeer. 

WHO INVENTED WHITE CHOCOLATE MACADAMIA NUT COOKIES

White chocolate chips were invented by Nestle in the 30’s, but macadamia nuts weren’t available to the public until 1975. Sometime after that these delicious flavors found each other, and history was made. 

I just love Macadamia Nuts and putting them in cookies is Amazing.

Plus these are Santa’s favorite cookies, so make sure save some for him too.

There are various recipes online that claim to be the best, I have tried a few. I have also tried a few from cookbooks and magazines that I have in my library.  I’ve come up with this recipe that makes the best large chewy cookies that everyone is sure to love.

CAN YOU FREEZE WHITE CHOCOLATE MACADAMIA NUT COOKIES

Yes, once you make the dough you can freeze in into small balls in the fridge for up to 3 months. Covered of course, then simply defrost them and smash them down before baking. 

HOW TO MAKE White Chocolate Macadamia Nut Cookies

The key is the ingredient ratio; along with using butter and shortening in the recipe. So be sure to follow this one to a tea and you will be sure to have the best cookies this time of year.

Christmas is just right around the corner, so I am getting my holiday baking done early this time. That way I have plenty of time to do all the other things that are at hand.

These cookies are simple to make and really go well with a cup of milk, rather rumor has it.

These White Chocolate Macadamia Nut Cookies are one of Santa’s favorite cookies.

So if you leave them by the chimney this Christmas he may leave behind something extra special for the baker.

Wishing you and your’s a wonderful and very merry Christmas.

Super easy to make, you can have these done in under 30 minutes.

Notes: After cookies are completely cooled, place in airtight container or plastic freezer bag.  Keep the dough refrigerated if you are going to be making these in batches.

Don’t forget to leave them by the fireplace with a glass of milk for Santa. 

LOOKING FOR MORE CHRISTMAS DESSERTS?

I am so thrilled you are reading one of my recipes, if you made this, I want to see! Follow Canadian Cooking Adventures Instagram, snap a photo, and tag and hashtag it with @canadiancookingadventures and #canadiancookingadventures

Stay connected and follow along on FacebookPinterest, and Instagram for all of my latest recipes!