Frozen Pumpkin No Bake Cheesecake

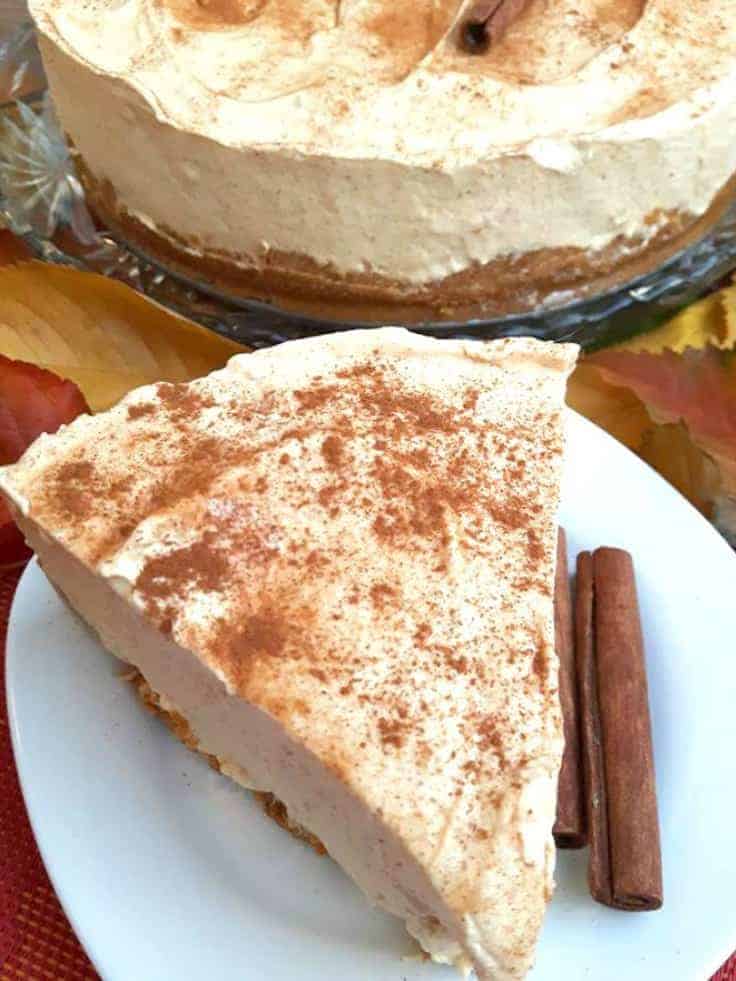
This Frozen Pumpkin No Bake Cheesecake is the perfect cheesecake recipe for those upcoming holiday get togethers such as Halloween, Thanksgiving or Christmas. Where you just want to serve something festive and different that the average pumpkin pie. 

This frozen spiced pumpkin cheesecake is just one of those recipes that everyone should have in their freezer around the holiday season.

Think Thanksgiving and Christmas or if you just love pumpkins and cheesecake then this recipe can really be enjoyed any time of the year.

Seriously it doesn’t get any more delicious than this dessert and trust me it’s pretty easy to make.

So go ahead and serve this to your guests and family and watch them beg for this recipe.

HOW TO MAKE A Frozen Pumpkin No Bake Cheesecake

TO MAKE THE FROZEN SPICED PUMPKIN CHEESECAKE CRUST:

  1. Start by making your base/crust, in a large bowl place your graham crackers, brown sugar and melted butter. Mix this together with a spoon and then use your hands to press it together so it sticks. Lightly oil your cheesecake pan and then place your graham cracker crust inside. Press firmly down to create your crust.

NO-BAKE GRAHAM CRACKER CRUST:

  1. Chill pie crust for at 30 minutes prior to filling. Prior to serving, rub the outside and bottom of the cheesecake pan with a wringed out hot cloth this helps to release the pan from the crust.
  2. Baked graham crust: Preheat oven to 325°. Bake crust for 10 minutes, cool completely before filling.
  3. Add 2 packages of cream cheese to a large bowl and with your hand held blender whisk in a can of condensed milk, whipped cream and vanilla extract. Blend till smooth, be careful to not over blend.
  4. Pour over your crust slowly then chill in the freezer anywhere from 6 to 24 hours.

FINISHING THE CHEESECAKE:

  1. Once your cake is absolutely cold, release the cheesecake from the pan slowly.
  2. Sprinkle some cinnamon sugar over top
  3. Cut and allow to defrost for roughly 20 minutes, enjoy!

What better way to celebrate fall in the kitchen than with a Spiced Pumpkin Cheesecake?

This Cheesecake will have you and those who get a chance to have a slice wanting more. And the nice thing is this 8″ inch cake can serve 12 people easily.

Since this is a no bake cake, you are going to want to prepare it the day ahead. Then allow it to set in the freezer for at least 6 hours prior to serving.

Tucker, you can serve it with a dollop of freshly whipped cream on the top prior to serving if desired.

However the rest of the Canadian Cooking Adventures team thinks it’s best with just a sprinkle of cinnamon on top, so we will leave that up to you.

This is the most creamy and tasty cheesecake, perfect for the holidays!

Also be sure to use “pumpkin puree” not “filling”, there is big difference here.

For this recipe, I used 1 1/2 cups of graham cracker crumbs, because I really like a thin crust however most recipes will call for 2 cups which makes a slightly thicker crust.

If you prefer a thicker crust then use the 2 cups.

Note: You can put a dollop of whipped cream on top. Place your cake back in the freezer or it will melt this cheesecake is best chilled frozen.

Inspired by: Chelsea’s Messy Apron ~ Frozen Pumpkin Pie Cheesecake

I am so thrilled you are reading one of my recipes, your visits and your comments are greatly appreciated. Thank you very much for reading and until next time see ya in the kitchen. Don’t want to miss a recipe? Sign up for our NEWSLETTER delivered right to your inbox!
Chinese Ginger Chicken

This Chinese Ginger Chicken stir fry goes great alongside a warm bowl of Jasmine rice and can be made in less than 20 minutes. You can use just about any type of vegetable also, today I choose celery!

This recipe calls for a fair amount of celery, and is gluten free. However you can add other fresh vegetables if you prefer.

Such as diced carrots, snow peas, broccoli etc.

I have tried many different vegetable varieties and really am fond of using just celery for this dish. While my partner much prefers it with red and green peppers, to each their own.

Also it’s very important to use fresh ginger, the fresher the better. If you do not have that on hand you can use powdered however it’s just not as good.

Also it’s best to use a wok or  frying pan to make this, besides that there really is no special technique to this dish.

You are just simply making the sauce, prepare the vegetables and chicken and you’re good to go.

Healthy and easy chinese food can be made at home any night of the week.

So get out your chopsticks prepare some rice on the side and enjoy fresh homemade chinese at home 🙂

I am so thrilled you are reading one of my recipes, if you made this recipe I’d love to hear about it! You can post a review, picture below or via Instagram and let me know how it turned out. Don’t want to miss a recipe? Sign up for our NEWSLETTER delivered right to your inbox every Month!

Vietnamese Salad Vermicelli

This Vietnamese Salad Vermicelli is made with rice noodles and is the Ultimate Summer Dish that is always served with fresh veggies that are then topped with a grilled meat of your choice and has an authentic fish sauce / dressing for serving.

Looking for more Thai dishes?  Try my Vietnamese Shrimp plating with Spring RollsSweet Thai Chili ChickenThai Red Crab CurryThai Basil Mussels or Red Thai Chicken Curry.

Never made a Vietnamese salad before? No problem! This step-by-step guide will walk you through the process of creating a delicious, healthy salad in the comfort of your own kitchen. It also will show you how to make homemade Vietnamese Salad Dressing to go on top of this salad. 

WHAT IS VIETNAMESE NOODLE SALAD CALLED

(Bun Bo Xao) in Vietnamese. Vietnamese Salad Vermicelli is a refreshing and healthy dish to serve on a hot summer day.

This flavorful and versatile recipe is packed with fresh herbs and veggies, protein, and a tangy dressing that will satisfy your taste buds and keep you feeling refreshed.

Thai Vermicelli salad can also have the addition of grilled pork and shrimp as well. If you would like to create that, simple grill some shrimp or sliced pork and season with salt to serve. 

WHAT IS VIETNAMESE SALAD

Vietnamese Noodle Salad is served with warm or cool noodles, fresh cold vegetables and cooked meats of your liking. Typically grilled pork, shrimp or beef. The noodles are always Vermicelli rice noodles that come with a light Thai inspired sauce. 

It’s fresh, filling and just like they serve in Thai restaurants.

If you have been to this blog before you will know that I’m a fan of Thai food and eat it often.

I used to go out to enjoy this food at least every other week, but now make it more at home. Because it is easy to do and saves me a ton of cash at that too!

Step-by-Step Instructions for Making Vietnamese Salad Vermicelli with Shrimp

HOW TO MAKE VERMICELLI SALAD

  • You will want to make two marinades, one for the chicken and one for the sauce that you will serve alongside these bowls.
  • Fresh lemongrass is very important here for the chicken marinade, it gives it that really intense lemon taste. So be sure to get your hands on a few stocks that you will simply chop and place into the marinade.
  • The longer you marinade the chicken the better. If your making it for dinner then simply marinate it in the morning or the night prior. Then basically the rest of the dish can be pulled together in less than 30 minutes. Easy peazy!

What makes these rice bowls so good is the fresh ingredients and the authentic Vietnamese Salad Dressing.

WHAT IS VIETNAMES SALAD DRESSING

It is a traditional dressing that is used on almost every type of Vietnamese salad dish and the recipe can be found below. It serves very well over cold salads, that are then topped with a marinated then grilled meat protein of your liking.

VIETNAMESE SALAD DRESSING

Also know as “Nuoc Mam” sauce which is a sweet, salty, sour and spicy dressing.

  1. 3 cloves garlic (minced)
  2. 1/2 cup cold water
  3. 1 lime (juiced)
  4. 2 tbsp rice vinegar or white vinegar
  5. 1/4 cup fish sauce
  6. 3 tbsp sugar
  7. 1 red chili (de-seeded and sliced, or substitute 2 teaspoons chili garlic sauce or Sriracha)

This makes enough for roughly 2 people. 

Substitute for Nuoc Mam sauce?

Soya sauce mixed with some red hot chili pepper flakes

The first time I ordered this salad, I was not expecting much.

That was years ago, I remember the day to a tea. I was with my aunt and she took me to this whole in the wall restaurant that I was not expecting to become my favorite restaurant in town. 

Fast forward 10 years later, you will find me going to the same restaurant ordering the same dishes. 

So, whenever that Thai salad craving hits and I’m not heading out to a restaurant. 

I will simply make this dish in the comfort of my own home. 

Trust me it’s pretty darn easy too!

So follow along and soon you will be a master chef in making Vietnamese rice bowls at home just like me 🙂

WHAT IS IN A VERMICCILI SALAD

  • Carrots, cucumbers, fresh herbs such as cilantro, shredded iceberg lettuce and a meat protein of your liking.
  • Thai marinade and Vietnamese salad dressing

Feel free to add other veggies such as Beans sprouts, fresh herbs, jalapeno peppers. 

Now doesn’t that sound healthy and fresh? This is one of the best salads if you ask me.

IS VIETNAMESE SALAD HEALTHY

Yes, it is packed full of fresh vegetables and herbs along with a lean protein such as shrimp

Keep in mind though the soya sauce and fish sauce has a high sodium content so you may want to use a lighter soya sauce or less dressing on your salad.

If you like a bit more heat to your vermicelli rice bowls.

Then go ahead and serve along with some “hot chili sauce” or if you prefer a sweeter dish try a “sweet chili sauce”.

LIKE THAI FOOD AS MUCH AS ME? 

Then you will want to try my other Thai inspired recipes on this website!

Sweet Thai Chili Chicken

 Thai Red Crab Curry

Thai Basil Mussels

Red Thai Chicken Curry

DID YOU MAKE THIS RECIPE?

If you make this recipe, I would love to hear about it! You can leave a 5 star review in the comments below! Thank you very much for reading and until next time see ya in the kitchen. Don’t want to miss a recipe? Sign up for our NEWSLETTER delivered right to your inbox!

Christmas Cheesecake

This Christmas Cheesecake is the perfect addition to your holiday celebrations! 

The Christmas Holidays are here once again! 

And boy oh boy am I excited! The holidays mean different things to different people, but I think we can all agree that it’s a time to rest and hopefully relax spending some quality time with those we love. And I hope this cheesecake may just be that one thing that helps with that.

CHRISTMAS CHEESECAKE NO BAKE

This cheesecake here is a no bake cheesecake, just so you know!

That means the only thing that is being cooked is the gram cracker crust, the rest is frozen prior to serving! 

WHY IS IT PURPLE

You may be thinking, how did you get that cheesecake purple? And is it even healthy! The answer to that is yes, it is healthy.

And it is made with purple yams.

If you have never cooked with purple yam before, trust me it is not hard.

It is like cooking any other yam actually. 

HOW TO PURPLE YAMS TASTE

You’re probably wondering if purple yams taste good in a cheesecake right? Well I assure you they do, purple yams are often cooked in cakes in the Philippines. And are a bit sweet and make for an excellent addition in a cheesecake. 

In the Philippines this cheesecakes is actually known as “Ube”.

Purple yams are packed with vitamins, such as A, C and are a good source of copper, dietary fiber, vitamin B6, potassium and iron.

And are known to improve blood sugar regulation and some studies have discovered significant antibacterial and antifungal properties.

HOW DOES A PURPLE YAM LOOK COOKED

HOW TO MAKE CHRISTMAS CHEESECAKE

  1. Start by making your base/crust, in a large bowl place your graham crackers, brown sugar and melted butter. Mix this together with a spoon and then use your hands to press it together so it sticks.
  2. Lightly oil your cheesecake pan and then place your graham cracker crust inside. Press firmly down to create your crust. No-bake graham cracker crust: Chill pie crust for at 30 minutes prior to filling. Prior to serving, rub the outside and bottom of the cheesecake pan with a wringed out hot cloth this helps to release the pan from the crust. Baked graham crust: Preheat oven to 325°. Bake crust for 10 minutes, cool completely before filling.

FILLING:

  1. Wash and cut your yams into bite size pieces and boil in a pot of water till tender.
  2. Strain your yams and allow to cool. Once your Purple Yams have cooled, mash them in a large bowl till smooth.
  3. Then add 2 packages of cream cheese and with your hand held blender whisk together till smooth. Add in your condensed milk, nutmeg and ground cinnamon. Pour over your crust slowly then chill in the freezer anywhere from 6 to 24 hours.

FINISHING THE CHEESECAKE:

  1. Once your cake is absolutely cold, release the cheesecake from the pan slowly.
  2. Add more whipped cream around the cake to decorate!
  3. Cut and allow to defrost for roughly 20 minutes, enjoy!
  • I like to use an 8″ inch cheesecake pan for this recipe which gives you a thick cheesecake as seen in the pictures below, which can serve 12 people.
  • If you prefer a thinner cheesecake, you can then use a 9″inch cheesecake pan. Really there is not much to it, besides boiling some purple yams, preparing your crust and whip up some cream cheese, along with whipped cream to give it the perfect lightness that makes this dessert so decadent!

Be sure not to skimp on the “whip cream” here because it really makes this cake come together perfectly.

If that is not more reason to enjoy them this holiday season in a cheesecake then I don’t know what is!

Wishing you and yours Happy Holidays!

Note: Place your cake back in the freezer or it will melt this cheesecake is best kept chilled. If you like a thinner graham cracker crust, feel free to use 1 1/2 cups of crushed crackers instead of 2.

I am so thrilled you are reading one of my recipes, if you made this recipe i’d love to hear about it!  Thank you very much for reading and until next time see ya in the kitchen. Don’t want to miss a recipe? Sign up for our NEWSLETTER delivered right to your inbox!

Chicken Korma with Coconut Milk

This Chicken Korma with Coconut Milk is easy to make and is made with coconut milk as opposed to yogurt. It can be prepared on the stove top in less than 30 minutes or in your pressure cooker in around 10 minutes time. A meal that will have you skipping the takeout every time.

Wanting more delicious Indian Chicken curry recipes? Try my Old fashioned Chicken curry or my Pakistani Chicken Curry. And even try your hand at some Homemade Naan Bread!

Your family will not believe this dish is being served straight from your kitchen, it’s that good. 

I used to order this type of dish at our local East Indian restaurant, however now I make it often at home. 

This simple curry will impress even the pickiest of eaters. 

And will have your family thinking that you either a) ordered this from your local Indian restaurant or b) have taken some cooking lessons because it tastes so amazing! 

You can by a pre-made Korma spice mix and make this dish even easy to make for yourself!

See the mix that you can use instead of all the individual spices listed below in the recipe card.

IS CHICKEN KORMA HEALTHY? 

Yes in most cases it is, however it really depends on the way it is made. Some curries call for heavy cream and lots of butter.

Like the typically butter chicken recipe that we have all come to know and love.

I love butter chicken just like the rest of you. However I have learned to make it slightly healthier. Feel free to check out my recipe here for that recipe: Butter Chicken.

My recipe here calls for coconut milk and no cream. Making this a very healthy curry option for those trying to watch their calorie intake. 

HOW TO MAKE CHICKEN KORMA WITH COCONUT MILK?

Cooking methods:

  • Simmer on a low-medium heat for 30 minutes on the stovetop
  • Cook in the pressure cooker around 10 minutes or depending on your instructions
  • Cook in the slow cooker from 8-10 hours.

Today, I used my pressure cooker because I was in a hurry to have dinner on the table so I could watch my favorite recorded show on the PVR.  

However this type of dish can be made either way.

This delicious curry is made with boneless chicken breast and simmered in a rich tomato, coconut sauce that you’re sure love time and time again.

WHAT IS CHICKEN KORMA?

Chicken Korma is a popular dish that originate from Indian, consisting of meat or vegetables braised with yogurt or cream, water or stock, and spices to produce a thick sauce. 

Chicken Korma is the ultimate comfort food for a lot of Indian people. And is typically served over a bed of Jasmine rice and or naan bread. 

As you may know if you have been to my blog before, I LOVE Curry.

So if you like curried foods as much as me then you are going to love this simple recipe too. 

Guaranteed! Plus it is a tad different than the average chicken curry recipes.

SPICES USED IN COCONUT KORMA

  • Curry Powder
  • Garam Masala
  • Turmeric
  • Ground Coriander
  • Ground Cinnamon
  • Ground Cumin Seed
  • Ground Cardamom
  • Freshly Ground Nutmeg
  • 1 tbsp Salt
  • 1 tbsp Kasoori Methi” = “Dried fenugreek” , optional

The green seasoning you see on top of this dish is called “Kasoori Methi” which is basically dried fenugreek” leaves. It can be found in almost any international isle at your local grocery. See below!

If you cannot find “dried fenugreek” leaves you can just omit it. However I find it adds an extra element to the dish that is really nice.

I have shared a few other curry recipes here on my blog, however this is the first one with coconut milk vs cream/milk. So if your lactose intolerant than this dish may be right up your ally. 

WHAT GOES WITH CHICKEN KORMA?

Be sure to make some basmati rice to serve alongside or if you really want to make it extra special go ahead and make some homemade Naan Bread.

I will share my favorite Naan bread recipe with you all on this blog very soon  so stay tuned

If you end up giving it a try, do let me know in the comments below. I would love to know what you think 

If you LOVE curry as much as me, simply go ahead and search my site for more of my curry recipes.

Inspired by: thewanderlustkitchen.com

DID YOU MAKE THIS RECIPE?

If you make this recipe, I would love to hear about it! You can leave a 5 star review in the comments below! Thank you very much for reading and until next time see ya in the kitchen. Don’t want to miss a recipe? Sign up for our NEWSLETTER delivered right to your inbox!


Air Fryer Asian Chicken Drumsticks

These Air Fryer Asian Chicken Drumsticks are sweet and sticky and are cooked to perfection in the air fryer.

CAN YOU PUT FOIL IN THE AIR FRYER

Iv’e been asked this question many times and the answer is yes.

I use it often when cooking sticky foods as the clean up after is that much easier. 

WHAT IS AIR FRYING

Air frying is a healthy alternative to deep frying food. And most air fryers have been marketed in a way to make you think that this cooking technique is best for those who make a lot of those at home.  

Well I am here to tell you that you do not need to just be a deep fried food lover to want to use this cooking method. RATHER if you love to bake food, then this is also a great alternative. And in most cases is much healthier than traditional baking methods. 

Because air frying mimics deep fried foods but uses little to no oil. And if your cooking something fatty, the fat will drip away and off the food.

So you can enjoy all the same deep – fried or baked foods that we have all come to know and love again but in a healthy way.

The air hot air is what cooks the food not the oil. If you have some frozen foods on hand, feel free to throw out any deep fryer you may have because the air fryer can now do the same job. 

But it is not only frozen food that can be cooked this way, pretty much any food you can think of can. 

If you like sweet and savory asian inspired chicken flavors, then you’re sure to want to add this recipe to your cookbook collection. 

I’m super excited to share my first Air Fryer recipe with you all today. I have been on the fence for the past year about buying an air fryer.

Mainly because I do not eat a lot of deep fried foods and also because I could not fathom spending $200 plus for ONE.  Air fryers promise that you can get that deep fried texture without all the grease.   

So recently when I came across the Gotham air fryer, that does the exact same thing as an air fryer.

And knew that I had to try it! So I’m now starting a Air Fryer collection of recipes on this blog because I have fallen in love with this NEW kitchen tool. 

CAN I USE ANY KIND OF AIR FRYER? 

YES! 

HOW TO COOK CHICKEN IN THE AIR FRYER?

  • If your using a Kitchen Top Air Fryer, follow your Air fryers cooking instructions for chicken drumsticks.
  • Then coat the Chicken in Olive Oil vs Cooking Oil = 3 tbsp per 6 legs is enough.
  • Marinated the chicken for 30 minutes before air frying.
  • Place the Chicken in or on the Air Fryer and allow it to do the Cooking.

NOTE: Each air fryer has different cooking instructions based on size and model. It is best to check with your units information in regards to cooking times and temps for chicken drumsticks

HOW TO COOK CHICKEN ON THE GOTHAM STEEL AIR FRYER? 

  • If your using the Gotham Steel Crisper I would advise to turn your oven to Conventional bake, which will make the chicken extra crispy. Otherwise if your oven does not have that setting you can simply place the crisper on the middle rack, which works well too.
  • Follow the same instructions above. 

If you have a table top Air Fryer all these recipes will work the same. Because Air Fryers all use the same type of cooking techniques. 

IS AIR FRYER CHICKEN HEALTHY? 

Yes, in comparison to other methods of cooking chicken it is. If you have never used an air fryer, now is the time. They are more affordable now than ever. Plus they are also a much healthier way to cook food, since the fat drains away and it is never deep fried.

Some people think that an Air Fryer is mostly for people who eat a lot of fried food. I admit I once was apart of that group, however I soon realised that if you like to bake foods too. Like I do, then the air fryer really cuts out a lot of the unnecessary fat.

Think of it, how do you typically bake chicken drumsticks or legs? If you are anything like me. You would place it on a pan in the oven and sometimes use a baking sheet to catch the grease. However with the air fryer it elevates the food and allows all that (FAT) to drip away. 

Plus if you use the Gotham Air Fryer it is super simple to clean, I am talking hard sticky food at the bottom of the tray slides right off. No scrubbing at all is needed, it could not be more simpular guys.

Another reason I like the Gotham Air Fryer is because it cooks more food than the typical table top Air Fryers. Because it has a lot of space on that tray !

IS AIR FRYER CHICKEN KETO?

Yes!

Wanting some more AWESOME Air Fryer recipes?

Stay tuned to this blog for more “Air Fryer inspired recipes to come!

★ Did you make this recipe? Please give it a star rating below! 


Asian Chicken Drumsticks

These Asian Chicken Drumsticks are baked in the oven in their own marinated. Which produces a tender and juicy chicken that is served best over rice. 

I really like to make these asian chicken drumsticks in my “dutch oven”.

The reason I do this is because the chicken cooks in the juices and never becomes dry.

Which works so well because this recipe is served over a bed of Jasmine rice and their is even leftover juice remaining that is uses as a sauce.

This is really a set it and forget it type recipe too, simply marinade the chicken in your dutch oven the night prior.

And take it out of the fridge and place in directly into a preheated oven at 425 f for 45 minutes. 

Meanwhile, cook some rice on the side in a rice cooker and your ready to eat a satisfying meal that the whole family is sure to love.

As with all my recipes, if you want to serve more people.

Simply double the recipe ingredients up.

Can I bake these in the oven?

Absolutely! However keep in mind they won’t be juicy and their will be no sauce for the rice. 

How to make the best baked asian chicken drumsticks

  1. Marinade– You want to marinate them overnight.
  2. Time – You do not want to bake them for more than 45 minutes.

This marinade consists of soy sauce, brown sugar, rice vinegar, garlic, ginger, sesame oil, black pepper.

If you follow those two tips alone you are sure to prepare the best baked chicken drumsticks. Also feel free to use bone in chicken thighs as well, those work for this recipe too

Looking for another popular chicken breast recipe?  try my Oven Baked Chicken Breasts”? It’s a another popular one on this blog. 

If you liked this recipe? Then you will want to try my other ASIAN inspired recipes below!

Key Lime Cheesecake – No Bake

Today I’m sharing with you this amazing recipe for a Key Lime CheesecakeEverybody loves cheesecake so it’s always a dessert winner if you ask me. 

I usually add whip cream to the top of this cheesecake as well. 

However the holidays are right around the corner and I thought why not make it festive by adding some Pistachios crumbled on top instead.

Doesn’t it look so fancy? 

WHAT DOES KEY LIKE CHEESECAKE TASTE LIKE

Just like the key lime pie only in a cheesecake.

So if you love cheesecake and love key lime pie you are sure to love this recipe which combines both cakes into one amazing cake.

IS KEY LIME CHEESECAKE GOOD

Yes it is one of my favorite cheesecakes ever! Then next to this cake, would be my other favorite cheesecake which is also on this blog.

Try it if you can, Cherry Cheesecake! 

The first time I tried Key Lime pie was at one of our local restaurants a few years back, my first thought was how come I have not tried this sooner.

Maybe it’s because I live in Canada where it’s more cold than warm.

But really that is not any kind of good excuse, I was immediately a hooked the first time I tried it.

So much so that I make it quite often now and even have a great recipe for the pie on this blog too, so go check it out!

CAN KEY LIME CHEESECAKE BE FROZEN

YES, you can freeze any type of cheesecake. Just be sure to wrap it tightly with aluminum foil or freezer wrap. 

I just love no bake cheesecakes!!

If you have not tried one before, then I encourage you to give it a go.

This is a no bake cheesecake, has a graham cracker crust, and is filled with cream cheese, condensed milk, vanilla extract and a little sour cream, oh and the juice from 10 limes, can’t forget the most important part.

I used a 8 inch cheesecake pan, this is the size I like most because it gives you a more taller and thicker cheesecake which can serve 12 people.

There really isn’t much to this recipe, just follow the basic steps below and you will have the most amazing Key Lime and pistachio cheesecake ever.

The awesome part about this cake is that you won’t have to spend all day in the kitchen baking, it really takes less than an hour to prepare.

Then the rest of the time is spend in your freezer, setting.

Also make sure you defrost the cheesecake for anywhere from 20 – 30 minutes on the counter prior to slicing and serving. 

This way you will have a creamy cheesecake, he really likes it creamy.

HOW TO MAKE A KEY LIME CHEESECAKE

  • You will want to start by either making the crust from scratch or buying a pre-made one. I highly recommend doing it from scratch though as it is not only simple to do but tastes way better. 
  • Then you will want to make the filling  – (see recipe below for those institutions)
  • The then topping – (see recipe below for those institutions)
  • Once it’s on the serving tray, sprinkle around the outer edge with the crushed pistachios.
  • Set cheesecake on the counter for another 20 minutes and then slice and serve. Enjoy!

During the defrosting time you can start to decorate it with the lime zest and pistachios.

Simply leave the cheesecake in the cheesecake pan on the countertop, and zest one lime overtop, release the cheesecake half way through defrosting and be sure to keep the metal bottom on in tack.

This ensures the cake stays together during serving, simply sparkle your crumbled pistachios over the out part of the cake prior to serving.

I think this cheesecake could be a staple at any holiday event, because I have yet to find someone who doesn’t love the fresh taste of key lime in their dessert.

Don’t forget the limes and zest!

Sprinkle the crushed Pistachios around the cheesecake rim like this, add as much as you want. 

Soley remove it from the cheesecake pan, keeping the metal bottom on for serving to help keep it intact.

That’s all folks, what a fresh and creamy cheesecake, enjoy!

Notes: You can skip the pistachio topping and add whip cream if desired. This cheesecake typically will make 12 slices, ruffly this thin. If you want thicker this will easily serve 8.

If you love Key Lime flavors, then be sure to try my other key lime inspired recipes!

I am so thrilled you are reading one of my recipes, if you made this recipe i’d love to hear about it! Thank you very much for reading and until next time see ya in the kitchen. Don’t want to miss a recipe? Sign up for our NEWSLETTER delivered right to your inbox!