Frozen Pumpkin No Bake Cheesecake

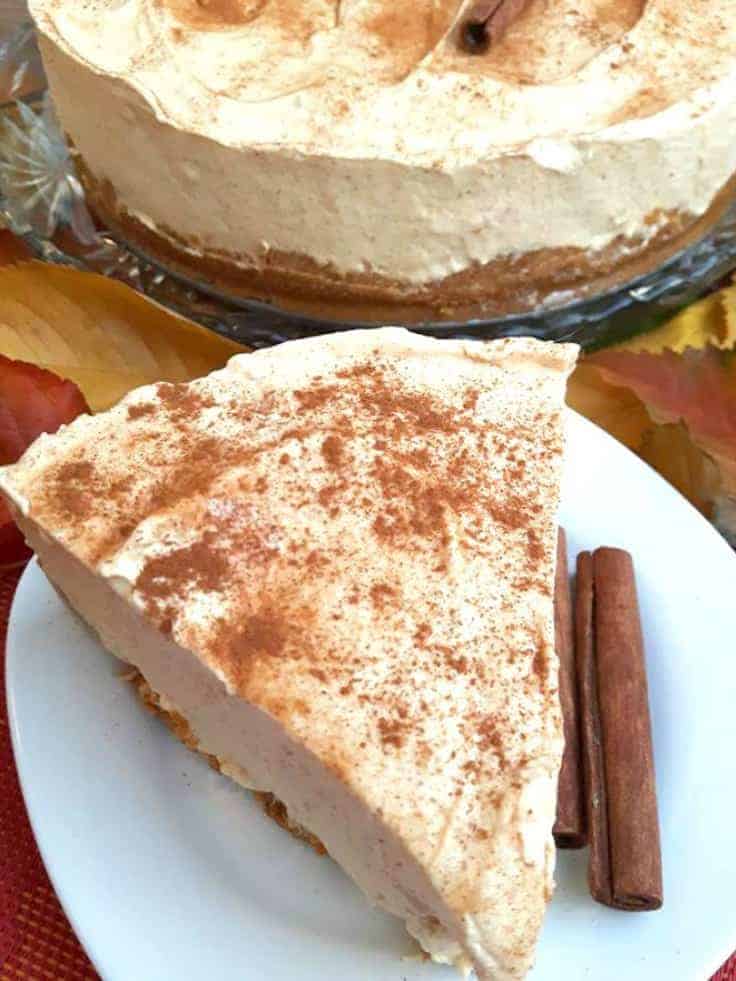
This Frozen Pumpkin No Bake Cheesecake is the perfect cheesecake recipe for those upcoming holiday get togethers such as Halloween, Thanksgiving or Christmas. Where you just want to serve something festive and different that the average pumpkin pie. 

This frozen spiced pumpkin cheesecake is just one of those recipes that everyone should have in their freezer around the holiday season.

Think Thanksgiving and Christmas or if you just love pumpkins and cheesecake then this recipe can really be enjoyed any time of the year.

Seriously it doesn’t get any more delicious than this dessert and trust me it’s pretty easy to make.

So go ahead and serve this to your guests and family and watch them beg for this recipe.

HOW TO MAKE A Frozen Pumpkin No Bake Cheesecake

TO MAKE THE FROZEN SPICED PUMPKIN CHEESECAKE CRUST:

  1. Start by making your base/crust, in a large bowl place your graham crackers, brown sugar and melted butter. Mix this together with a spoon and then use your hands to press it together so it sticks. Lightly oil your cheesecake pan and then place your graham cracker crust inside. Press firmly down to create your crust.

NO-BAKE GRAHAM CRACKER CRUST:

  1. Chill pie crust for at 30 minutes prior to filling. Prior to serving, rub the outside and bottom of the cheesecake pan with a wringed out hot cloth this helps to release the pan from the crust.
  2. Baked graham crust: Preheat oven to 325°. Bake crust for 10 minutes, cool completely before filling.
  3. Add 2 packages of cream cheese to a large bowl and with your hand held blender whisk in a can of condensed milk, whipped cream and vanilla extract. Blend till smooth, be careful to not over blend.
  4. Pour over your crust slowly then chill in the freezer anywhere from 6 to 24 hours.

FINISHING THE CHEESECAKE:

  1. Once your cake is absolutely cold, release the cheesecake from the pan slowly.
  2. Sprinkle some cinnamon sugar over top
  3. Cut and allow to defrost for roughly 20 minutes, enjoy!

What better way to celebrate fall in the kitchen than with a Spiced Pumpkin Cheesecake?

This Cheesecake will have you and those who get a chance to have a slice wanting more. And the nice thing is this 8″ inch cake can serve 12 people easily.

Since this is a no bake cake, you are going to want to prepare it the day ahead. Then allow it to set in the freezer for at least 6 hours prior to serving.

Tucker, you can serve it with a dollop of freshly whipped cream on the top prior to serving if desired.

However the rest of the Canadian Cooking Adventures team thinks it’s best with just a sprinkle of cinnamon on top, so we will leave that up to you.

This is the most creamy and tasty cheesecake, perfect for the holidays!

Also be sure to use “pumpkin puree” not “filling”, there is big difference here.

For this recipe, I used 1 1/2 cups of graham cracker crumbs, because I really like a thin crust however most recipes will call for 2 cups which makes a slightly thicker crust.

If you prefer a thicker crust then use the 2 cups.

Note: You can put a dollop of whipped cream on top. Place your cake back in the freezer or it will melt this cheesecake is best chilled frozen.

Inspired by: Chelsea’s Messy Apron ~ Frozen Pumpkin Pie Cheesecake

I am so thrilled you are reading one of my recipes, your visits and your comments are greatly appreciated. Thank you very much for reading and until next time see ya in the kitchen. Don’t want to miss a recipe? Sign up for our NEWSLETTER delivered right to your inbox!
Fluffy Bannock Recipe

This Fluffy Bannock Recipe is traditional Canadian recipe that can be made in small batches, medium-size batches or large batches. I like to make mine into mini bite-sized morals that I serve with butter or homemade Jam. Plus the kids really like it too!

Serve this alongside some fresh Blackberry Jam Recipe and you will have a fantastic breakfast!

What is your favorite topping for Bannock? I would love to know. 

HOW TO MAKE FLUFFY BANNOCK

  • You simply need 1 large bowl and 1 large non stick frying pan

Ingredients 

  • Cooking Oil
  • Flour
  • Baking Soda
  • Salt
  • Sugar
  • Water

You will find the directions in the recipe card below!

You can eat this Fluffy fried Bannock Bread as is or top it with fresh butter or a Jam of your liking.

CAN BANNOCK BE FROZEN

Yes, just be sure it has cooled down before placing into an airtight sealed Ziplock bag. 

CAN BANNOCK BE BAKED

Yes it can and it is good that way too. However, I suggest mixing in liquid butter to the batter if you choose to cook it this way.

Canadian Maple Glazed Salmon

This Canadian Maple Glazed Salmon can be grilled or pan seared. You will find this fish is not only healthy but packed full of so many amazing flavors! Plus it can be on the table in less than 15 minutes! 

Looking for other Maple Syrup recipes? Then your sure to love my Pork Chops with Maple Syrup and Apples.

I really enjoyed creating this Maple Soy Glazed Salmon recipe.

Salmon is such a great type of fish to work with. And I highly recommenced using a fresh fillet for this recipe vs frozen.

Not only is it easy and quick to make, even my toddler loves this recipe and will eat the salmon and the salad all in one sitting!

Fresh is best when it comes to this type of fish. I have made this classic recipe, many times in our kitchen. 

However this is the first time I used Maple Lifestyle Maple Syrup in it.

And it turned out beautifully and tasted even better than I remember. This syrup really amped up the flavor! 

Canadian Maple Glazed Salmon

You can grill it also outside on the BBQ if desired!

MAPLEY SYRUP SUBSITUTE

You can use real honey instead if desired.

This is one of those recipes, that you will want to serve to your guests.

Because you will have them thinking that they have just been dining at some kind of fine dining restaurant.

And will be the talk of the town, I promise! 

HOW TO MAKE Canadian Maple Glazed Salmon

It is simple as 1, 2, 3

MAPLE GLAZED SALMON MARINADE

MARINATE THE MAPLE SOY GLAZED SALMON

1 – mix the marinade 2 –  marinate the salmon & 3 – saute the salmon!

MAPLE SOY GLAZED SALMON

Cooked to perfection in a cast iron skillet, in under 15 minutes! 

We used some wild BC caught salmon for this dish that we found at our local fish monger.

And boy oh boy, did we enjoy!

This has now become a family favorite and will be made often in this house.

I was given some maple syrup to try recently from a company called Maple Lifestyle.

So I chose their dark maple syrup to highlight the salmon with. And it went beautiful with the salmon, soy, garlic marinade.

You can buy the Dark Maple Syrup that I used right from their website! Or you can find a link to it in the recipe card below, where their bourbon variety is sold on Amazon.

So simple, yet so impressive that you could serve this to a crowd and call it fine dining. 

I like to serve this maple soy glazed salmon over a bed of salad blend. And will make a dressing for the salad.

To make a basic dressing for the salad:

  • You will simply want to add 1/4 cup of olive oil to a small bowl. Then add 2 tbsp of apple cider vinegar, 2 tbsp of maple syrup and season with salt and pepper to taste.
  • Then mix till blended and pour over your salad and top with the salmon!

Dinner is done!

This can also be served with rice if desired or along side some asparagus or any other type of green vegetables you like. 

LOOKING FOR MORE SALMON RECIPES?

Be sure to try these tasty recipes below!

LOOKING FOR MORE RECIPES THAT USE MAPLE SYRUP?

  1. Pork Chops with maple syrup and apples
  2. Canadian Maple Butter
  3. Instant Pot Honey Glazed Carrots

I am so thrilled you are reading one of my recipes, if you made this, I want to see! Follow Canadian Cooking Adventures Instagram, snap a photo, and tag and hashtag it with @canadiancookingadventures and #canadiancookingadventures

Stay connected and follow along on FacebookPinterest, and Instagram for all of my latest recipes!

Creamy Pork Fettuccine Alfredo

This Creamy Pork Fettuccine Alfredo is made exactly like how you would make regular Fettuccine Alfredo however with the addition of a fried pork chop that has been seasoned and cooked broccoli. This dish is easy to make, requiring only a few ingredients and minimal effort.

When it comes to comfort food, there’s nothing more mouthwatering than a plate of freshly prepared pork fettuccine alfredo. This classic creamy dish is a perfect blend of savory, juicy pork topped with a decadent Alfredo sauce, and delicious pasta cooked to al-dente perfection.

Not only is pork fettuccine alfredo a family favorite meal, but it’s also surprisingly easy to make.

Pork and Fettuccine Alfredo

Takes no more than 30 minutes to prepare unless you want to bake the pork chops then aim for an hour.

Why is Fettuccine Alfredo so good

Pork Fettuccine Alfredo is an Italian-style dish that packs plenty of flavor and comfort for a filling meal.

From the creamy cheese sauce to the juicy pork, this dish offers a truly delicious dining experience. Start off your next dinner with this great dish and leave your guests raving for more

HOW LONG TO COOK PORK CHOPS ON STOVE TOP

Rule of thumb is to have the pork chops no longer pink inside and them to be an internal temperatures of 145 degrees f. Depending on the thickness of the pork chop that typically is a pork chop cooked anywhere from 6 to 10 mins on each side till browned. 

Where does Fettuccine Alfredo Originate

Italy, word has it an Italian man invested it for his wife who lost her appetite! 

With its creamy cheesy sauce and delicious fried pork chops, this simple dish will have you licking your plate clean.

HOW TO MAKE Creamy Pork Fettuccine Alfredo

  • Start by brining a large pot of water to a boil toss in 1 tbsp of either salt or cooking oil to the pot and add in the pasta.
  • Stir and bring down to a medium – high heat and cook the pasta till al dente, strain saving 1/4 cup of the water and set aside.
  • Next cook the broccoli in a pot of boiling water till soft, strain and set aside.
  • Next in a large non stick frying pan, add in your pork chops and season on both sides with salt, pepper and Italian seasonings.
  • Cook on medium – high heat on both sides till the pork chops are browned and no longer pink inside.
  • Remove the pork chops and in the same pan add in the butter, cream, salt, pepper, garlic and onion powder.
  • Once hot add in the parmesan cheese and remaining 3/4 cup of pasta water.
  • Simmer on low heat and adjust to taste
  • Once the sauce has thickened add back in the pasta and toss to coat along with the cooked broccoli.
  • Serve and top with the cooked pork chops. Enjoy!

If you make this recipe, I would love to hear about it! You can leave a 5 star review in the comments below! Thank you very much for reading and until next time see ya in the kitchen. Don’t want to miss a recipe? Sign up for our NEWSLETTER delivered right to your inbox!

Tuna Pasta with Mayo

This Creamy Tuna Pasta with Mayo Recipe is made with egg noodles and is super easy to make and the perfect dish for those who loves sweet pickles in there salad.

Wanting more canned tuna or salmon pasta recipes to try? Check out my Salmon and kale pasta salad or Canned Salmon Pasta Salad

My Tuna Pasta with mayo is a simple inexpensive meal that is packed full of protein and vitamins.

You can add just about any type of veggie you have on hand to this dish such as broccoli, cauliflower, peas etc. However, when I make it I make it just like this with sweet pickles.

It serves best cold, however you can serve it warm if your in a hurry and it tastes very good still.

Looking for a Awesome drink recipe to serve with this salad?

Try my “Raspberry sweet tea” that is made with agave nectar or honey.

SUMMER 🙂 means picnics and or easy fresh homemade salads for me.

This salad just works!

The addition of the lemon juice really enhances this salad even more and contrasts the sweetness from the pickles.

If you like sweet things your going to love this as the sweet pickles as it really give it that extra something special. 

Of course however you can use garlic pickles instead if you prefer, it’s your pasta salad after all.

LOOKING FOR OTHER SUMMER SALAD RECIPES?

I am so thrilled you are reading one of my recipes, I appreciate every single one of you! Thank you very much for reading and until next time see ya in the kitchen. Don’t want to miss a recipe? Sign up for our NEWSLETTER delivered right to your inbox!

Italian Tuna Pasta Salad

This Healthy Italian Tuna Pasta Salad is the perfect summer salad and is made with Zesty Italian salad dressing.

Yes I said it “Summer” and it’s official. We are finally saying goodbye to winter and hello to SUMMER 🙂 

You can use just about any type of lettuce mixture for this salad, I choose a good mixture for mine as you can see and it was super delicious!

This salad can be thrown together in no time at all and is filled with 5 different types of salad mix, along with some bowtie pasta, tuna.

Then tossed in a healthy balsamic, garlic dressing that you are sure to love.

I went a little lighter on the pasta for this salad, I typically use three to four cups of pasta in my pasta salads.

However for this recipe I used two cups because I REALLY wanted to highlight this lettuce.

You can serve this for the main course or as a side dish.

Because it has two cans of tuna it can be a real filling dinner option, so do not let all the greens here fool you. 

This salad can be enjoyed pretty much any time of year, but I know it will be best enjoyed on those long summer nights out on the back patio! 

I can picture it now 🙂 Can’t you?

Looking for a Awesome drink recipe to serve with this salad?

Try my “Raspberry sweet tea” that is made with agave nectar or honey.

LOOKING FOR OTHER SUMMER SALAD RECIPES?

I am so thrilled you are reading one of my recipes, I appreciate every single one of you! Thank you very much for reading and until next time see ya in the kitchen. Don’t want to miss a recipe? Sign up for our NEWSLETTER delivered right to your inbox!

Lobster Ravioli Sauce Recipe

This Lobster Ravioli Sauce Recipe is made by simmering a lobster shell in heavy cream and tomato puree along with onion, garlic, parmesan cheese and Italian seasonings. 

Sauce for Lobster Ravioli is best served with your favorite ravioli. Personally, I like 3 cheese ravioli pasta. However it really works with just about any type. Also this recipe serves 2 people, want to serve more simply double it up!

WHICH SAUCE FOR LOBSTER RAVIOLI

You can serve it in a red sauce or white sauce.

HOW TO MAKE BUTTER SAUCE FOR LOBSTER RAVIOLI

You make it the same way as this recipe, however omit the tomatoes. You can find that recipe here, please note that I used 2 lobster when sharing that recipe. Here is my recipe for Butter Lobster Sauce which is excellent also.

CAN YOU USE RED SAUCE FOR LOBSTER RAVIOLI

Of course and this recipe does with the addition of the tomato puree.

WHAT DOES LOBSTER BUTTER SAUCE TASTE LIKE

If you have ever been to Red Lobster and order a lobster tail with butter on the side. This sauce will remind you of just that with the addition of cream, garlic and cheese.

Honestly, two steaks could cost more than this recipe. Even though its Lobster this recipe does not have to break the bank.

I actually picked up two pre cooked frozen Lobsters for $10 a piece. So making this sauce costs around 20$ dollars and we all know adding pasta to it is not that expensive at all. Enjoy!

HOW TO MAKE SAUCE FOR LOBSTER RAVIOLI 

  • The sauce is made from the lobster shell that is first simmered in heavy cream and seasonings.
  • Once that has simmered you will remove the shell and season with parmesan cheese and garnish with a lemon.

CAN YOU USE ALFREDO SAUCE FOR LOBSTER RAVIOLI

You can however, I would advice to omit the tomatoes and half it with the cream.


3 bean broccoli salad recipe

Summer is here and this 3 bean broccoli salad recipe is ready to take to your next picnic or large family gathering in 30 minutes flat. I like to add ranch dressing to the salad, however you can use whichever salad dressing is your favorite even a vinaigrette will work great!

Serve alongside some Air Frye BBQ Ribs or some BBQ Chicken if desired.

What I love about this three 3 bean broccoli salad recipe is that it is inexpensive and easy to make. And it can be used as a side dish, dinner entrée, or to take to a potluck.

I love this 3 bean and broccoli salad so much that I tend to make it at least once a week in the summer months. It serves so good alongside just about any main course, however can serve also as a main course.

The beans are filling and are packed full of fiber and protein. 

Also this salad is best served very cold, so place in the fridge at least 1 hour prior to serving for the best taste experience!

WHAT CAN GO INTO A BEAN SALAD

  • Any type of bean really, I have used just chickpeas or kidney beans before too. 
  • Cilantro
  • Celery
  • Avocado

Feel free to add 2 cans of beans if desired and or even more veggies such as celery, carrots etc

With 3 Bean Salad, you can create a healthy and delicious meal or side dish that’s quick and easy to make. Not only will 3 Bean Salad save you time, it also provides cost savings with the use of common and affordable beans.

With the tips and variations provided in this blog, you can mix it up with new flavors and textures to keep your meals interesting.

HOW MAKE BEAN SALAD

  • Simply your can of strained 3 beans into a large bowl
  • Along with a chopped veggies
  • Then pour over the dressing and serve chilled

BENEFITS OF EATING BEANS

Packed full of feel good fiber, protein and nutrients. 

WHAT GOES WITH BEAN SALAD

Today, I served this salad along with some Air Fried BBQ Pork Ribs. My recipe for the best homemade Air Fried BBQ pork ribs can be found here: Air Frye BBQ Ribs

REALLY though this salad can be enjoyed alongside just about any meal, think chicken, pork even steak etc. 

So now that you know the benefits of a 3 Bean Salad, why not give it a try?

Share your own variations on our 3 Bean Salad and let us know how it worked out for you in the comments section!

HOW LONG WILL BEAN SALAD KEEP IN FRIDGE

My bean salad will last ruffly 3 days fresh. However if you add avocados or tomatoes etc to it. I would make sure it is eaten on the very day you make it!

Looking for more Summertime salads? Try these popular recipes below. 

I am so thrilled you are reading one of my recipes, if you made this recipe i’d love to hear about it! Thank you very much for reading and until next time see ya in the kitchen. Don’t want to miss a recipe? Sign up for our NEWSLETTER delivered right to your inbox every month!