Tortellini Kale Sausage Soup

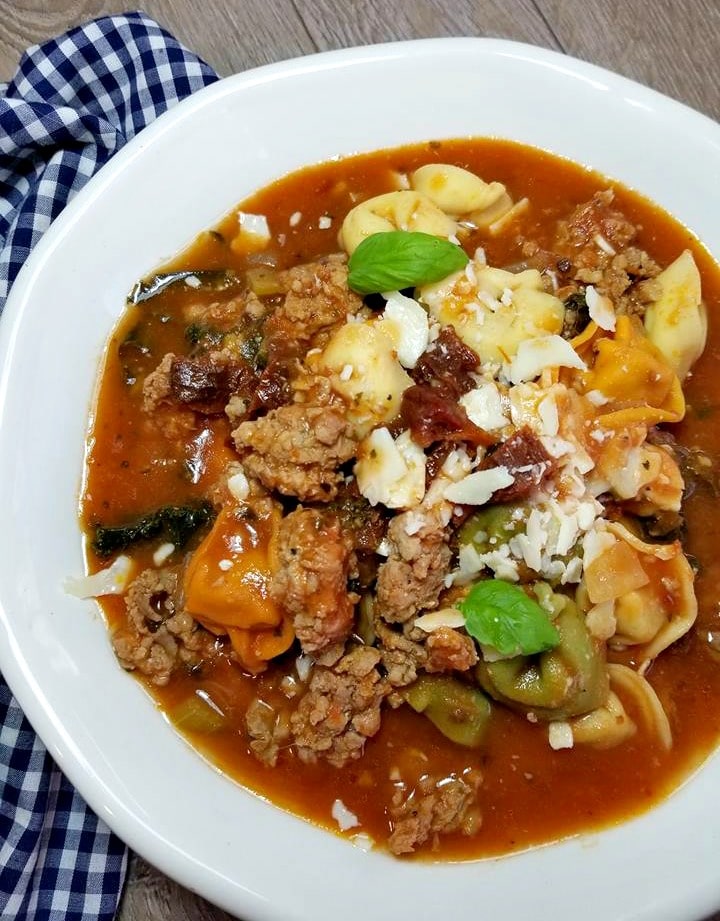
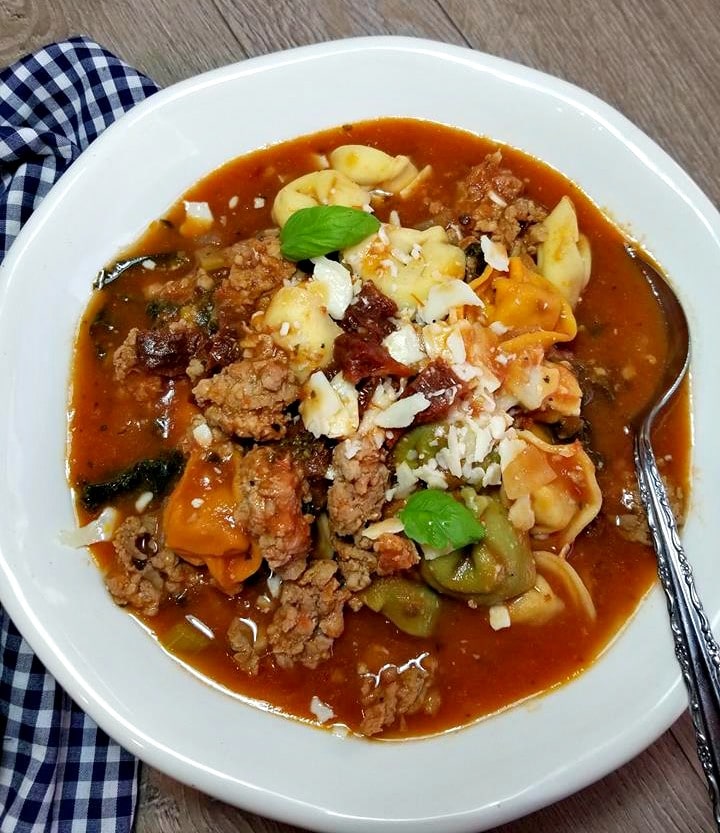
This Tortellini Kale Sausage Soup is one of those soups that you will want to make a big old pot of and enjoy over a few days. 

Believe it or not but this soup even tastes better the second day, it’s absolutely delicious! 

I have always loved Italian type soups and have been testing out a few of these tortellini sausage recipes over the past year. And decided to finally share my favorite version of it with you today! Mine is pretty similar to allot of those Italian Tortellini soup recipes you will find out there.

However mine has a few differences such as mine will use kale instead of spinach and celery instead of the carrots.

Not to sure why almost all Italian tortellini soups call for carrots these days, but to me that is so wrong. Oh and mine also has a fair amount of parmesan cheese and absolutely “no cream”.

The tomatoes and cheese will make it creamy enough!

I like to use canned tomatoes because it really helps to make this soup super creamy without all the extra fat. I do not recommend using chunked canned tomatoes as some other recipes will have you.

Unless you want a stew not a soup!

Also if you are planning to enjoy this soup over a couple of days, then you will want to add one more cup of chicken stock since the tortellini tends to soak it up overnight. 

I really like to use “spicy italian sausage” for this recipe. Trust me you won’t even notice the spice, however if you cannot get your hands on it.

Then I would recommend adding in a pinch of red pepper flakes.

You do want a little kick added to those crushed tomatoes, it really helps to pick up the flavor.

So that is about it along with some onions, celery and extra spices you too can be enjoying one of the best bowls of Tortellini Kale Sausage Soup.

Also you can use “Passata Sauce” in replace of the stewed canned tomatoes if you desire. Both products work very well for this soup, so it’s totally up to you!

So if your craving a soup to warm you up, but also want a hearty meal. Then this Parmesan Tortellini Kale Sausage Soup will hit the spot!

Notes: Also keep in mind, as with all my recipes. If you want to make more or less of this soup, simple adjust the serving size in the ingredients section above and the servings will automatically adjust for you. This soup can store in the fridge for up to 3 days and or freeze for up to 3 months.

I am so thrilled you are reading one of my recipes, if you made this, I want to see! Follow Canadian Cooking Adventures Instagram, snap a photo, and tag and hashtag it with @canadiancookingadventures and #canadiancookingadventures

Stay connected and follow along on FacebookPinterest, and Instagram for all of my latest recipes!

Vietnamese Salad Vermicelli

This Vietnamese Salad Vermicelli is made with rice noodles and is the Ultimate Summer Dish that is always served with fresh veggies that are then topped with a grilled meat of your choice and has an authentic fish sauce / dressing for serving.

Looking for more Thai dishes?  Try my Vietnamese Shrimp plating with Spring RollsSweet Thai Chili ChickenThai Red Crab CurryThai Basil Mussels or Red Thai Chicken Curry.

Never made a Vietnamese salad before? No problem! This step-by-step guide will walk you through the process of creating a delicious, healthy salad in the comfort of your own kitchen. It also will show you how to make homemade Vietnamese Salad Dressing to go on top of this salad. 

WHAT IS VIETNAMESE NOODLE SALAD CALLED

(Bun Bo Xao) in Vietnamese. Vietnamese Salad Vermicelli is a refreshing and healthy dish to serve on a hot summer day.

This flavorful and versatile recipe is packed with fresh herbs and veggies, protein, and a tangy dressing that will satisfy your taste buds and keep you feeling refreshed.

Thai Vermicelli salad can also have the addition of grilled pork and shrimp as well. If you would like to create that, simple grill some shrimp or sliced pork and season with salt to serve. 

WHAT IS VIETNAMESE SALAD

Vietnamese Noodle Salad is served with warm or cool noodles, fresh cold vegetables and cooked meats of your liking. Typically grilled pork, shrimp or beef. The noodles are always Vermicelli rice noodles that come with a light Thai inspired sauce. 

It’s fresh, filling and just like they serve in Thai restaurants.

If you have been to this blog before you will know that I’m a fan of Thai food and eat it often.

I used to go out to enjoy this food at least every other week, but now make it more at home. Because it is easy to do and saves me a ton of cash at that too!

Step-by-Step Instructions for Making Vietnamese Salad Vermicelli with Shrimp

HOW TO MAKE VERMICELLI SALAD

  • You will want to make two marinades, one for the chicken and one for the sauce that you will serve alongside these bowls.
  • Fresh lemongrass is very important here for the chicken marinade, it gives it that really intense lemon taste. So be sure to get your hands on a few stocks that you will simply chop and place into the marinade.
  • The longer you marinade the chicken the better. If your making it for dinner then simply marinate it in the morning or the night prior. Then basically the rest of the dish can be pulled together in less than 30 minutes. Easy peazy!

What makes these rice bowls so good is the fresh ingredients and the authentic Vietnamese Salad Dressing.

WHAT IS VIETNAMES SALAD DRESSING

It is a traditional dressing that is used on almost every type of Vietnamese salad dish and the recipe can be found below. It serves very well over cold salads, that are then topped with a marinated then grilled meat protein of your liking.

VIETNAMESE SALAD DRESSING

Also know as “Nuoc Mam” sauce which is a sweet, salty, sour and spicy dressing.

  1. 3 cloves garlic (minced)
  2. 1/2 cup cold water
  3. 1 lime (juiced)
  4. 2 tbsp rice vinegar or white vinegar
  5. 1/4 cup fish sauce
  6. 3 tbsp sugar
  7. 1 red chili (de-seeded and sliced, or substitute 2 teaspoons chili garlic sauce or Sriracha)

This makes enough for roughly 2 people. 

Substitute for Nuoc Mam sauce?

Soya sauce mixed with some red hot chili pepper flakes

The first time I ordered this salad, I was not expecting much.

That was years ago, I remember the day to a tea. I was with my aunt and she took me to this whole in the wall restaurant that I was not expecting to become my favorite restaurant in town. 

Fast forward 10 years later, you will find me going to the same restaurant ordering the same dishes. 

So, whenever that Thai salad craving hits and I’m not heading out to a restaurant. 

I will simply make this dish in the comfort of my own home. 

Trust me it’s pretty darn easy too!

So follow along and soon you will be a master chef in making Vietnamese rice bowls at home just like me 🙂

WHAT IS IN A VERMICCILI SALAD

  • Carrots, cucumbers, fresh herbs such as cilantro, shredded iceberg lettuce and a meat protein of your liking.
  • Thai marinade and Vietnamese salad dressing

Feel free to add other veggies such as Beans sprouts, fresh herbs, jalapeno peppers. 

Now doesn’t that sound healthy and fresh? This is one of the best salads if you ask me.

IS VIETNAMESE SALAD HEALTHY

Yes, it is packed full of fresh vegetables and herbs along with a lean protein such as shrimp

Keep in mind though the soya sauce and fish sauce has a high sodium content so you may want to use a lighter soya sauce or less dressing on your salad.

If you like a bit more heat to your vermicelli rice bowls.

Then go ahead and serve along with some “hot chili sauce” or if you prefer a sweeter dish try a “sweet chili sauce”.

LIKE THAI FOOD AS MUCH AS ME? 

Then you will want to try my other Thai inspired recipes on this website!

Sweet Thai Chili Chicken

 Thai Red Crab Curry

Thai Basil Mussels

Red Thai Chicken Curry

DID YOU MAKE THIS RECIPE?

If you make this recipe, I would love to hear about it! You can leave a 5 star review in the comments below! Thank you very much for reading and until next time see ya in the kitchen. Don’t want to miss a recipe? Sign up for our NEWSLETTER delivered right to your inbox!

Thick New England Clam Chowder Recipe

This may be the best Thick New England Clam Chowder recipe you have ever tried.

This is my go to recipe for New England Clam Chowder soup.

It is out of this world delicious!

WHERE DID NEW ENGLAND CLAM CHOWDER ORIGINATE 

It is said to have originate in NYC and was introduced by the French, Nova Scotian, or British settlers.

And this here is truly an authentic clam chowder recipe. 

I know because this is my favorite soup in the whole wide World.

I will eat this all day everyday if I could.

An when I say my version it’s quick to make, I mean it. 

WHAT IS NEW ENGLAND CLAM CHOWDER

It is a milk or cream based clam chowder vs a tomato like another famous chowder called the Manhattan we have all known to love as well.

It is also thicker and made with butter, potatoes, pork in this case bacon, onions and clams.

WHAT DOES NEW ENGLAND CLAM CHOWDER TASTE LIKE

Creamy, thick, sweet and salty. 

HOW IS NEW ENGLAND CLAM CHOWDER MADE

It is really easy rather, you are simply adding everything to one pot to cook.

Dicing and chopping will take the majority of the time then let the pot do the rest.

Want to save some time with this soup?

Simply use frozen yet clams, there will be no shucking here.

You can have a huge pot of this soup ready to serve in 30 minutes time. 

This soup takes me right back to my childhood, where I used to eat this soup religiously.

I hope you give it a try!

However my family never made it from scratch so I had to settle for the canned stuff.

You know the soup that has way more potatoes than clams? 

Oh the things we remember eh!

My parents used to buy those cans for me by caseload because, they knew I would go through a case in less than 2 weeks.

Well looking back I sure was missing out, now I know how to make real clam chowder.

Long gone are the days of eating thick clumpy chowder from a can and having to add extra cream to it to make it creamy.

Clam chowder soup should be creamy and smooth and filled with clams and there juices. 

Not thick and clumpy and filled with mainly potatoes.

And please don’t add carrots to it, why do some people do that anyway? it’s so so wrong.

Yes there are some people who still prefer a thicker chowder and that is fine, feel free to omit the vegetable stock of that is you.

But please don’t add canned clams, using fresh or frozen is best.

The trick to making the best clam chowder is using fresh or frozen clams and cooking them for just a few minutes at the end to prevent them from becoming rubbery.

HOW TO MAKE NEW ENGLAND CLAM CHOWDER SOUP

  • So what are those secret ingredients?
  • Simply Old Bay Seasoning and some Red Wine Vinegar that we will splash in at the end.
  • The Red Wine Vinegar will give it that extra oomph and help tie this soup all together.
  • And clam juice (See below the kind I used for this recipe)

CAN NEW ENGLAND CLAM CHOWDER BE FROZEN

Most defiantly! 

I hope you give it a try and if you do I would love to know what you think, just let me know in the comments below.  

Keep in mind if you wanting a lower fat clam chowder, you can always use all milk and omit the cream.

I would not recommend that personally but if your on a diet of some kind then by all means, it’s your chowder.

Don’t mistake this clam chowder with any other and definitely not it’s counterpart named the Manhattan clam chowder.

Which is good but made with a tomato stock rather than cream. I now make this soup in big batches so that I can enjoy it over a few days 🙂

What soup is your go to in the colder months?

I am so thrilled you are reading one of my recipes, I appreciate every single one of you! If you made this recipe i’d love to hear how it turned out!  Thank you very much for reading and until next time see ya in the kitchen. Don’t want to miss a recipe? Sign up for our NEWSLETTER delivered right to your inbox!

Spicy Avocado Hummus

This Spicy Avocado Hummus has a little kick and that is from the Amazing Serrano Pepper. This recipe is a cross between they every day normal garlic hummus to Mexican guacamole!

Do you love Guacamole? 

Then you are sure to want to try this recipe. It is allot like guacamole with a more creamy thick base.

That comes from the tahini sauce and chickpeas.

IS AVOCADO HUMMUS HEALTHY

Yes this recipe is packed full of protein, healthy fats and fiber.

So you can make this more than a snack if you want. 

YOU are going to love how fresh it tastes.

WHAT TO EAT WITH AVOCADO HUMMUS

  • Tortilla chips
  • Pita Bread
  • Carrots
  • Broccoli
  • Peas
  • Cauliflower
  • You name it!

WILL AVOCADO HUMMUS TURN BROWN

Yes, unless you freeze it. You can expect the avocados to turn brown in less than a day!

CAN YOU FREEZE HUMMUS

Absolutely, I do it all the time. I will make a big batch and store some in the fridge for my family.

Which lasts us up to a week in an air tight container. 

Then I will section some off for the freezer, for movie nights, game nights and snacks. 

There is always hummus in our fridge or freezer.

HOW TO MAKE AVOCADO HUMMUS

  • Drain and rinse chickpeas, add to your blender or food processor with your avocado, olive oil, tahini, lime juice, cilantro and fresh garlic. Pulse for 1 minute or so until chickpeas and avocado are semi – smooth.
  • Next add in all your “dry spices” and pulse again until smooth this time, scraping down sides if needed and adding in more olive oil if you feel is needed.
  • Serve an hour or more after chilling in the fridge with your choice of tortilla chips ARRIBA!

Note: For best results chill it in an airtight container for up to 1 hour or more before serving. The longer it chills in the fridge the thicker it becomes and the flavors really set in. Also add the pit of one Avocado in the mixture helps to maintain its freshness.

WANT ANOTHER AWSOME HUMMUS RECIPE?

Try my Roasted Garlic Hummus!

I am so thrilled you are reading one of my recipes, if you made this recipe id love to hear about it! Thank you very much for reading and until next time see ya in the kitchen. Don’t want to miss a recipe? Sign up for our NEWSLETTER delivered right to your inbox every Month!

COCONUT CURRY SHRIMP

Satisfy your curry craving tonight with this mouthwatering  Coconut Curry Shrimp that contains a fusion of flavor. 

This Coconut Curry Shrimp is bursting with flavors from around the World.

As it contains two different types of curry flavors in it. 

Think Thailand meets Jamaica! 

And trust me it is super simple to make. 

If you have never tried Red Thai Curry before, I encourage you to give it a try. 

Some of the ingredients of RED THAI CURRY paste includes “Lemongrass”; “Galangal” , “Kaffir lime leaves” and Bird’s Eye Thai chilies. 

HOW TO MAKE COCONUT CURRY SHRIMP

  • Red Thai Curry Paste * see the picture below for my favorite brand
  • Jamaican Curry Powder
  • Thick Coconut milk * skip the watered down varieties
  • Shrimp
  • Cilantro
  • Green peppers
  • Onion
  • Limes
  • Rice

Our favoriteRED THAI CURRY PASTE

The shrimp is curried to perfection and has become one of our new households favorites. 

It is very similar to my Jamaican Curry Shrimp and if your interested in that recipe.

It is also a favorite in our household.

The difference between that recipe and this recipe is that here we are adding tomatoes and omitting the scotch bonnet peppers and replacing that with a bit of “Red Thai Curry” paste. 

Both recipes are amazing and I encourage you to try this one and that one separately. 

So if you like curry as much as me, then you are sure to love this recipe. We are infusing it also with salt and pepper, tomatoes and coconut milk that help to bring all those curry flavors alive.

Keep in mind you will want to use a good quality coconut milk, one that is not to watery. When it comes to the tomatoes you can choose fresh or canned.

COCONUT CURRY SHRIMP AND RICE

  • Start by making your rice
  • Bring a medium pot of water to a boil
  • Turn the heat down to medium and add in 2 cups of rice
  • Simmer on medium heat till the water is almost evaporated
  • Turn down to low and simmer till tender, keep an eye on the liquid you may need to add a bit more or remove some.

HOW TO MAKE COCONUT CURRY SHRIMP

This recipe is super easy to make. Trust me it is as easy as 1, 2, 3

First you want to cook some rice. I like to use Basmati rice for this dish, however any type works. 

  1. First you want to cook some rice. I like to use Basmati rice for this dish, however any type works. 
  2. Then in a large skillet you will want to add some coconut oil then the garlic and ginger powder along with the Jamaican curry powder and saute on medium heat till fragrant.
  3. Next add in your Red Thai Curry paste and saute 1 minute till fragrant.
  4. Add in remaining spices then the can of coconut milk.
  5. Simmer on medium heat and add in your chopped onion and green pepper. Simmer on medium – low till the veggies have become tender. 
  6. Lastly add in the shrimp and cook till no longer pink.
  7. Serve over rice with fresh limes. 

Keep in mind you can use fresh ginger and garlic if you so desire.

Notes: “Lemongrass”, “Galangal” and “Kaffir lime leaves” can be found in most Asian stores. “Thai Red Curry Paste” can be found in most Supermarkets, Thai Red Curry paste has all the above ingredients in it needed to make this dish.

HOW TO COOK COCONUT CURRY SHRIMP JAMAICAN STYLE

Find that recipe here on my website: Jamaican Coconut Shrimp Curry

I’m thrilled you are reading one of my recipes, if you made this recipe i’d love to hear about it! Thank you and until next time see ya in the kitchen. Don’t want to miss a recipe? Sign up for our NEWSLETTER delivered right to your inbox!

LOOKING FOR MORE CURRY RECIPES

Creamy Coconut Curry Chicken

This Creamy Coconut Chicken Curry can be prepare on your stove top, slow cooker or instant pot. 

Want another Indian restaurant style recipe? Try my Butter Chicken or my Lamb Curry.

Coconut Chicken Curry can be served alongside some basmati rice or some Homemade Naan Bread!

Love Indian food as much as me? Then your going to want to try my Eggplant Curry” , BUTTER CHICKEN or my “Chickpea Curry” as well. 

BUTTER CHICKEN 

THIS “BUTTER FENUGREEK NAAN BREAD” RECIPE IS A WINNER!

IS INDIAN CHICKEN CURRY HEALTHY?

Yes in most cases it is, however it really depends on the way it is made. Some curries call for heavy cream and lots of butter.

Like the typically butter chicken recipe that we have all come to know and love.

I love butter chicken just like the rest of you. However I have learned to make it slightly healthier.

Feel free to check out my recipe here for that recipe: Butter Chicken

My recipe here calls for coconut milk and no cream. Making this a very healthy curry option for those trying to watch their calories intake. 

Your family will not believe this dish is being served straight from your kitchen, it’s that good. 

I used to order this type of dish at our local East Indian restaurant, however now I make it often at home. 

You can find the pre-made curry package that I used to make this curry in the AMAZON link below or you can just add in each spice individually if you prefer.


This simple curry will impress even the pickiest of eaters.

And will have your family thinking that you either

a) ordered this from your local Indian restaurant or

b) have taken some cooking lessons because it tastes so amazing! 

WHAT TYPE OF CURRY SHOULD I USE TO MAKE COCONUT CHICKEN CURRY

Curry powder is a blend of up to 20 different herbs and spices.

And there are many different type of curries available. Whenever I am making any Indian dish, I like to use a “mild indian curry” or for a hotter curry I will opt for “Madras Curry”.

Both can be found in the ethnic aisle in the Indian spice section!

LEARN MORE HERE ABOUT CURRY: All About Curry Powders

HOW TO MAKE INDIAN CHICKEN CURRY WITH COCONUT MILK

Cooking methods:

  • Simmer on a low-medium heat for 30 minutes on the stovetop
  • Cook in the pressure cooker around 10 minutes or depending on your instructions
  • Cook in the slow cooker from 8-10 hours.

Today, I used my pressure cooker because I was in a hurry to have dinner on the table so I could watch my favorite recorded show on the PVR. 

However this type of dish can be made either way.

This delicious curry is made with boneless chicken breast and simmered in a rich tomato, yogurt, coconut sauce that you’re sure love time and time again.

WHAT IS INDIAN CHICKEN CURRY

Indian chicken curry is the ultimate comfort food for a lot of Indian people.

Typically it is served over a bed of Jasmine rice and is made with chicken, spices, tomatoes and some type of cream. 

As you may know if you have been to my blog before, I LOVE Curry.

So if you like curried foods as much as me then you are going to love this simple recipe too. 

Guaranteed! 

Plus it is a tad different than the average chicken curry recipes.

Feel free to add some cubed mini potatoes to this curry if you like, just omit the rice if you choose to do that. 

Either way this dish will turn out amazing!

SPICES USED IN COCONUT CHICKEN CURRY

  • 1 tbsp Garam masala
  • 1 tbsp Curry powder
  • 1 tbsp Turmeric powder
  • 1 tsp Coriander
  • 1 tsp Cumin
  • 1 tsp Sugar
  • 1 tsp Cayenne pepper powder
  • 1 tbsp or tsp of Salt, according to taste
  • 1 tbsp Kasoori Methi” = “Dried fenugreek” , optional

The green seasoning you see on top of this dish is called “Kasoori Methi” which is basically dried fenugreek” leaves.

It can be found in almost any international isle at your local grocery. See below!

If you cannot find “dried fenugreek” leaves you can just omit it. 

However I find it adds an extra element to the dish that is really nice.

I have shared a few other curry recipes here on my blog, however this is the first one with coconut milk vs cream/milk. So if your lactose intolerant than this dish may be right up your ally. 

WHAT GOES WITH COCONUT CHICKEN CURRY

Be sure to make some basmati rice to serve alongside or if you really want to make it extra special go ahead and make some homemade Naan Bread.

If you end up giving it a try, do let me know in the comments below. I would love to know what you think 🙂

LOOKING FOR AN AWESOME NAAN BREAD RECIPE TO SERVE ALONGSIDE THIS CURRY? Then look no further, I got you covered! My Garlic Naan Bread Recipe is a sure WINNER!

If your a CURRY lover like me… Then you will definitely want to try these other curry  dishes from this website!

DID YOU MAKE THIS RECIPE?

If you make this recipe, I would love to hear about it! You can leave a 5 star review in the comments below! Thank you very much for reading and until next time see ya in the kitchen. Don’t want to miss a recipe? Sign up for our NEWSLETTER delivered right to your inbox!

Quick Carnitas Recipe (Pressure Cooker)

These Quick Carnitas Recipe is an inexpensive weeknight meal that can feed a crowd! 

I love making this recipe, you can either simmer it all day in your slow cooker or prepare it in less than 20 minutes in your pressure cooker. 

What kind of meat is use for Carnitas? 

Carnitas is the Mexican version of pulled pork. It’s traditionally made with pork shoulder or pork butt. This piece of meat contains more fat and helps it to stay juicy!

How to make Pork Carnitas in pressure cooker? 

You will start by searing the pork until it’s browned on all sides, then you will add all the ingredients listed here directly into the slow cooker.

Allowing it to cook throughout the day or you can cook it in under 20 minutes in the pressure cooker. 

Can’t get simpler than this, once it’s cooked you will take two forks and shred the pork on a cutting board before serving over rice or in a taco. 

Then you will be ready to have a feast fit for a Mexican Queen or King.

I love the ingredients in this recipe, because everything tastes so fresh. Adding fresh lime juice along with a fresh orange juice really makes the flavors pop, so be sure not to skip them.

Also the addition of the the raw onions surprisingly work so well here too, trust me or I should say the Mexicans!

So be sure not to skip on those very important ingredients. Serve this up with some avocados and you will have one great meal tonight. I hope you enjoy, ARRIBA MEXICO!

Looking for an awesome recipe for Mexican Salsa?

LOOKING FOR MORE TACO RECIPES?

Be sure to try these tasty recipes below!

  1. Tilapia Fish Tacos
  2. Blackened tilapia fish-tacos
  3. Barbacoa beef recipe slow cooker
  4. Pulled Pork Carnitas (Mexican Tacos)

Notes: Make sure to broil the pork once it’s been shredded, this ensures the meat is crispy just like they serve in mexico. This shredded pork can be served in burritos, tacos, quesadillas, enchiladas and or over rice.


I am so thrilled you are reading one of my recipes, if you made this recipe i’d love to hear about it! Thank you very much for reading and until next time see ya in the kitchen. Don’t want to miss a recipe? Sign up for our NEWSLETTER delivered right to your inbox!

★ Did you make this recipe? Please give it a star rating below! 

Roasted Leg of Lamb (Greek Kleftiko)

You have not truly tried traditional Greek food, until you tried a Roasted Leg Of Lamb, also known as Lamb Kleftiko.

And you don’t have to wait till Easter to serve either, this recipe is so good you will be sure to crave it just as often as the Greeks do in Cypress.

If you follow this recipe to a tea, you will have the most juicy and tender leg of lamb you ever tasted. 

The size of your leg you make depends on how many you are cooking for.

A 6 pound leg of lamb will feed about 8 people so you can judge by this what weight you will need.

I am using 3 pound leg which will feed a family of three to four. 

HOW TO MAKE GREEK LAMB KLEFTIKO 

  1. If your lamb leg is frozen, start by defrosting it in the bottom of the fridge anywhere from 24-48 hours (if fresh skipped this step)
  2. Next prepare your marinade. In a bowl, mix your crushed garlic, rosemary, thyme, oregano, olive oil, and lemon juice.
  3. Lay your lamb out on the counter, and season on both sides generously with salt and pepper.
  4. Then take your knife and make slits all over the leg, front and back.
  5. Place the lamb now on a long piece of parchment paper and make a boat around it to hold in the marinade.
  6. Massage the marinade all over the lamb, making sure to get some of the marinade in the slits.
  7. Place the wrapped leg in the bottom of your roasting pan, and allow it to marinade overnight in the fridge.

HOW TO COOK LAMB KLEFTIKO 

  1. The next morning, take your lamb out and allow it to sit on the counter for 30 minutes prior to cooking.
  2. Open up the parchment paper, and pour in your “Chicken Stock” around the leg (try not to pour it all over the leg) rather around. As you don’t want to remove the seasonings.
  3. Now with a little bit of tinfoil cover the ends of the leg to ensure the parchment paper does not fold away.
  4. Preheat your oven to 425 f (convection ovens) or 450 for (standard ovens) for 30 minutes, then lower it to 325 f (conventional ovens) or 350 for (standard ovens) and allow it to bake for 3 1/2 hours.
  5. Once cooked, remove from the oven and open the paper to baste the lamb with the remaining juices.
  6. Place back in the oven for 30 more minutes uncovered till browned. (You may want to add a bit more liquid) totally up to you.
  7. Once done, remove the leg and drain the broth directly into a gravy holder.
  8. Allow it to rest 30 minutes before serving and serve with that delicious broth, adjust to taste.

Note: You can add potatoes into the parchment paper. I like to serve my lamb with pita bread, either are great ways to sop up that delicious gravy. Goes great with my Greek Tzatziki sauce too.

Serve with some warm pitas to mop up that amazing gravy!

You can also serve with mash potatoes and any vegetable of your liking.

I am so thrilled you are reading one of my recipes, if you made this recipe i’d love to hear about it! Thank you very much for reading and until next time see ya in the kitchen. Don’t want to miss a recipe? Sign up for our NEWSLETTER delivered right to your inbox!