Looking for an awesome way to use Pumpkin puree? Well look no further than this delicious Pumpkin Mac ‘ N Cheese with Hamburger recipe.
If you and your family like boxed hamburger helper, then trust me you have not tried nothing yet.
Because I do to but this stuff is does not even compare!
It gives it that extra creaminess everyone craves with a health benefits of pumpkin!
So I hope the next time that craving hits for some good old mac n cheese? or some gold old fashion hamburger helper.
You think of this recipe instead, because it’s that much better and healthier for you.
Plus adding in the pumpkin helps to stretch out the meal even further.
So if your feeding a bunch of little ones, you will ample to serve.
This recipe definitely cannot compare to any of the box stuff I just mentioned above.
And that is because this is homemade and you have the say in what kind of ingredients are used.
Also we are adding a whole cup of Pumpkin puree which gives it so much extra flavor.
Did you know Pumpkin puree is very good for you? It’s true, for one it helps to regulating blood pressure and is good for the heart.
Not The mention is packed full of feel good fiber, potassium, and vitamin C. So this Mac n Cheese is actually very good for you.
Once this recipe has been cooked, feel free to add 1 cup of panko bread crumbs on top along with some more cheddar cheese and bake it in the oven at 400 f for 15 minutes for something extra special. Totally depends on the time you have and what kind of dinner your wanting to serve!
Also you can go ahead and bake two batches. Just double the recipe with my easy to use recipe adjuster above and then simply use two baking pans.
Comfort food made Healthy!
I am so thrilled you are reading one of my recipes, if you made this recipe i’d love to hear about it! Thank you very much for reading and until next time see ya in the kitchen. Don’t want to miss a recipe? Sign up for our NEWSLETTER delivered right to your inbox every Month!
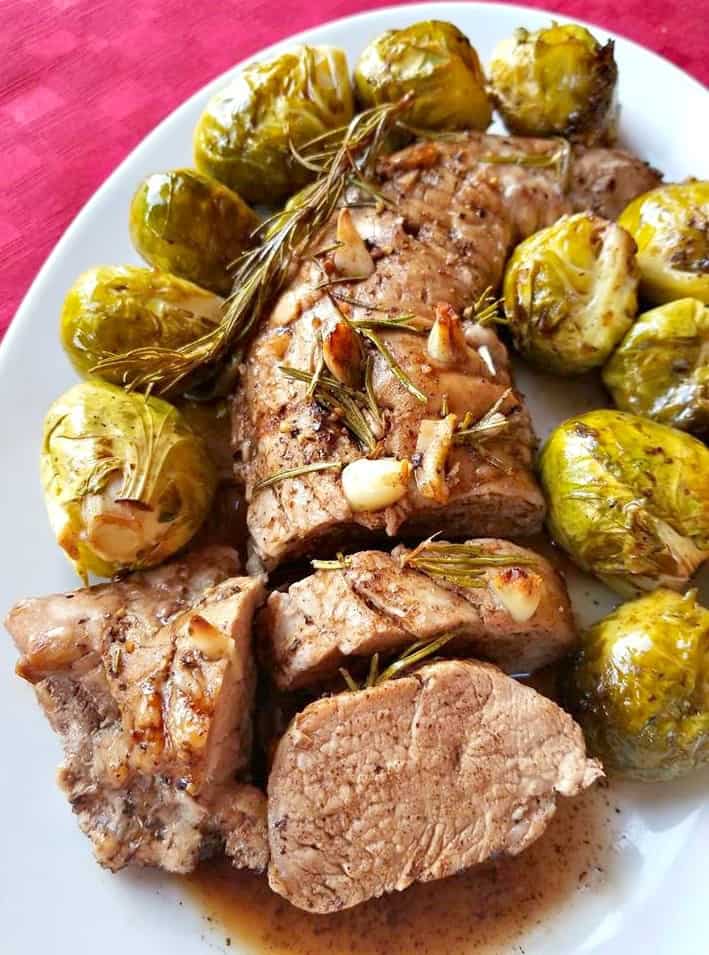
This super simple to make Balsamic Rosemary Pork Tenderloin will save you from cooking in the kitchen all day.
Wanting to serve this with some rice or potatoes? Feel free to add 1/2 cup of chicken stock to this recipe and that will create more of a broth at the end.
I saw a similar recipe done by Rachel Ray a while back and knew it was only a matter of time before I gave it a go!
Paired this delicious tenderloin with a bunch of brussel sprouts, they go great well with balsamic vinegar.
You can always try asparagus, carrots or potatoes as well.
There really is not much too it, your basically seasoning the tenderloin and then stuffing it with some fresh garlic and rosemary.
Then drizzling more olive oil over top and balsamic vinegar which helps to caramelize the meat.
Then place into a oven safe dish and baking it along with your favorite vegetable of choice.
Easy peezie weeknight dinner that can easily feed a family of 3.
Wanting to feed more people simply double up the recipe with my easy to use recipe adjust above.
I am so thrilled you are reading one of my recipes, if you made this recipe i’d love to hear about it! Thank you very much for reading and until next time see ya in the kitchen. Don’t want to miss a recipe? Sign up for our NEWSLETTER delivered right to your inbox every Month!
This Garlic Naan Bread Recipe is by far my favorite recipe for making homemade naan bread. It’s so soft and fluffy and fresh! Plus it’s pretty simple to make.
And if your looking for a few amazing curry recipes to serve alongside this bread.Then I got you!
I have also listed some other popular Indian dishes that I like at the bottom of this page.
Whenever I make Indian food at home, which is a lot.
I tend to make either naan bread or steamed basmati rice to go along with.
This garlic naan bread recipe is even better than any of those naan breasts that I have tried in our favorite Indian Restaurants.
So, I must be on to something eh?
It’s not only technique that makes this naan so good, it’s the ingredients “fresh yogurt, butter and flour that make this naan something extra special.
Giving it a taste/texture that you’re sure to love, not to mention the addition of ‘kasuri methi’ which is dry fenugreek leaf.
However if you can’t get your hands on dried fenugreek leaves then you can substitute it with cilantro. Naan bread is best made in batches, that way if you have any leftovers however (i have no idea why you would).
It can be stored easily it in the freezer for another time all you have to do is heat it prior and it’s good as the day you made it.
HOW TO MAKE GARLIC NAAN BREAD AT HOME
Easy follow along!
HOW TO MAKE GARLIC NAAN BREAD
BOWL 1: In a large bowl mix together warm water, sugar and yeast, Allow it to dissolved, roughly 10 minutes.
BOWL 2: In another large bowl add your flour, Greek yogurt, garlic powder and salt
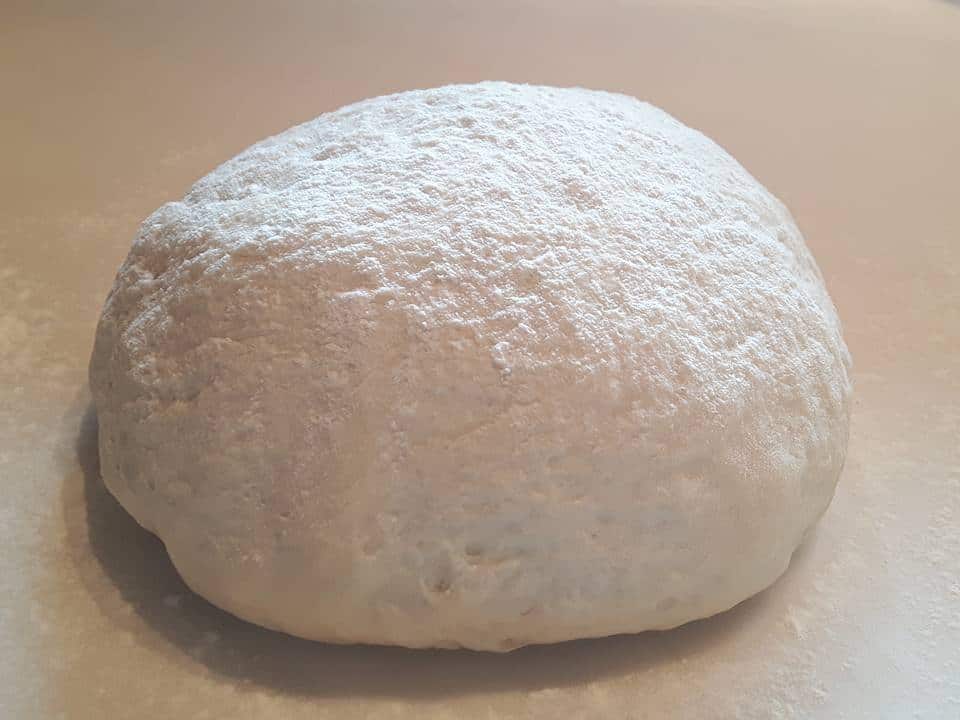
Then knead it all together with your hands in the bowl and once combined, remove from the bowl and shaped into a large ball.
Oil one of the bowl and place the big ball of dough back inside and sprinkle with some flour.
Cover it with a damp towel for 1 hour till your dough has doubled in size.
Once the dough has doubled in size, flour your counter and place the dough on top.
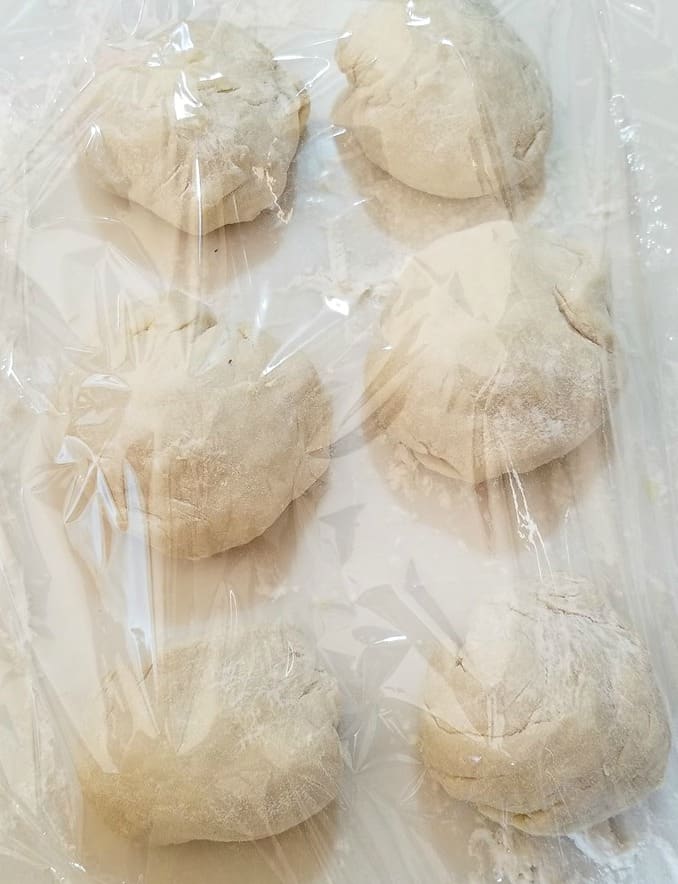
Separate the dough with a pastry cutter into 6 pieces.
Roll each into a ball with your hands, sprinkle with flour then cover with saran wrap for 20 more minutes to rise some more.
Then you can roll each one out individually to make your naan breads.
Each bread is to be fried separately! Best fried in ghee butter for a more authentic taste!
HOW TO MAKE GARLIC NAAN BREAD WITHOUT YOGURT
Simply do not add the yogurt, it will still be amazing!
Trust me I have tried both methods, the yogurt just helps it to be a tad more softer.
Cooking the Naan Bread
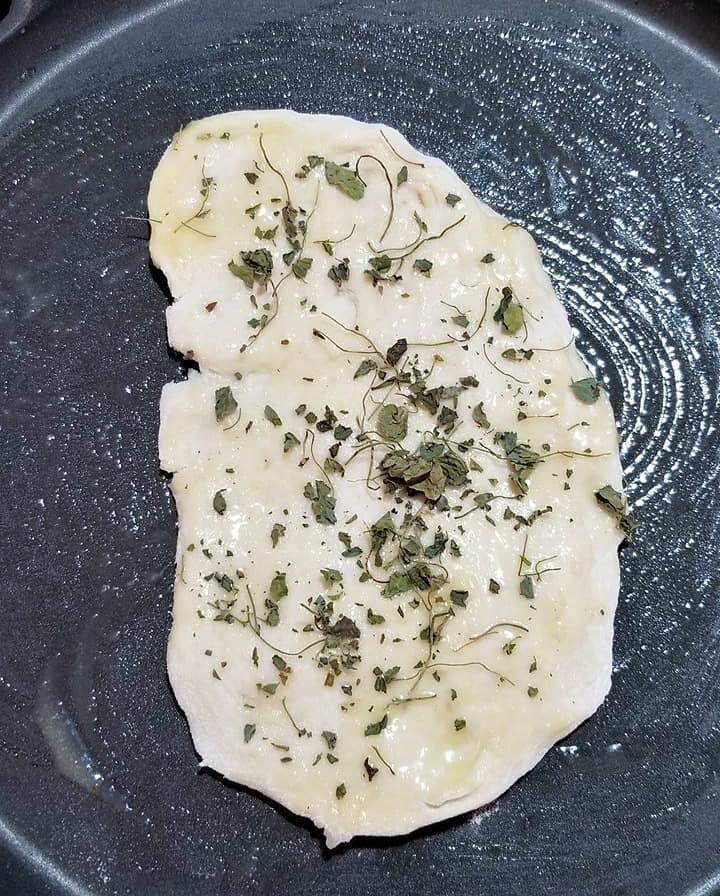
Heat a your skillet over medium – heat and with a basting brush, season the skillet with some ghee/butter.
One by one, roll your dough out and place onto the skillet individually.
You will see tiny bubbles form on top the dough (see picture above) roughly around 1-2 minutes as the dough begins to take on a light brown color underneath, this is when you will want to flip the dough over.
However before flipping the dough brush with ghee/butter and add fenugreek leaves, then flip.
Cook on the other side for 1 minute or until golden and transfer to your serving plate and cover with a towel to keep warm.
REPEAT steps 3-5 till all pieces are cooked.
Serve warm.
Kasoori Methi = Dried Fenugreek Leaves.
Sprinkle some on your NAAN for that extra flavor
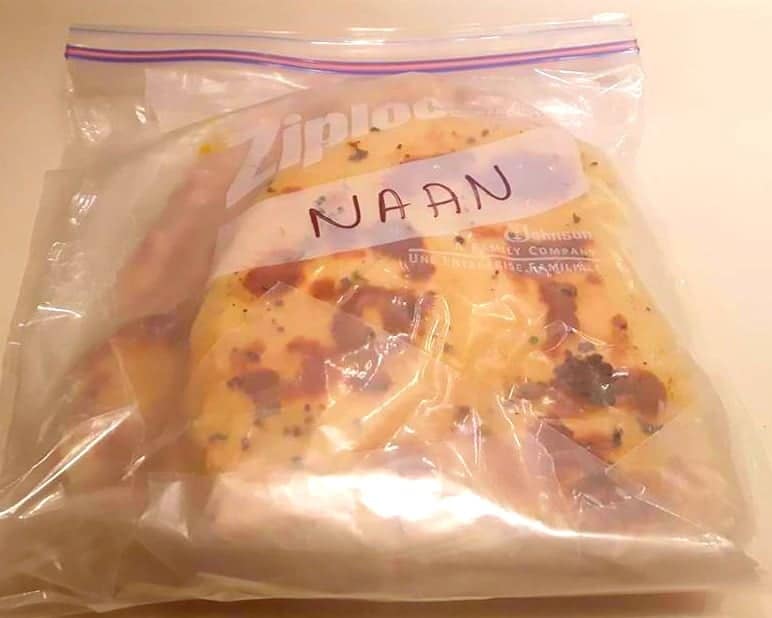
Leftover Naan: Double up the recipe if you want to freeze some for later. Naan Bread can be frozen easily by placing in a zip lock bag. Just place parchment paper in-between each one. This will sea in the freshness and allow you to remove each piece, one at a time as needed. (see pictures below
You can freeze for another time, simply heat up in the microwave
I’m thrilled you are reading one of my recipes, if you made this recipe i’d love to hear about it! Thank you and until next time see ya in the kitchen. Don’t want to miss a recipe? Sign up for our NEWSLETTER delivered right to your inbox!
Below you will find some popular recipes from this blog that go great with this naan bread:
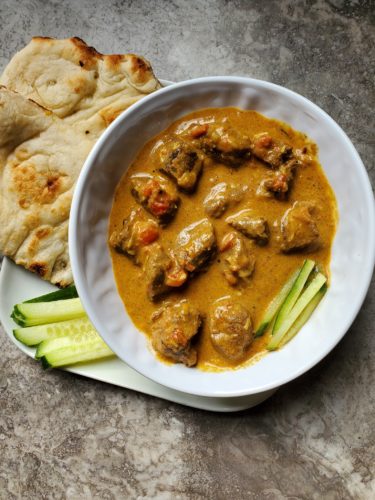
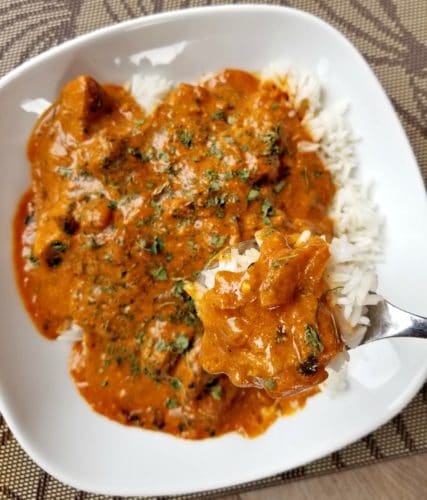
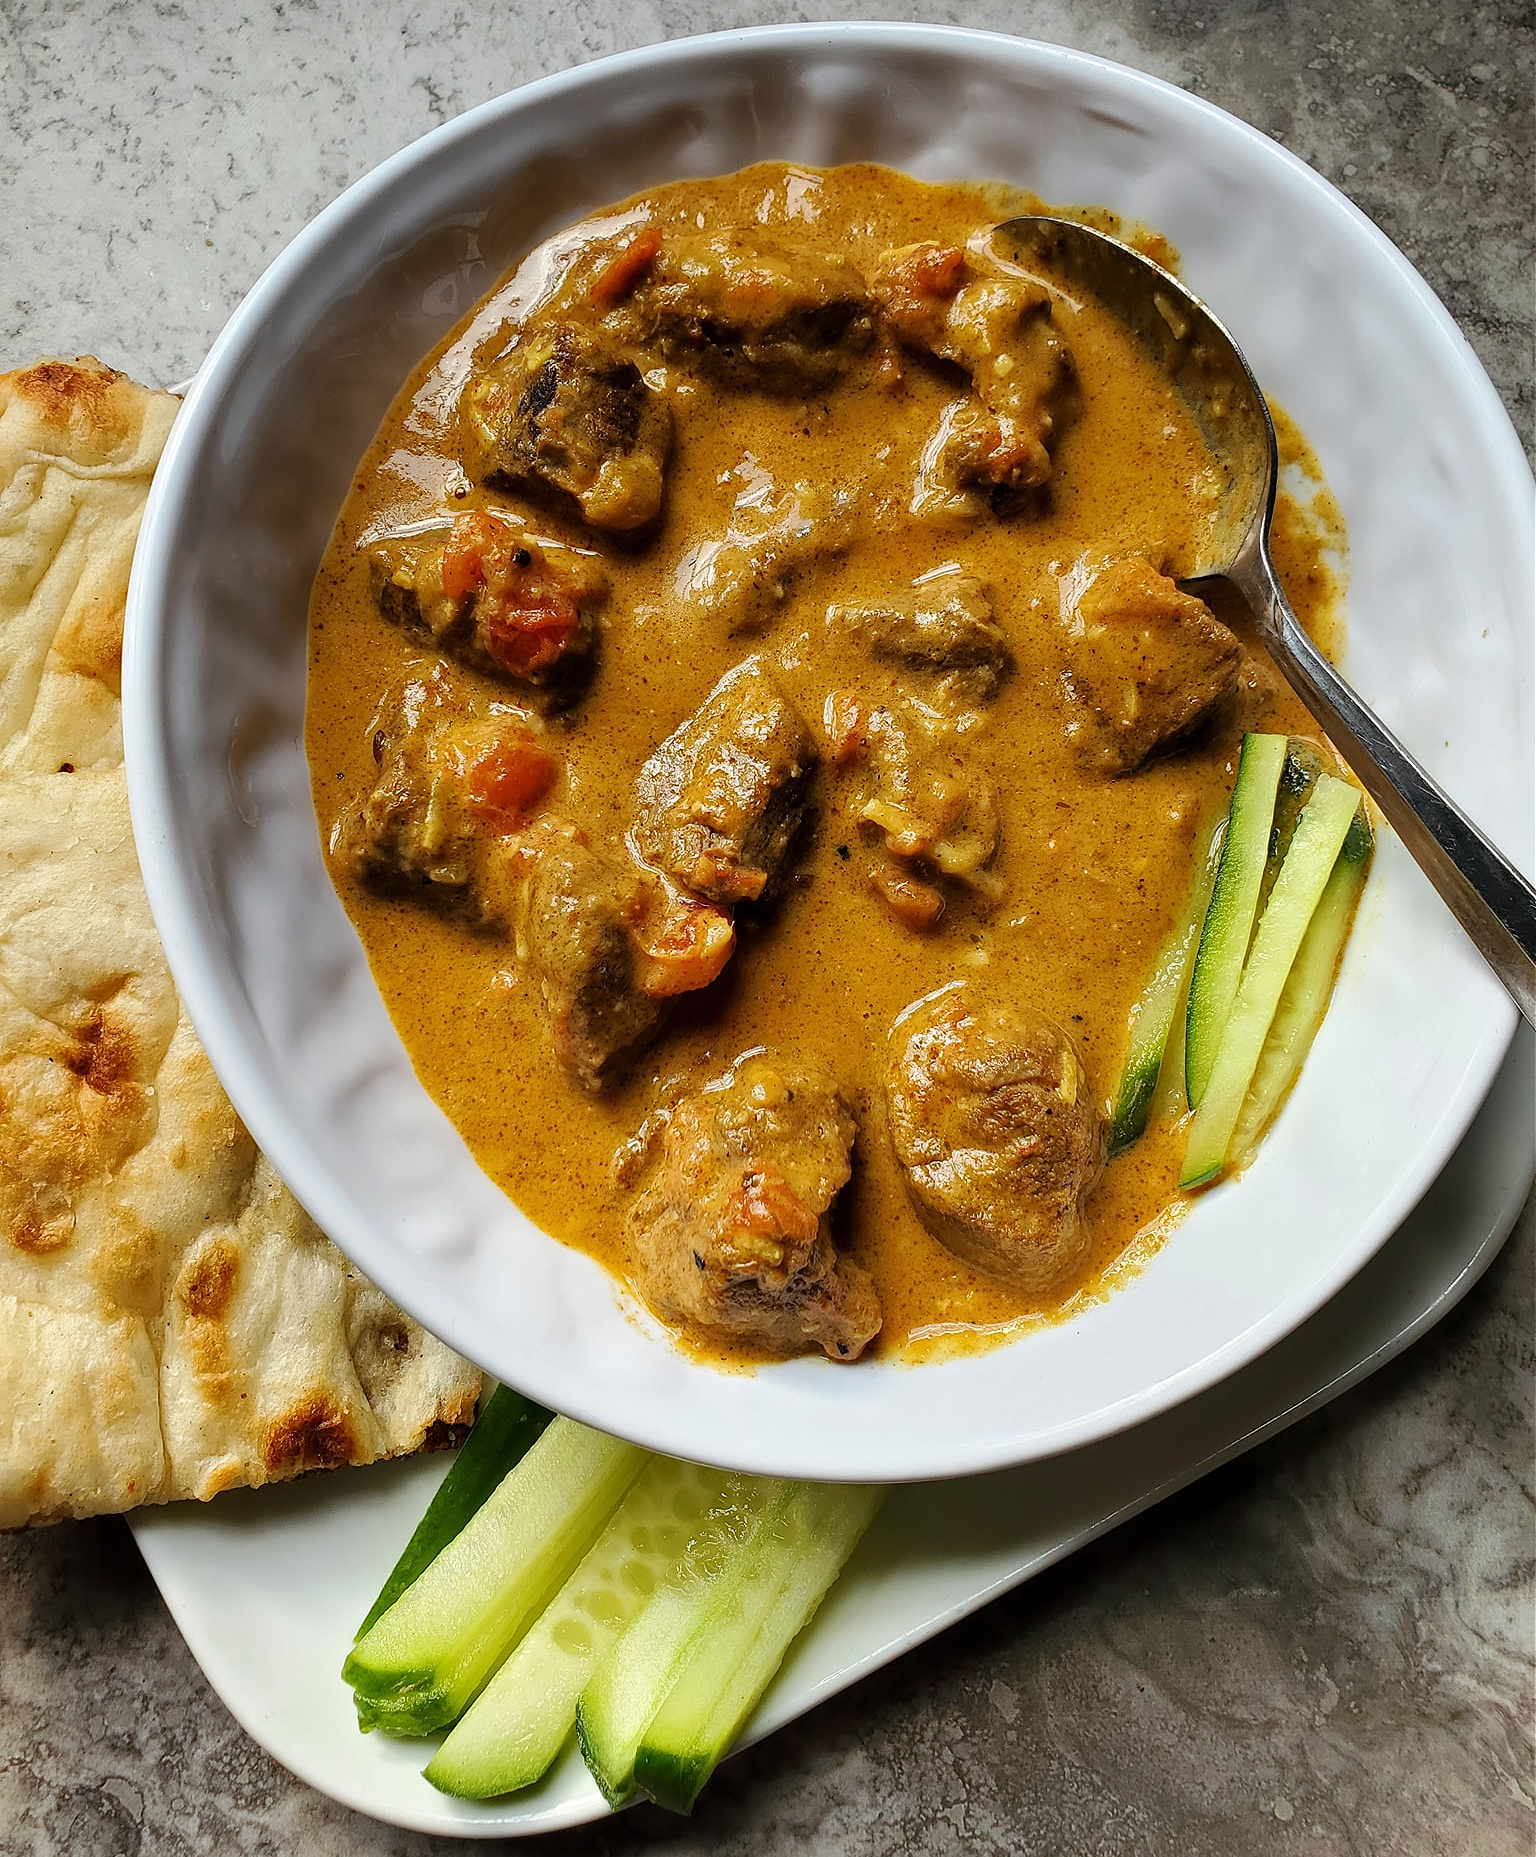
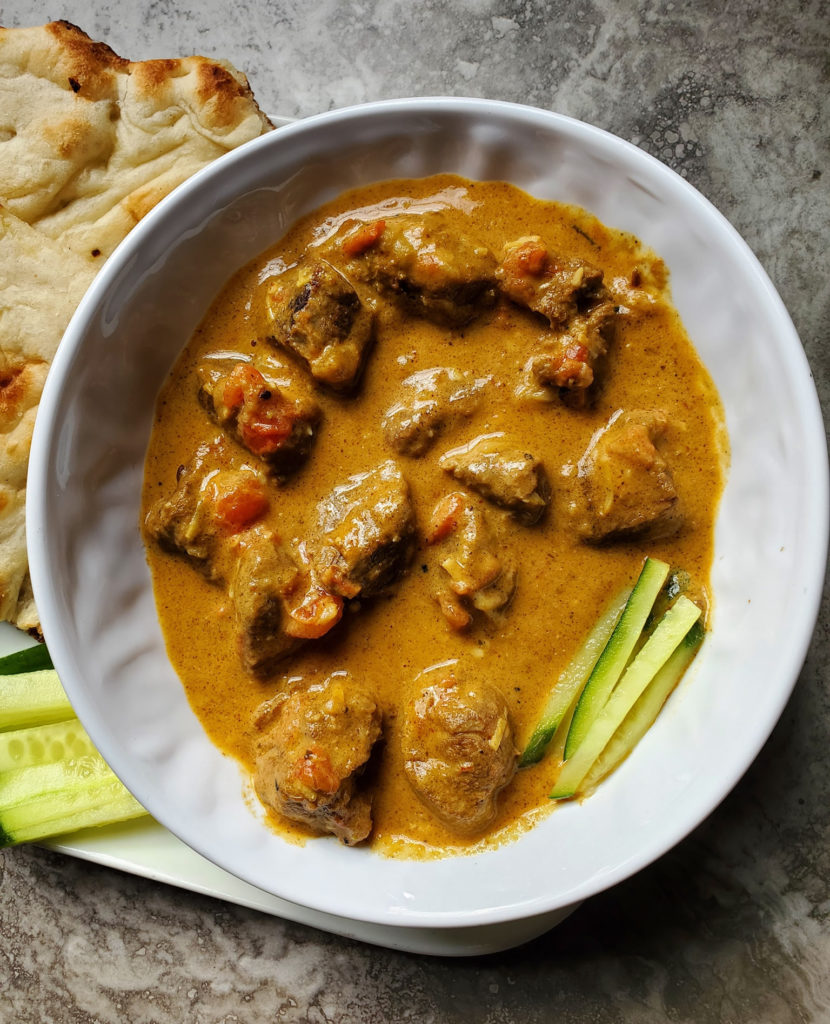
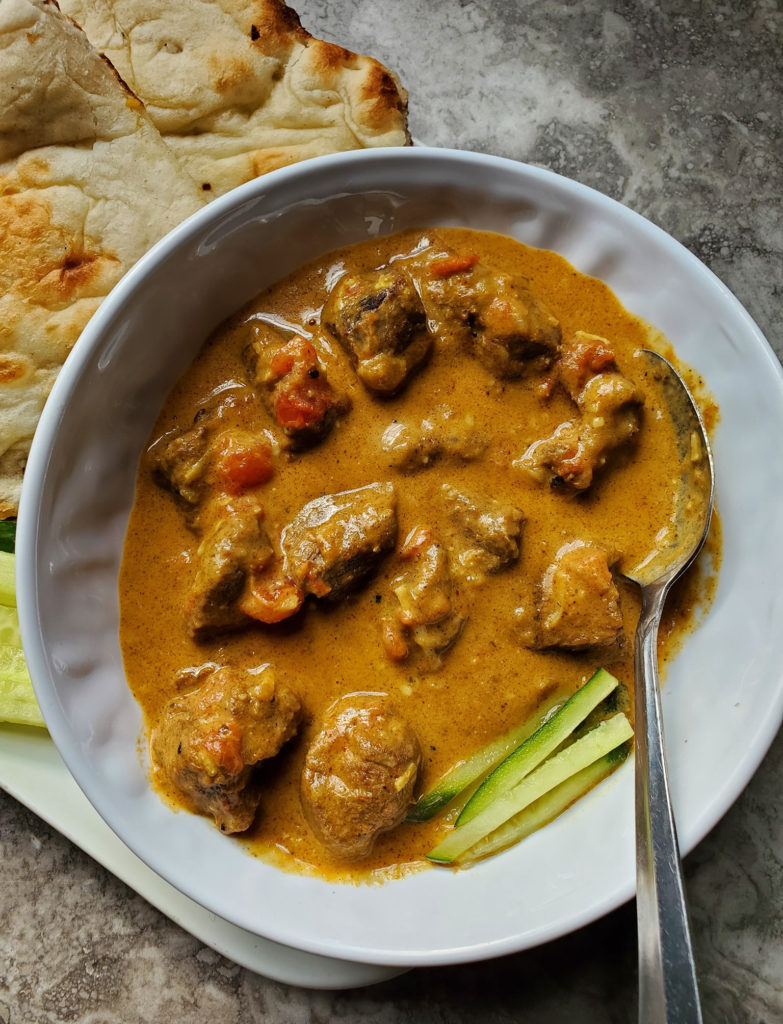
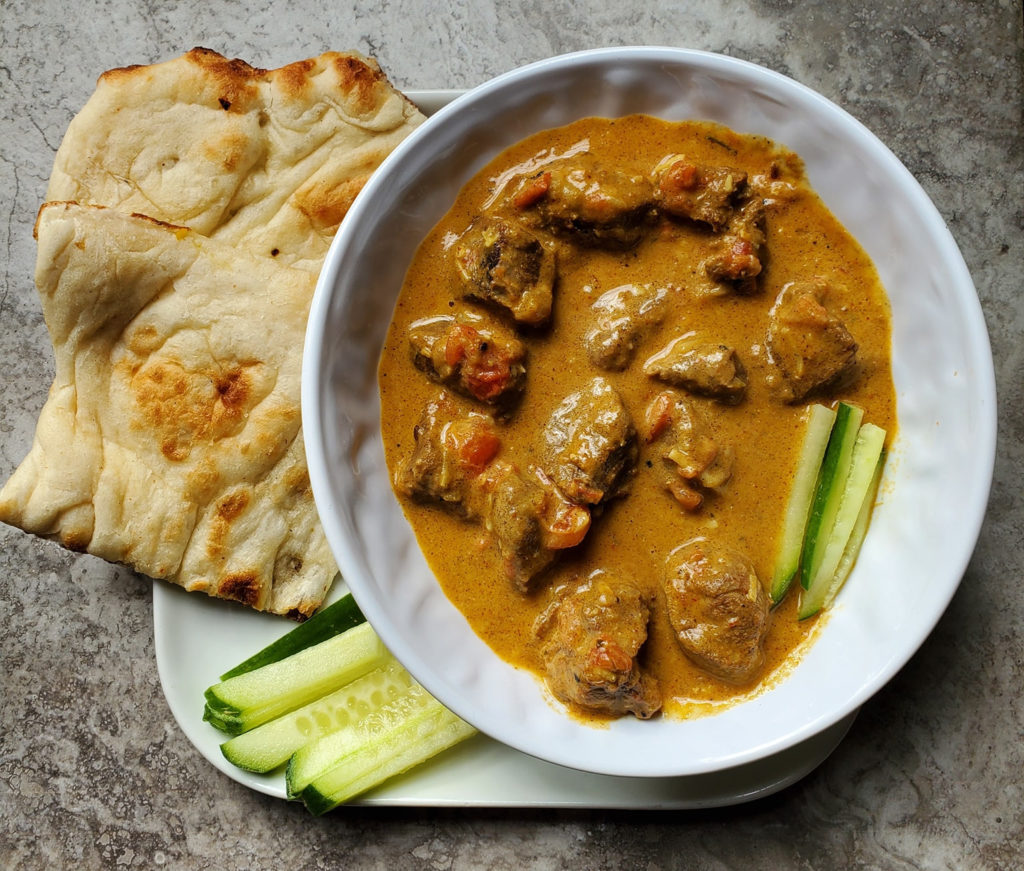
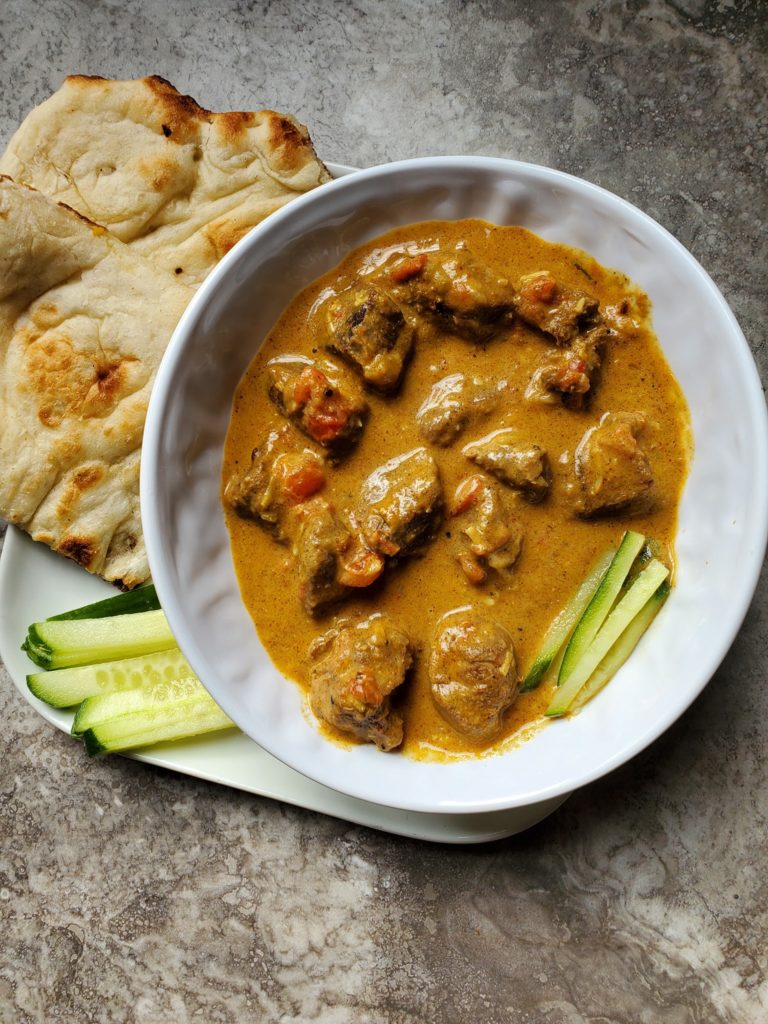
This Easy Indian Lamb Curry also known as (Karahi Gosht) is super quick and easy to prepare and is just like something you would order from your favorite restaurant.
You can make it in your pressure cooker or on your stovetop in under 30 minutes making it a great weeknight meal or a great dish for meal prep throughout the week!
Making curry doesn’t have to be hard. You just need the right spices, directions and ingredients and you too can be enjoying some of the same foods at your favorite restaurants.
And the nice thing is that once you purchase the basics, you will have everything you need in stock for the next time you’re in the mood for some delicious curry.
IS LAMB CURRY KETO
Yes
WHICH LAMB CURRY IS THE BEST
This one of course! As it is made with cubed lamb and has all the right spices in it, and is also know as Kahari Gosht.
WHAT IS KARAHI GOSHT
Karahi Gosht is typically made with either goat, lamb or chicken, in a “WOK” called a “Karahi” and the”Gosht” refers to the mutton. Which is the most popular meat used for the recipe.
Gosht karahi is a dish that comes from the Indian subcontinent that is noted for its spicy taste; however originates from Pakistan.
IS LAMB CURRY HEALTHY
Yes, it is packed with protein and comes in a low fat sauce.
IS LAMB CURRY SPICY
Not really, curry has some spice to it but on a heat level I would give this curry a 1 out of 5.
You can make it more hot of course by adding more cayenne pepper.
I have been making Indian curries at home for years. So when I say this recipe is “easy” I mean it.
You do not have to be some sort of Indian chef to make Indian food.
Why You’ll Love This Recipe
You can make this dish more spicy, by simply adding more cayenne pepper if desired.
I like to make this recipe at home often because it’s super simple and healthy and doesn’t contain any MSG or preservatives.
You can make it in large batches which makes it a great budget friendly dinner option.
Add in your favorite vegetables to boost the nutrition.
You can easily make it on the stovetop or in a pressure cooker.
Ingredients You’ll Need
Cooking Oil or Ghee – This is what you’ll use to saute the lamb, onion, garlic and ginger. It will help brown them and bring out the flavors.
Boneless Lamb Cubed – Lamb is the main protein source of this dish, but feel free to use any protein you enjoy.
Fresh Tomatoes – Which help to give it more depth of flavor
Onion & Garlic – These two aromatic vegetables add a great layer of flavor to chicken curry.
Raw & Canned Tomato – You’ll need a mix of raw tomatoes and tomato paste for this recipe. Tomatoes add a great color and acidity to curry dishes.
Ginger – Ginger helps give a spicy flavor that pairs well with any curry recipe.
Full Fat Yogurt & Cream – These two ingredients help give the curry a nice creamy texture.
LAMB CURRY WITH COCONUT MILK
You can use coconut milk in replace of the yogurt and cream if desired.
Homemade Curry Spice Blend
You can use a premade spice blend or a curry spice blend made from scratch!
1 1/2 tbsp Garam masala
2 tbsp Curry powder
1 tbsp Turmeric powder
1 tbsp Sugar
1 tsp Coriander
1 tsp Cumin
1 tsp Cayenne pepper
1 tsp Salt
You can also buy a pre – made Karahi Gosht Spice Mix. This can be found in most Indian grocery stores.
How To Make Karahi Gosht
In a large pot or into a slow cooker pot add the cooking oil/ghee and turn on the heat. Next add in a large diced onion and saute for 2 minutes before adding in the diced mutton. Saute another 7 minutes or until the mutton is no longer pink and the onion is tender.
Next toss in the curry and remaining spices and saute another 2 minutes before adding in the minced garlic and ginger. Saute for 1 minute till fragrant.
Add in the tomatoes and smash with a potato masher till pureed.
Next add in the yogurt, cream and stir everything to combine.
Simmer on low – medium heat covered for 30 minutes.
Serve hot on top of your favorite rice or with naan bread.
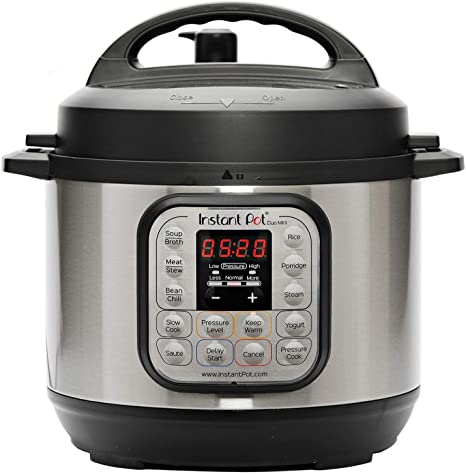
Pressure Cooker Karahi Gosht
If you’d like to make this recipe in your instant pot or pressure cooker, follow these steps:
Add cooking oil/ghee into the pot and turn it to SAUTE mode.
Next add diced onion and saute for 2-5 minutes or until it begin to soften.
Add in diced mutton and saute for another 2-5 minutes or until mutton is no longer pink.
Toss in the curry and spices along with garlic and ginger.
Add in the tomatoes, cream and yogurt.
Close the lid and seal. Cook on manual high pressure for 10 minutes.
Release naturally or quickly, stir then serve hot over rice.
Slow Cooker Karahi Gosht
You can also make this recipe in your crockpot or slow cooker by following the instructions below:
Saute all ingredients except tomatoes, cream and yogurt in a skillet over medium high heat for 5-8 minutes or until onion begin to soften and mutton is no longer pink.
Add everything to a slow cooker including the tomatoes, cream and yogurt and stir until fully combined.
Cook on low for 8-10 hours or on high for 5-6 hours or until mutton is fully cooked through.
Stir everything together and serve hot on top of your favorite rice.
FAQ
CAN I USE COCONUT MILK IN ?
Yes, you can subsite the yogurt for a thick coconut milk if desired. Check out my popular Coconut Chicken Curry Recipe if you are looking for a creamy and dairy free curry.
This is one of my favorite curries, well i’d say my top 10 favorite curry I just love curry if you did not know that about me already!
I hope you give it a try it’s a very tasty dish, and be prepared to watch it disappear before your eyes, it’s that good folks.
Serve alongside some naan bread, or rice and you have yourself an amazing curry.
I am so thrilled you are reading one of my recipes, if you made this, I want to see! Follow Canadian Cooking Adventures Instagram, snap a photo, and tag and hashtag it with @canadiancookingadventures and #canadiancookingadventures.
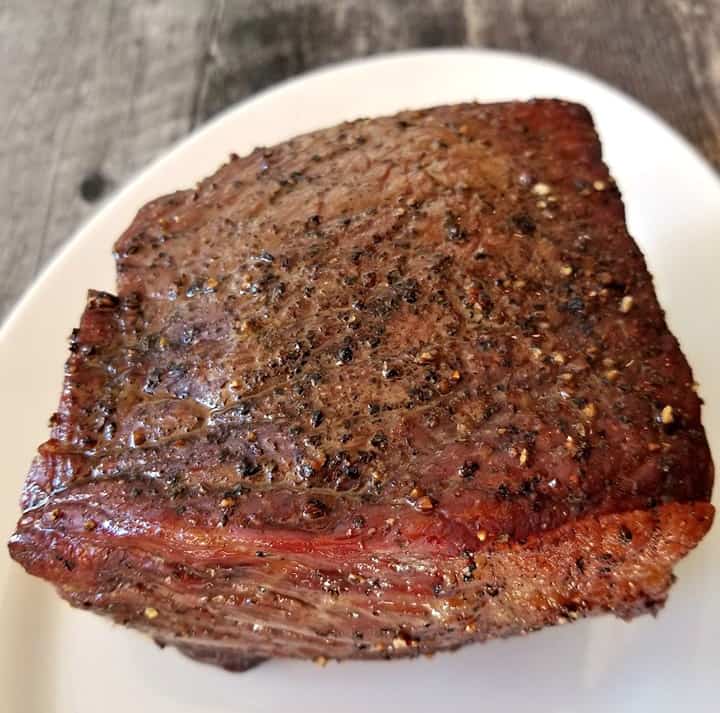
This Simple Roast Beef Recipe is just that simple to make. All we are doing here is seasoning with salt and cracked pepper and baking at 375 f for 1 hour.
WHAT KIND OF ROAST BEEF IS GOOD FOR THE HOLIDAYS
RIBEYE ROAST is typically used more for around the holidays and has a fine texture.
However you can use whatever type of roast beef you want as all the below cuts do work well for baking in the oven.
TENDERLOIN is the most tender and some people prefer that
TOP SIRLOIN ROAST is a lean cut of beef and is a smaller version of the Top Sirloin roast.
EYE OF ROUND ROAST is also a lean cut, that can be roasted or slow-cooked.
SIRLOIN TIP ROAST is a lean cut of meat as well, typically cheaper and good for roasting.
RIBEYE ROAST is typically used more for around the holidays and has a fine texture.
BOTTOM ROUND ROAST is also a lean meat and good for roasting.
WHAT ROAST BEEF IS THE MOST TENDER
The Rib Roast
So depending on what you can find in the store it is best to keep all the above in mind.
If the Rib Roast is on sale or it is around the Holidays.
I will splurge and pick that up, however on most occasions I will go for a cheaper cut and it works just fine for us.
What I like to do is make a Roast say on a Sunday, then slice it thin the next day and make hot “Roast Beef” sandwiches for the next night’s dinner. It allows me to cook one meal and have it for two dinners for us all in one.
A roast beef sandwich consists of thinly cut beef, mustard, cheese and lettuce on a Kaiser bun.
CAN ROAST BEEF BE PINK
Yes, some people PREFER their meat rare. Rare is when you cut the beef in the middle with a knife and it is bright pink in the middle.
Well done meat, has no pink inside at all.
So what type of roast are you familiar with making? I encourage you to give this simple recipe a try.
Really it is not difficult at all to prepare. I like to bake this in a cast iron skillet, however you can do it in a dutch oven or any other type of baking pan.
Also be sure to remove the Roast once cooked from the baking pan and allow it to sit for 20 minutes before slicing and serving.
You also will have some beef drippings left in the roasting pan, so feel free to add 1 tbsp of cornstarch and 1/2 cup of water in their to create a gravy if desired.
WHAT TO SERVE WITH ROAST BEEF
Mashed Potatoes
Gravy
A Vegetable of your liking
Salad
SPICES THAT GO WELL ON A ROAST
Rosemary
Sage
Paprika
Onion Powder
Garlic Powder
Oregano
Cayenne pepper
The recipe I GAVE was for a basic Roast, sometimes I will use Rosemary too and garlic powder.
But for this recipe I wanted to keep it simple.
And simple is DELICIOUS too!
IS ROAST BEEF GLUTEN FREE
Yes
HOW TO MAKE ROAST BEEF
BEFORE COOKING LET YOUR ROAST SIT OUT ON THE COUNTER UNTIL IT REACHES ROOM TEMPERATURE.
You can use COOK Roast beef in your favorite Roasting pan or a cast iron skillet which I prefer.
First you will want to preheat your oven to 375 F
Then unwrap your Roast and place it on a large cutting board.
If there is string around it, cut it off and remove.
Season generally on all sides with cracked pepper, using your hands to make it stick all over.
Then you will want to season it on all side with salt.
Place in the oven on your Roasting Pan on the middle rack and cook anywhere from 2 to 3 hours. It is recommended to cook for “20 minutes per pound”.
Serve and enjoy!
HOW TO MAKE CASHEW CHICKEN SAUCE
Some people use Hoisin sauce in there sauce, I prefer Oyster which makes it less sweet.
Oyster Sauce – feel free to use Hoisin
Soy sauce
Cornstarch
Sesame oil
Shaoxing wine
Chicken stock or Vegetable
Sugar
White pepper
IS CASHEW CHICKEN SWEET
Cashew chicken should not be only sweet, however there are some places that make it sweet. Traditional Cashew Chicken should have a balance of flavors. Which make it sweet, spicy and savory!
WHAT TO SERVE WITH ROAST BEEF
You can try and of these side dishes below, all would go well with Roast Beef.
Notes: This recipe can also be made with just about any meat such as chinese pork, beef or shrimp. Plus, if you like a little more heat to your dish then feel free to add some red pepper chili flakes or some fresh chili paste.
DID YOU MAKE THIS RECIPE?
If you make this recipe, I would love to hear about it! You can leave a 5 star review in the comments below! Thank you very much for reading and until next time see ya in the kitchen. Don’t want to miss a recipe? Sign up for our NEWSLETTERdelivered right to your inbox!
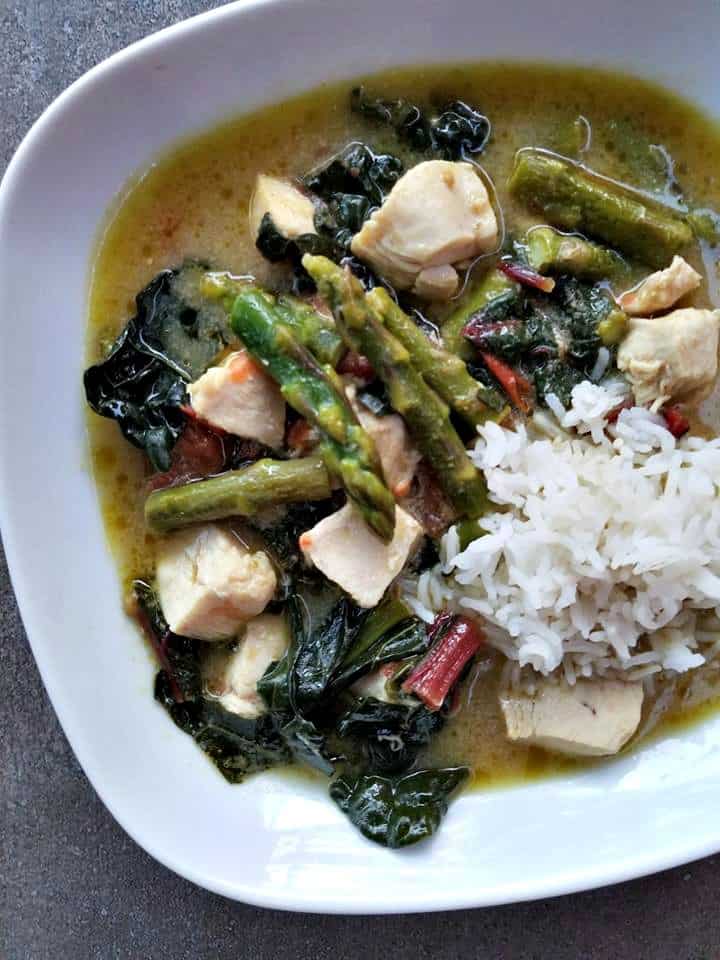
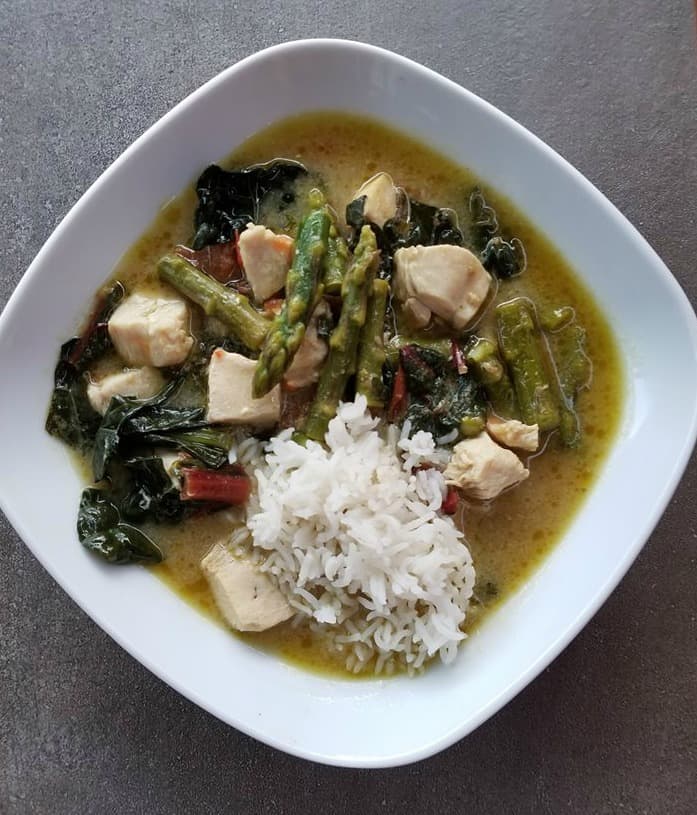
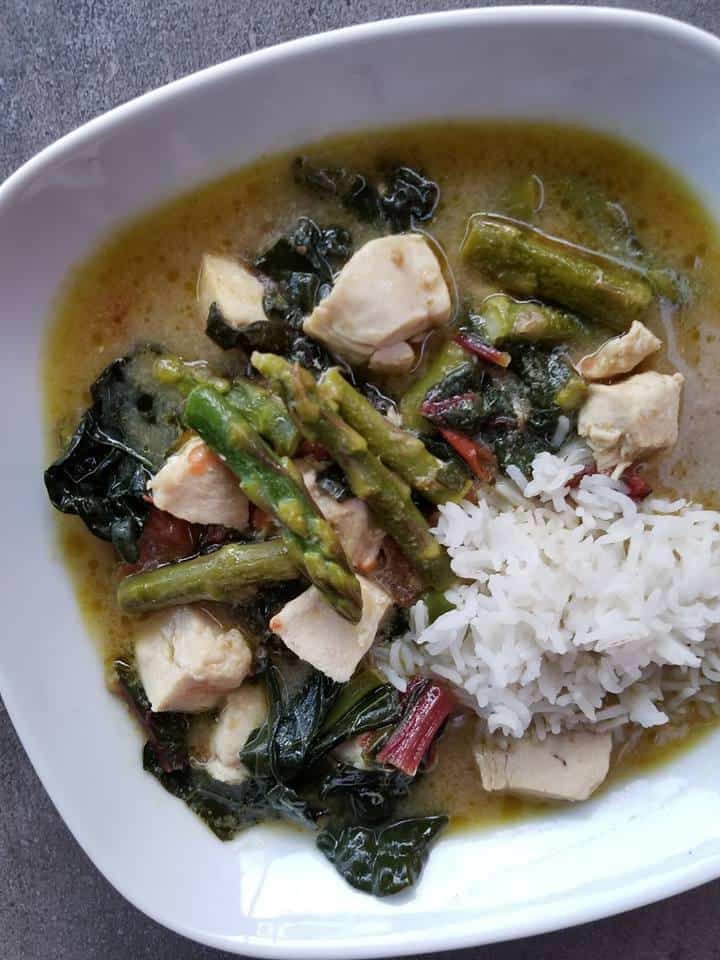
This Easy Green Thai Curry can be pulled together in less than 30 minutes!
WHAT DOES GREEN THAI CURRY TASTE LIKE
Green Thai Curry has hints of spice, tang and sweet flavors. It really is something special and this recipe has all the same tastes that you would find at your local Thai restaurants too!
You may have thought that making Thai curry at home would be complicated, but I am here to tell you it is not.
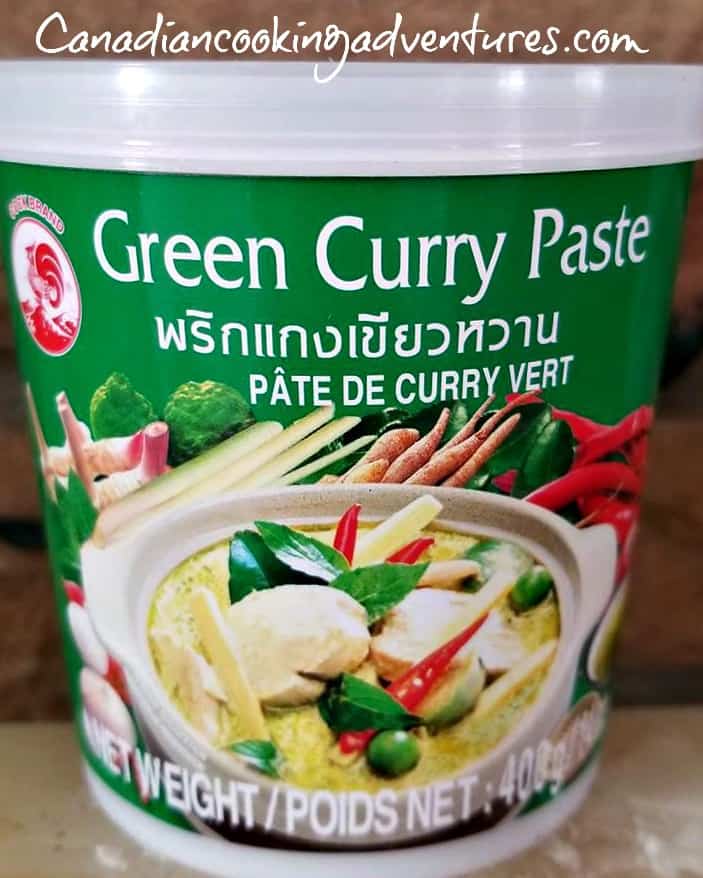
However I have found a healthy paste product that contains all those foreign ingredients that is out of this world amazing.
It will not only taste the exact same way as making it all from scratch, it will save you all the hassle of learning to do that and time.
What am I talking about? My favorite GREEN THAI CURRY PASTE! You can see that below!
Green Thai Curry is just a bit milder than Red Thai Curry, however both taste similar. There are plenty different ways to make Thai curry and that is because you can add just about any type of vegetable or meat protein to your dishes.
WHAT IS IN GREEN THAI CURRY
Thai Green Curry consists of some kind of protein, some kind of vegetable, lime juice, fish sauce, sugar and Coconut milk and Green Curry Paste.
Traditionally that paste is made in a mortar and is comprised of shallots, garlic, green chilies, galangal, lemongrass, kaffir lime leaves among some other ingredients and spices.
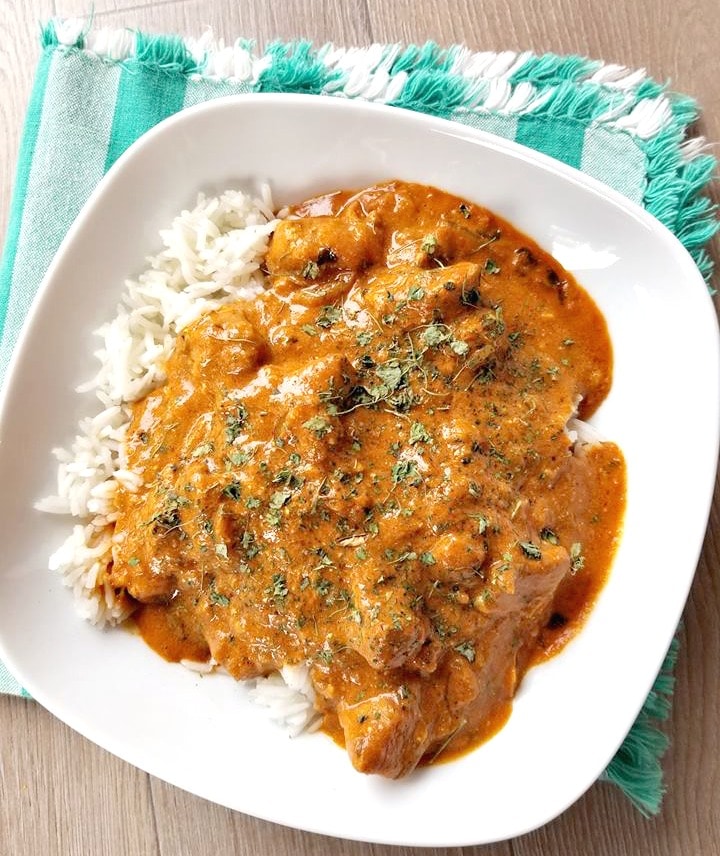
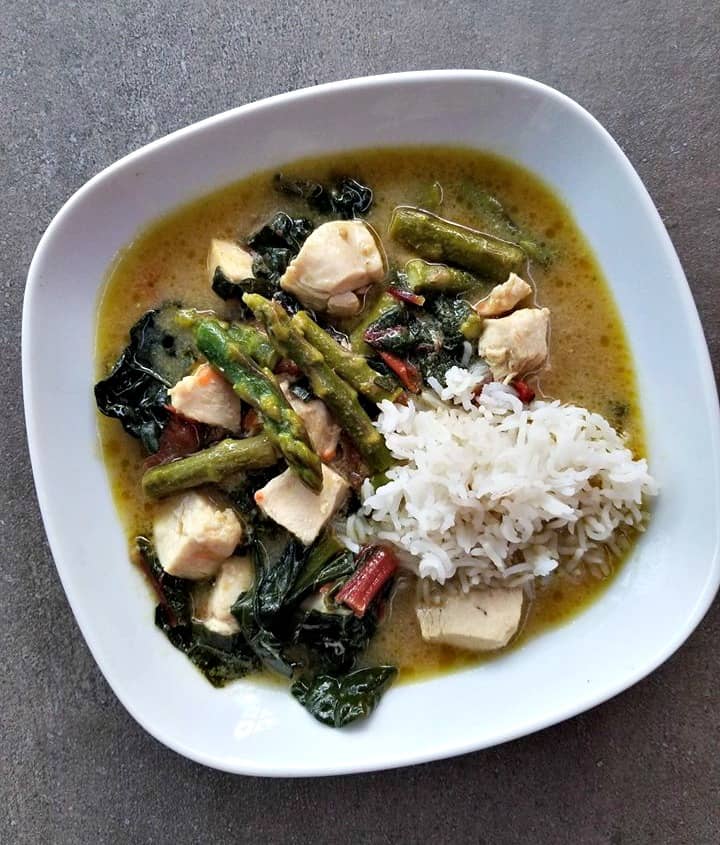
This one here is made with Chicken breasts, Asparagus and Swiss Chard.
As you may know I love Thai food and make it a lot in our home. Actually I make it every week, because I crave it that much. With any of my Thai recipes, you will learn that you really only need a few ingredients in your fridge and pantry to make any of them easily.
And that is because, I have been making homemade Thai recipes for years. And have learned all the tricks to making it quickly and healthily for just about anyone who loves it.
Making homemade Thai curry at home is really easy once you have all the basic ingredients!
Once you picked your vegetable and protein you will simply want a quality coconut milk product (the less liquidity) the better and a pre-made green Thai curry paste along with some fish stock, sugar and salt.
WHAT’S IN GREEN THAI CURRY PASTE
Fresh Green Chilli
Lemongrass
Garlic
Shallots
Galangal
Cumin
Coriander seeds
HOW MUCH GREEN THAI CURRY PASTE TO USE
2 tbsp per 400 grams of Coconut Milk
The ONLY brand I will use!!
IS GREEN THAI CURRY GLUTEN FREE
YES!
IS GREEN THAI CURRY KETO
Yes
VEGETABLES THAT GO GREAT IN GREEN THAI CURRY
Kale
Spinach
Red, Green, Yellow or Orange peppers
Swiss chard
Asparagus
Mushrooms
PROTEINS THAT GO GREAT IN GREEN THAI CURRY
Shrimp
Chicken
Tofu
IS GREEN THAI CURRY HEALTHY
YES, Thai Curry is very healthy for you!
So what are you waiting for?
Skip the takeout tonight and make this quick and easy dish right in the comfort of your own home.
Something to be savored!
Some people like to use one can of coconut for their Thai curries. I will do that at times too, however for this recipe I used two cans of light coconut milk which helps to make this dish go father and serves more people.
One can typically serves two people for dinner, two can’s can serve three. Being I adore Thai food, I will eat it all to myself if I can.
Another reason I like to use light coconut milk is because it’s healthier and being that I eat this dish almost every other week. It works well for me!
However if your wanting a thicker sauce, you can use full fat coconut milk. Both work really good in this recipe and is something I do use at times.
Before you know it you will be a TOP CHEF in your kitchen, cooking Thai dishes like a Pro.
WHAT GOES WITH GREEN THAI CURRY
Jasmine Rice
Vermicelli Rice
If you love Thai food as much as me, then you will want to try my other thai dishes! All are AMAZING and really are some of the best ways to make Thai at home in a fraction of the time.
Note: Want more heat, simply add in more Thai Green Curry Paste.
I’m thrilled you are reading one of my recipes, if you made this recipe i’d love to hear about it! Thank you and until next time see ya in the kitchen. Don’t want to miss a recipe? Sign up for our NEWSLETTER delivered right to your inbox!
Newfoundland Cod Au Gratin is a traditional recipe that comes from the Maritimes in Eastern Canada. It’s also super easy to make and absolutely delicious!
Newfoundland Cod Au Gratin
If you’re looking for a excellent recipe that utilizes fresh or frozen cod fish, then you have just found it!
It is finished off in the oven or under the broiler till it gets perfectly browned.
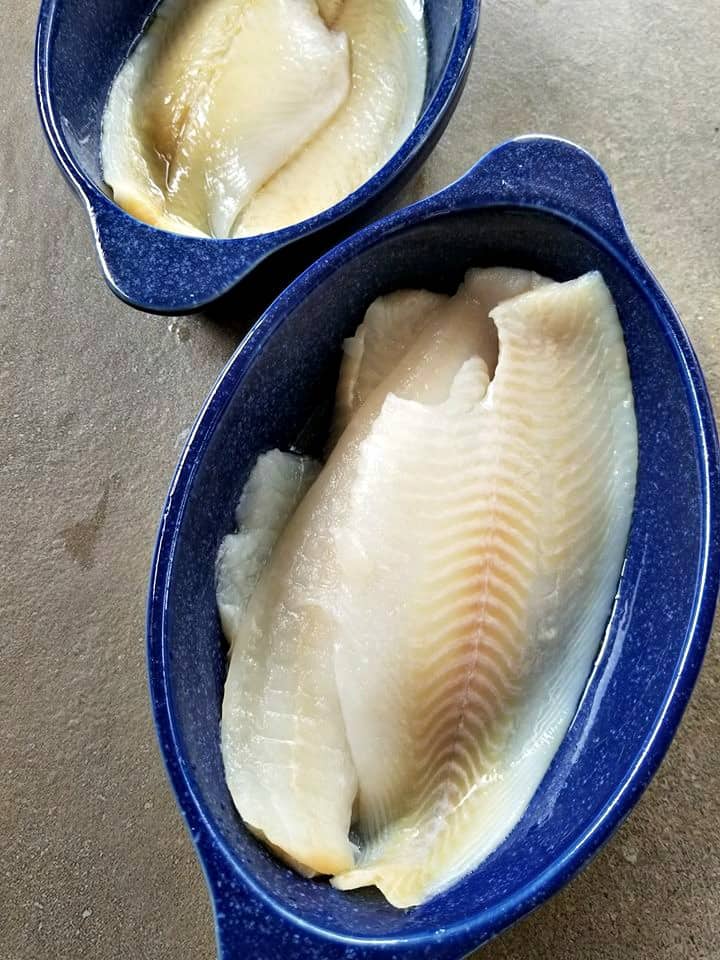
I made my cod au gratin in two oven safe baking dishes, however you can also make this exact recipe in a 8.1in X 2.1in baking dish.
Wanting to make more? Simply double the recipe with my easy to use recipe adjuster above in the ingredients section! Then you can use a large baking dish and serve more people with that!
WHAT IS COD AU GRATIN?
Cod Au Gratin is a dish that originates from the maritime provinces in Canada, Newfoundland to be exact. It is a dish consisting of fresh cod, flour, bread crumbs, lemon juice, cheese, and other seasonings and spices.
Some people use breadcrumbs and onions, while others don’t. For this dish we used onion powder, panko bread crumbs and a little dijon mustard. It is all about personal preference when it comes to making this or any dish.
We ask our Direction of Operation what he thought, about the dishes original origins. He stated that it is a well known fact that Newfoundland has a deep connection to it’s Irish and English heritage.
However he thinks that the dish was introduced by the French. What do you think?
If anyone knows indefinitely, we would love to hear about it!
CAN I USE FROZEN COD FOR COD A GRATIN?
Yes, and that is what I used. Just be sure to defrost it and pat it dry prior to using. I find the best way to defrost fish is in a warm bath of water. Not hot and not cold, luke warm is perfect.
HOW TO MAKE NEWFOUNDLAND COD AU GRATIN?
HOW LONG TO COOK COD AU GRATIN
You will want to start with some fresh cod or frozen that has been defrosted and patted dry.
Then you will want to set aside some shredded cheddar cheese and parmesan cheese.
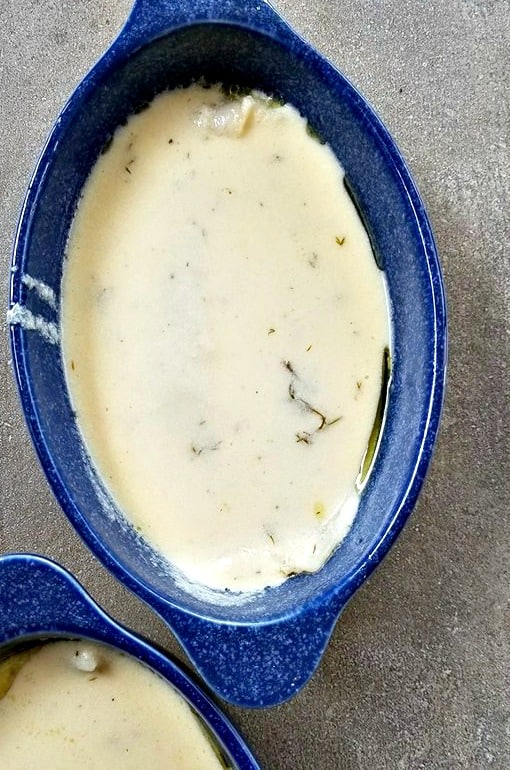
You will start by heating some milk in a small saucepan till hot, once the milk has reached that hot consistency. Remove it from the heat and create the roux.
Create a roux by heating the butter first then flour then whisking the milk in with a whisk to create a smooth texture.
Turn up the heat to medium heat before adding in the parmesan cheese and dijon mustard. Then remove from the heat and set aside.
Place the fish in the bottom of a shallow baking dish and toss with olive oil then season with onion powder and salt + pepper.
Once the fish has been seasoned, simply pour over the roux and season with fresh dill.
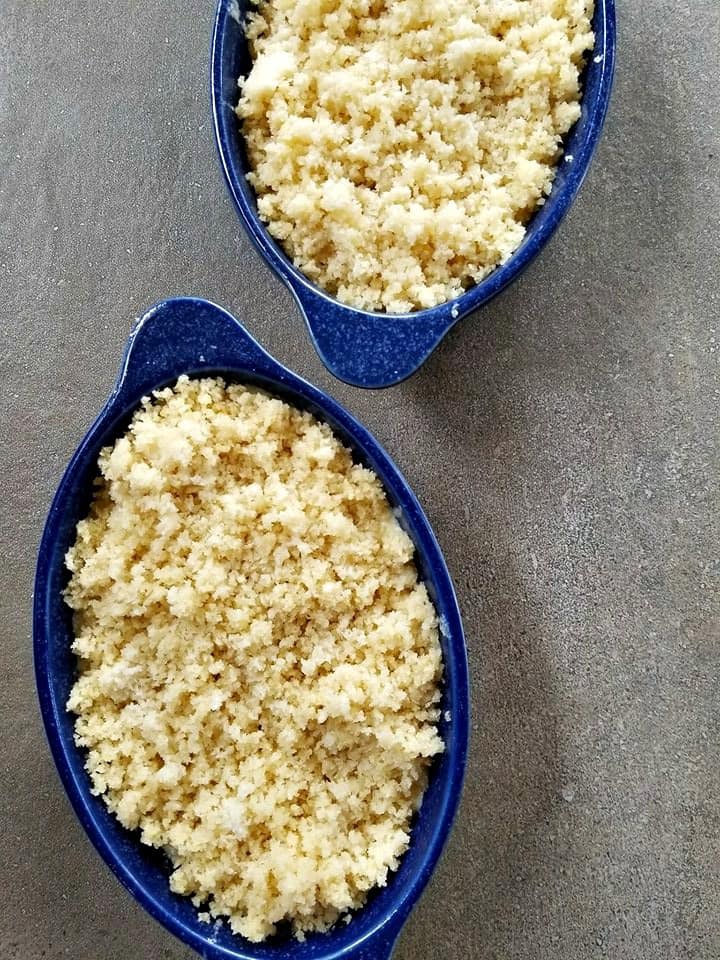
In a small bowl, mix the panko bread crumbs with olive oil and 2 tbsp of water and place overtop of the fish/roux.
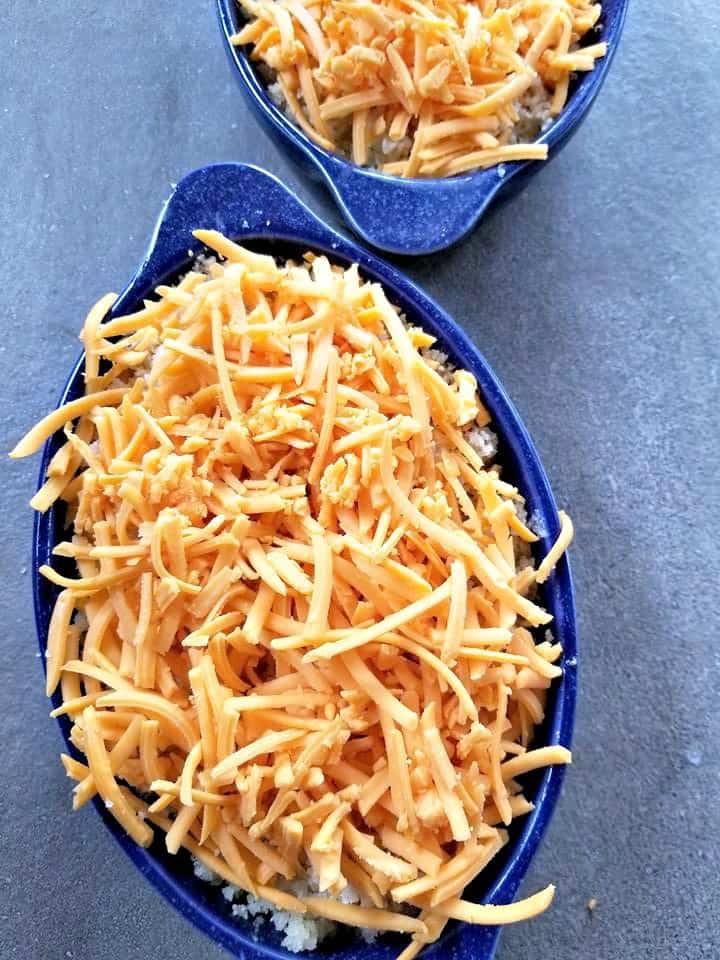
Cover with the shredded cheddar cheese and bake at 350
Individual cod au gratin dishes should take about 30 minutes.
Larger dishes take a bit longer, be sure to check the center of the dish to ensure the fish is flaky and cooked before serving!
I’m really surprised that I have never heard of this dish before, however Canada is a BIG Country.
And Newfoundland is located on the far east and I on the West. So I guess it makes sense, but now that I know of it.
I am forever hooked!! It is not only super simple to make and it is also a very healthy and a hearty meal that can be enjoyed by the whole family.
WHAT GOES WITH COD AU GRATIN?
Salad
Corn on the cob, frozen corn or another vegetable of your liking
I recently learned about this dish from another Canadian food blogger named Dawn who is over at Girl Heart Food.
She actually lives in Newfoundland and shared her recipe on her instagram feed last week, I was immediately intrigued and vowed to try it.
After doing some more research on it, I learned their are slightly different ways to make it. And so I used what skills I have in the kitchen and made my own variation.
I hope you give it a try, because it is absolutely amazing!
CAN COD AU GRATIN BE FROZEN?
Yes, that is if you are using fresh cod to begin with. You will want to purchase the freshest cod possible, then you will make the dish exactly as stated.
However before freezing it, be sure to allow the roux to cool down completely before pouring over the fish and do not bake it. Safe that for the day you want to eat it. Remove from the freezer and simply bake at 350 for 45 minutes till done!
DID YOU MAKE THIS RECIPE?
If you make this recipe, I would love to hear about it! You can leave a 5 star review in the comments below! Thank you very much for reading and until next time see ya in the kitchen. Don’t want to miss a recipe? Sign up for our NEWSLETTER delivered right to your inbox!
Inspired by two Newfoundland Canadian Bloggers, you can find their recipes here: Cod Au Gratin & cod au grati
This one pan Chinese Eggs and Tomatoes are served for breakfast and dinner in most asian homes.
It is not only super simple to make it is also inexpensive and a healthy meal option. You can also find this popular dish on the menu at almost every chinese restaurants.
We have ordered it a few times, however once you learn to make it at home you can save yourself a lot of money.
Your sure to love this breakfast and probably will make it time and time again. Keep in mind you can make this more watery than I did, some restaurants will do that so you can enjoy it alongside a bowl of rice.
However if that is your plan, be sure to use a watery tomato such as beefsteak. Rather than the Roma that I have used in my recipe.
It is not only easy to make it’s also will give you the right amount of fuel to tackle the day. To prepare this dish you will simply want to start by dicing your tomatoes. Then breaking the eggs into a shallow dish to whisk into submission.
Once that is done you can heat the sesame oil up in a the pan or wok and stir fry the eggs, the bugger the egg pieces the better so do not break them up to much,
Next you will add in the tomatoes along with the salt and sugar and saute all together before serving.
Breakfast or Dinner, totally up to you!
Did you try this? I would love to hear about your favorite breakfast memories in the comments below. Till next time friends, see you in the kitchen 🙂
I am so thrilled you are reading one of my recipes, I appreciate every single one of you! Thank you very much for reading and until next time see ya in the kitchen. Don’t want to miss a recipe? Sign up for our NEWSLETTER delivered right to your inbox