Asian Chicken Drumsticks

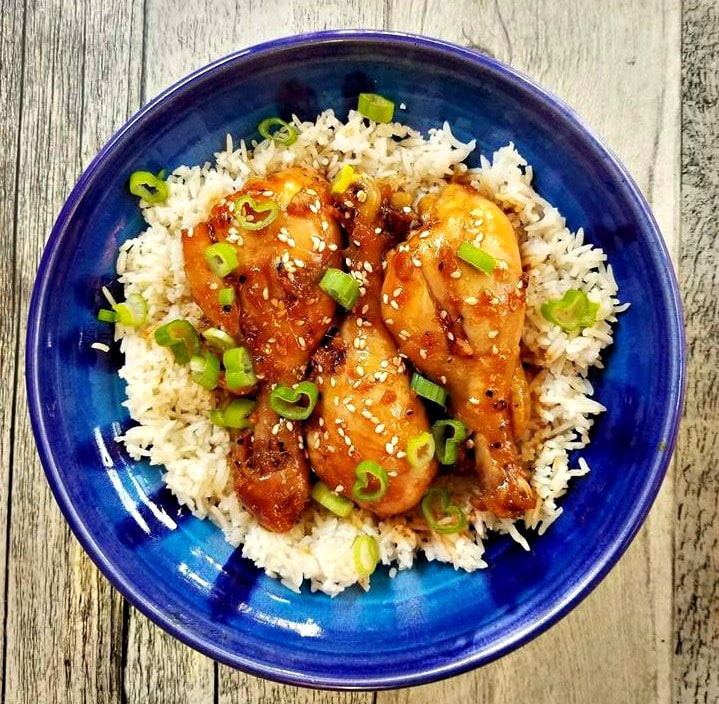
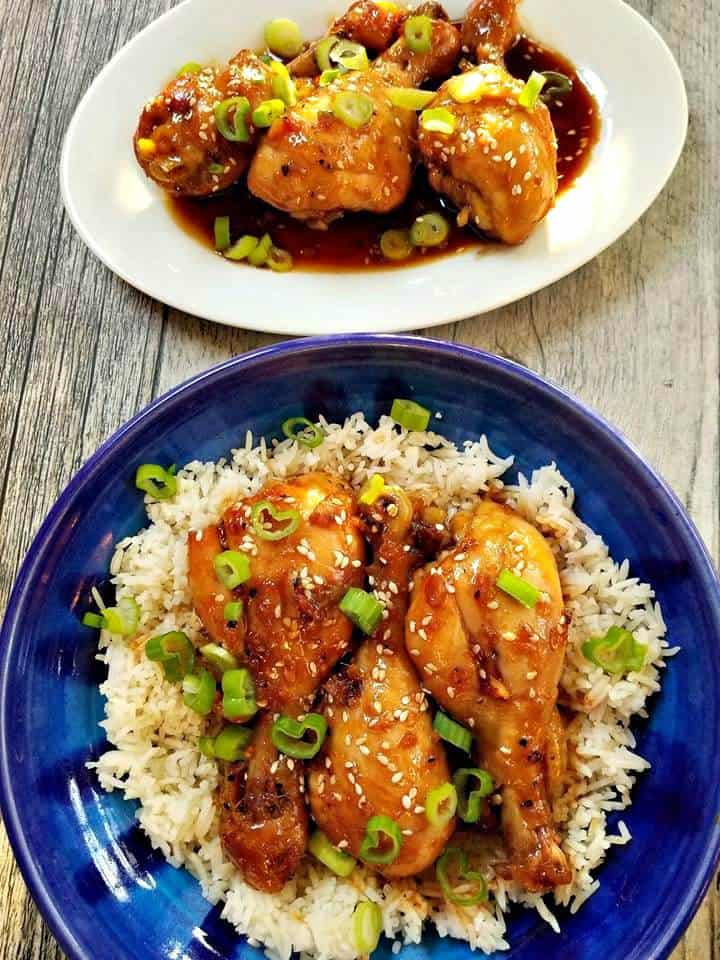
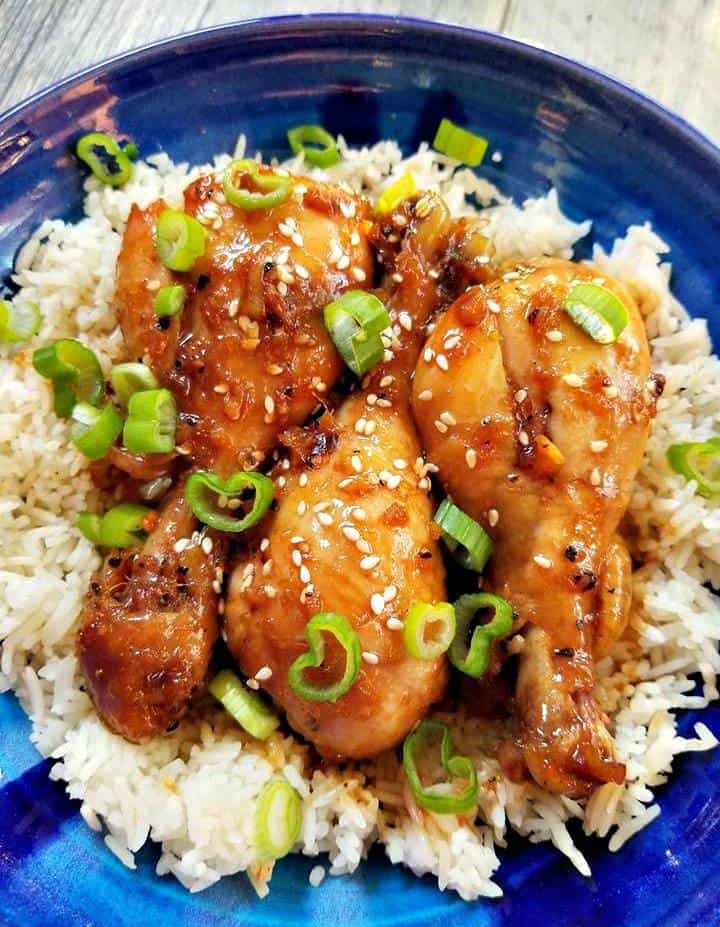
These Asian Chicken Drumsticks are baked in the oven in their own marinated. Which produces a tender and juicy chicken that is served best over rice. 

I really like to make these asian chicken drumsticks in my “dutch oven”.

The reason I do this is because the chicken cooks in the juices and never becomes dry.

Which works so well because this recipe is served over a bed of Jasmine rice and their is even leftover juice remaining that is uses as a sauce.

This is really a set it and forget it type recipe too, simply marinade the chicken in your dutch oven the night prior.

And take it out of the fridge and place in directly into a preheated oven at 425 f for 45 minutes. 

Meanwhile, cook some rice on the side in a rice cooker and your ready to eat a satisfying meal that the whole family is sure to love.

As with all my recipes, if you want to serve more people.

Simply double the recipe ingredients up.

Can I bake these in the oven?

Absolutely! However keep in mind they won’t be juicy and their will be no sauce for the rice. 

How to make the best baked asian chicken drumsticks

  1. Marinade– You want to marinate them overnight.
  2. Time – You do not want to bake them for more than 45 minutes.

This marinade consists of soy sauce, brown sugar, rice vinegar, garlic, ginger, sesame oil, black pepper.

If you follow those two tips alone you are sure to prepare the best baked chicken drumsticks. Also feel free to use bone in chicken thighs as well, those work for this recipe too

Looking for another popular chicken breast recipe?  try my Oven Baked Chicken Breasts”? It’s a another popular one on this blog. 

If you liked this recipe? Then you will want to try my other ASIAN inspired recipes below!

Grilled Cheese Tomato Tortellini Soup

This Grilled Cheese Tomato Tortellini Soup is super tasty and simple to make. If you like grilled cheese sandwiches then your going to love this soup!

I grew up eating grilled cheese sandwiches, I have no idea how many I have eaten in my adolescent years. But I’m guessing hundreds if not… dare i say thousands.

I mean what kid doesn’t like a grilled cheese sandwich? Now that I am grown, I like to experiment with lets say, more sophisticated recipes. You know so that my family thinks my tastes have evolved. 

This soup really satisfies my craving for a grilled cheese sandwich, which i admit comes on now and again. If you have kids, I can only imagine how much they would love this soup!

Also keep in mind, as with all my recipes. If you want to make more or less of this soup, simple adjust the serving size in the ingredients section above and the servings will automatically adjust for you. This soup can store in the fridge for up to 3 days and or freeze for up to 3 months.

Over the years I have made this soup a few different ways and found this recipe to sure hit the spot. Actually the day I discovered “Passata Sauce” is the day I started experimenting with homemade tomato soups.

So what is Passata Sauce?

Passata Sauce is the base for all Italian tomato sauces, it is uncooked tomato puree without seeds or skins. Essentially, it is tomato sauce in its rawest form. Of course you can always use fresh tomatoes by blending them into a puree in the blender as well. Totally up to you!

Then to add a bit more of a tomato base, I will use a can of tomato paste which blends out well when added to the vegetable stock.

Serve this alongside a grilled cheese sandwich and you will be in HEAVEN!

And without further adieu the secret ingredient is Philadelphia Cream Cheese!

Liked this recipe? Try my “Tomato Soup” it is delizioso as too! 

Will you give this recipe a go? You can rate this recipe by posting a review below, I would love to hear from you. Thank you very much for reading and until next time see ya in the kitchen. 

Don’t want to miss a recipe? Sign up for our NEWSLETTER delivered right to your inbox!


I am so thrilled you are reading one of my recipes, if you made this recipe i’d love to hear about it! Thank you very much for reading and until next time see ya in the kitchen. Don’t want to miss a recipe? Sign up for our NEWSLETTER delivered right to your inbox every Month!


PIN IT FOR LATER

Best Homemade Guacamole

This is my all time favorite way to make Guacamole, that is why I call it “The Best Homemade Guacamole“. 

There is a trick to making the best guacamole so follow along.

Your going to love this recipe!

Now, I know there are a ton of so called AMAZING Guacamole recipes out there. However most are mediocre if you ask me, as I have been making this stuff for years.

In my pursuit for the best recipe, I have also spoken to many Mexicans who have shared some of their recipe secrets with me. If that is not market research, then I don’t know what is. 

WHO INVENTED GUACAMOLE?

The Aztecs from the old world have been credited for inventing this delicious dip. The dip was called ahuaca-molli; molli was the Nahautl word for “something mashed or pureed.

HOW TO MAKE THE BEST GUACAMOLE?

  • I don’t know about you but I like my guacamole to be medium spicy, so I will add 1 serrano pepper to 3 avocados.
  • Also I like to make my guacamole in a traditional pestle, however it  will turn out the same way if you decide to make it in a bowl and then mash it with a fork. 
  • Be sure to not over mash the avocados, because you want to leave some small chunks in there. It just tastes better that way 🙂
  • Season well with salt and the right amount of citrus and you will have the best guacamole ever!

WHAT MAKES A GUACAMOLE AUTHENTIC?

  • It is in the ingredients, true Mexican guacamole uses:
  • Serrano Peppers not Jalapenos and White Onions not Yellow or Purple.

WHAT MAKES A GUACAMOLE AMAZING?

  • The ratio of ingredients that are used
  • The right amount of spices
  • The right ingredients 

How do I know how to make real Guacamole you ask? Well I have traveled to Mexico before along with have visited Old Town in San Diego and ate at every single Mexican restaurant I could find! Asking how it’s made, if that is not market research, then I don’t know what is. 

I’ve also spent a lot of time testing many of those recipes and came up with our favorite way to Mexican Guacamole at home. 

Real Mexican Guacamole highlights the avocados and does not allow any other ingredient to take over. That is why I do not add roma tomatoes anymore as they take from the avocados. 

In this house we eat guacamole every week, because we adore Guacamole. And whenever we go down to Mexico or the States we always order it as an appetizer.

Okay, I’m now ready to reveal the SECRET  ingredient.

Ready? It’s Fresh Squeezed Orange juice!

Along with fresh squeezed lime juice ~But that is not so secret!

Both of those fruits really help to enhances the avocados. I learned about this secret ingredient from one of my favorite mexican restaurants, however I won’t say which as I do not want anyone to get in trouble!

IS GUACAMOLE HEALTHY FOR YOU?

YES! Guacamole is very healthy for you because it contains fat to have in your diet, so eating this often would be a win win! Here are just a few benefits of The Avocado.

  • They contain Vitamins A, C, and E are all present in the flesh of tasty avocado.
  • They’re are immune-boosting, so forget an apple a day eat an avocado a day. 
  • They protect the eyes
  • They can curve hunger, eating just one and you will feel full. 
  • The antioxidants in avocados are good for fighting off cancer. 
  • They lower cholesterol and help fight diabetes and so much more. 

If that is not reason enough to eat more Guacamole, than I don’t know what is. I really encourage you to try a few Guacamole recipes to decide what is your favorite!

Below you will also find my favorite recipe for Cabbage Pico De Gallo it’s AMAZING! 

If you want it more spicy, simply chop more of the Serrano pepper.

Also you can add a diced roma tomato if you’d like. Also be sure to not over mash the avocados, because you want to leave some small chunks in there. It just tastes better that way 🙂 Want to store it in the fridge for a couple of days, be sure to place the pit from one avocado into the dip. This will allow it to store longer and not brown to fast. 

LOOKING FOR MORE AWESOME DIP RECIPES?Try some of my favorite Homemade Creations below!


I am so thrilled you are reading one of my recipes, if you made this, I want to see! Follow Canadian Cooking Adventures Instagram, snap a photo, and tag and hashtag it with @canadiancookingadventures and #canadiancookingadventures

Stay connected and follow along on FacebookPinterest, and Instagram for all of my latest recipes!


Best Chicken Tortellini Soup

This Best Chicken Tortellini Soup has fresh asparagus along with kale it it. It is one of those soups that you will want to make a big old pot of and enjoy over a few days

If your craving a soup to warm you up, but also want a hearty meal. Then this Soup is sure to hit the spot! Not only does it tastes good it is also very healthy for you.

WHAT IS CHICKEN TORTELLINI SOUP

The reason I call this tortellini soup the best, is because it is! Yes, I know it’s not traditional to put asparagus and kale in this type of soup. And i’m aware that most of these types of recipes call for carrots.

But for me I much prefer these veggies!! Don’t you?

You can also replace the kale with spinach if desired. What I like most about making this soup is that it can be enjoyed over a few days. Because it keeps very well in the fridge and even tastes better the second day!

CAN YOU FREEZE CHICKEN TORTELLINI SOUP

Yes, up to three months!

Absolutely delicious! 

I have always loved chicken noodle soup, however it is nice to try different versions of it now and again, right? 

This soup is allot like Chicken Noodle soup, but we are omitting the noodles and carrots and uses tortellini along with kale and asparagus instead. 

It’s pretty similar to allot of those other Chicken Tortellini soup recipes, however mine uses more vegetables and is more on the healthy side. 

What makes the soup creamy is the mixture of the chicken stock, cream and parmesan cheese. Some recipes will have you using all cream and of course that will make it ultra creamy. However for this soup I wanted it to be lower in fat and also stay true to a chicken noodle type soup base. 

Such a fantastic soup to have simmering on the stovetop when your not feeling so great or heck even when you are. 

I like to use better than bouillon chicken stock when making most of my soups. So I will mix just the right amount of that with water for the stock.

Plus using mostly stock vs cream really helps to make this soup super creamy without all the extra fat. Of course you can use whatever chicken stock you have on hand, just be sure it is not laddled with to much salt. 

Also, you will want to allow the asparagus to simmer for a least 15 minutes along with the chicken to ensure both are super tender prior to adding the tortellini and kale. 

If you are planning to enjoy this soup over a couple of days, then you will want to add one more cup of chicken stock as well, since the tortellini tends to soak it up overnight. 

I really like to use “Herb Chicken Tortellini” for this recipe. However you can use whatever brand you like most. Also if you want a little heat to this soup then I would recommend adding in a pinch of red pepper flakes.

Also keep in mind, as with all my recipes.

If you want to make more or less of this soup, simple adjust the serving size in the ingredients section above and the servings will automatically adjust for you. This soup can store in the fridge for up to 3 days and or freeze for up to 3 months.

I am so thrilled you are reading one of my recipes, if you made this recipe id love to hear about it! Thank you very much for reading and until next time see ya in the kitchen. Don’t want to miss a recipe? Sign up for our NEWSLETTER delivered right to your inbox every Month!

Creamy Cheese Mashed Potatoes

These Creamy Mashed Potatoes have no lumps and are my absolute favorite way to make mashed potatoes. Plus they work as a great addition to just about any meal.

Made with just a few simple ingredients of russet potatoes, cream cheese, butter and the right seasonings.

You will find that the best mashed potatoes will result from these three things.

This recipe here is great for serving 6-8 people, so if you have more or less to feed just use the recipe server below and the recipe will auto populate the ingredients so you don’t have too.

There are a few tricks to getting your potatoes so creamy, and step one is using the right tool for the job.

Back in the day we used potato mashers, but those always left clumps in the potatoes and today they’re becoming less and less popular since people are learning that with a potato ricer you can have the creamiest mashed potatoes ever without the clumps.

Below you will find a link under my kitchen essentials where you can find an excellent potato ricer, trust me it’s a kitchen tool you will come to love.

If you do not mind a few lumps in your mashed potatoes then a regular masher will do a great job as well.

Potato ricers look like the one below!

You can cook these potatoes in the slow cooker or if you like on the stove top, completely up to you.

Just keep in mind that the stovetop method cooks them much quicker and is my prefered method.

Note: These can be done in your slow cooker as well, just follow steps 1-2 and place them in the slow cooker anywhere from 4-6 hours then follow steps 4-5 and you’re done. Don’t skimp on the salt it really helps to bring the flavors all together.

I am so thrilled you are reading one of my recipes, if you made this recipe i’d love to hear about it! Thank you very much for reading and until next time see ya in the kitchen. Don’t want to miss a recipe? Sign up for our NEWSLETTER delivered right to your inbox!

Portobello Mushroom Kale Risotto

This Creamy and Cheesy Portobello Mushroom Kale Risotto is quick and easy to make. Not to mention gluten free and vegetarian! 

Made with tender sauteed mushrooms along with kale and fresh parmesan cheese. Then it is simmered in a vegetable stock for extra flavor. 

Valentine’s day is just around the corner and like every other year I like to come up  with some new dishes for those who are looking to feast at home. 

I had some Portobello Mushrooms on hand and then came up with tasty recipe, I hope you give it a try because it is absolutely delicious! 

Orzo also known as Arborio rice is a grain that can be found in the rice isle and is very popular in Italian cuisine. Orzo is basically a short-cut pasta, shaped like a large grain of rice.

Of course this dish can be served just about anytime of the year and is served on the menu often in and around Italy!

You can always double up the recipes and make it into a few meal preps to enjoy throughout the week.

Just simply use my recipe adjuster above if you plan to make more than two dishes and it will calculate the ingredient ratio automatically for you. 

In order to make this dish low fat and more savory, I simmer this dish in a quality vegetable stock and then simply will season with salt and pepper to taste. 

However you could always add some cream to the stock as well, which will make it even more creamy if desired. 

Pretty simple one pot dish that is sure to impress!

Not a fan of Portabella Mushrooms? or have another kind on hand.

Go ahead and slice them up and prepare them the same way. Almost any type of mushroom will go well with this dish.

As for me I like it just like this, however will sometimes use brown mushrooms which work well too.  

Once it has been served, go ahead and sprinkle some fresh parmesan cheese on top and enjoy.. Bone appetit!

I am so thrilled you are reading one of my recipes, if you made this recipe id love to hear about it! Thank you very much for reading and until next time see ya in the kitchen. Don’t want to miss a recipe? Sign up for our NEWSLETTER delivered right to your inbox!


Easy Ground Beef Wellington recipe

This Easy Ground Beef Wellington recipe is spiced just right and is family favorite in our house. With the additions of mushrooms and is something that can be whipped up in less than an hour since we are using some pre made puff pastry. 

Looking for another festive dish? Then your gonna want to try my Baked Holiday Ham or even my Recette Sheppard’s Pie.

Your family can enjoy this homemade recipe any time of the year.

But really makes the perfect addition to any Holiday meal.

FUN FACT: Beef Wellington get’s it’s name from a man named Arthur Wellesley who was the first Duke of Wellington. He had a victorious Battle on June 18 1815.

The Duke was given his title after defeating Napoleon Bonaparte the year before, and not long after he became Prime Minister. 

Traditional Beef Wellington was made with fillet steak inside. I have had that at a restaurant once and it was delicious.

However, I wanted to create something different. And mix the best of both worlds, beef and mushrooms. This recipe has now become popular on this blog, I hope you give it a try and let me know what you think. 

HOW TO MAKE HAMBURGER BEEF WELLINGTON

This recipe is made with lean ground beef, onions, mushrooms, eggs, panko bread crumbs, flour, red wine vinegar, worcestershire sauce and seasoned with fresh thyme and rosemary.

Be sure to use fresh thyme and rosemary in this recipe, it makes all the difference.

Also do not skip on the worcestershire and red wine vinegar it helps to merge all the flavors together. 

HOW TO MAKE PUFF PASTRY

I used a pre – made puff pastry to save time, (see below) The pre – made puff pastry I recommend is from Tenderflake. The box has 397 grams of puff pasty in it!


Simply remove it from the package, allow it to defrost for 1 hour and sprinkle with flour before rolling it out. 

Fill the pastry with the Beef and Mushroom mixture.

Brush with the egg wash.

And make impressions to the dough as so with a fork.

Looking for a FANTASTIC homemade puff pastry recipe?

I have one here in my in my “Turkey Pot Pie” recipe instructions.

You may be more familiar the more traditional “Beef Wellington” type recipes. Which have you using Beef tenderloin or fillet instead of hamburger.

However, this recipe is just as good and if you use brown mushrooms alongside the hamburger it becomes absolutely amazing.

You will be able to serve 3 peoples for dinner easily with this. And if your wanting to serve more, I would recommending make 2 of them. Which is not hard to do at all!

Wishing you and yours a Merry Christmas and Happy New Year!

Want more Christmas & Thanksgiving recipes?

Canadian Tourtiere Recipe


Also check out my roundup of Thanksgiving & Christmas Recipes from around the World or my 10 delicious stuffing recipes! for more inspiration!

I am so thrilled you are reading one of my recipes, if you made this, I want to see! Follow Canadian Cooking Adventures Instagram, snap a photo, and tag and hashtag it with @canadiancookingadventures and #canadiancookingadventures

Stay connected and follow along on FacebookPinterest, and Instagram for all of my latest recipes!


Sauteed Sesame Tofu

This Sauteed Sesame Tofu can be pulled together in no time at all. It’s not the sweet kind of tofu rather a savory kind. 

So if you’re looking for a new way to prepare tofu, then this recipe is sure to impress.

I sometimes like to enjoy it just like this or I will prepare some rice and vegetables on the side and serve it like that.

Whichever way you prefer to serve this recipe you can’t go wrong. It’s basic but also so versatile that it goes great with anything. 

IS SESAME TOFU VEGAN

Yes, since tofu is plant based it sure is.

Want to make it a bit sweet? Feel free to add 2 or 3 tbsp of honey to the sauce and your good to go.

You can also serve this as a appetizer around the holidays, why not it takes really no effort at all and would sure to be eaten up in no time. 

This is one of my favorite ways to make tofu and trust me you won’t miss the meat in this recipe. Because the tofu has a good source of protein and essential amino acids.

It is also an excellent source of iron and calcium and the minerals.

In addition, tofu is a good source of magnesium, copper, zinc and vitamin B1. So go ahead and indulge! 

HOW TO MAKE SESAME TOFU

  • Start by slicing the tofu as seen in the steps picture above. Once it has been sliced, dry it off as much as possible with a paper towel.
  • Next make the sauce, add all the sauce ingredients into a small bowl and whisk with a fork till combined. 
  • Now in a small bowl add the tofu along with the cornstarch and coat. Add the combination of cooking oil and sesame oil to a non stick frying pan, and saute the tofu on each side for 5 minutes, turning a often in order to brown the tofu. 
  • Once browned about 15 minutes into cooking, add in the sesame seeds and toast for 2 more minutes. Drizzle the sauce overtop of the browned tofu and saute for 5 more minutes. Serve and enjoy!

Recipe adapted fromGenius kitchen

Note: You can always add 2 tbsp of honey for some added sweetness if desired. 

I am so thrilled you are reading one of my recipes, I appreciate every single one of you! If you made this recipe i’d love to hear how it turned out. Thank you very much for reading and until next time see ya in the kitchen. Don’t want to miss a recipe? Sign up for our NEWSLETTER delivered right to your inbox!