This easy creamy one pan Italian Sausage Gnocchi recipe is made with just a few simple ingredients that produce big flavors. Plus it is ready in 30 minutes which makes for a win win dinner that the whole family will enjoy!
The Gnocchi is simmered in a light cream sauce that is made of chicken stock, parmesan cheese, sour cream and Dijon mustard.
Along with fresh sage and few Italian spices that sure enhances all those ingredients very well.
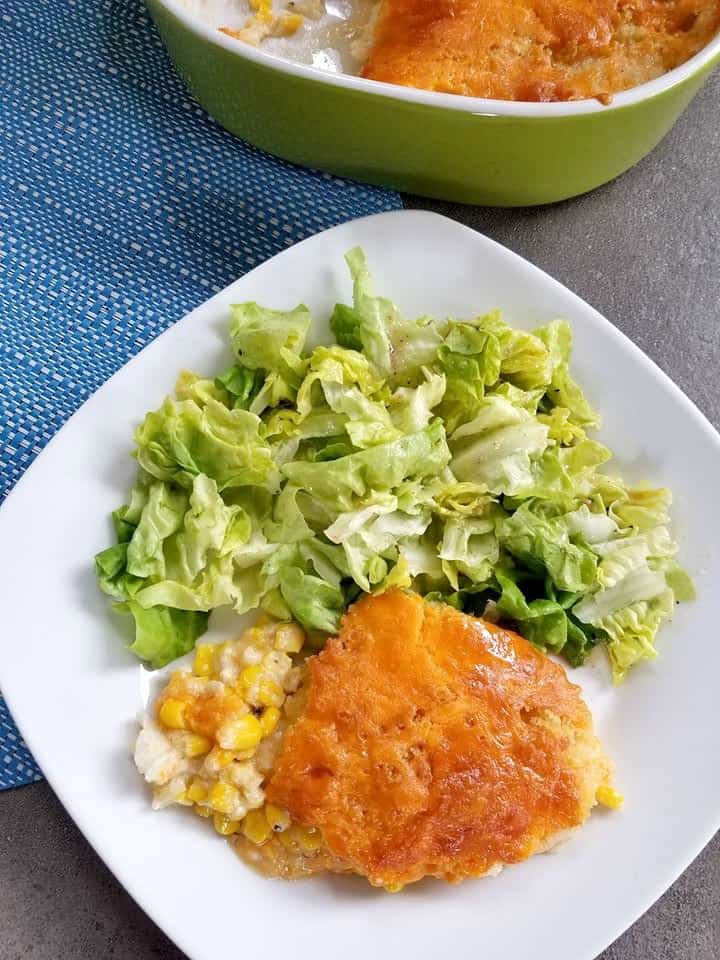
This Cod Au Gratin with Corn is a filling a satisfying meal that really highlights cod fish. It is a traditional recipe that comes from the maritimes in Canada.
What does Cod Au Gratin mean? Cod au Gratin is a traditional french recipe that means white fish covered in breadcrumbs and cheese. Looking for more Eastern Canadian recipes?Try myLobster Ravioli Sauce recipe
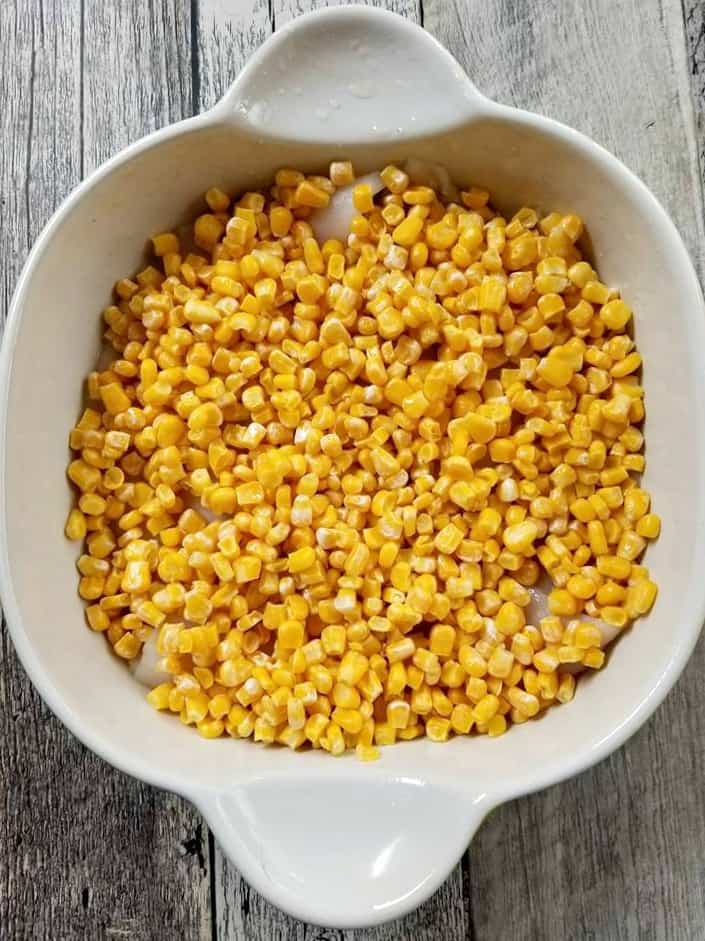
You can add corn or any vegetable you like or omit the vegetable and just have the fish. I have made this dish before on this site and today I made it again with the addition of corn. If you would like to check out my original recipes, here it is Newfoundland Cod Au Gratin
If you’re looking for a excellent recipe that utilizes fresh or frozen cod fish, then you have just found it!
The first time I made “Cod au Gratin” was last week. Believe it or not! And I loved it! I served it alongside a salad. And thought to myself, wow corn would be really good in this.
So I create this the very next day! We basically have been eating “Cod Au Gratin” for the past few days. And no one is complaining! It is delicious and filling.
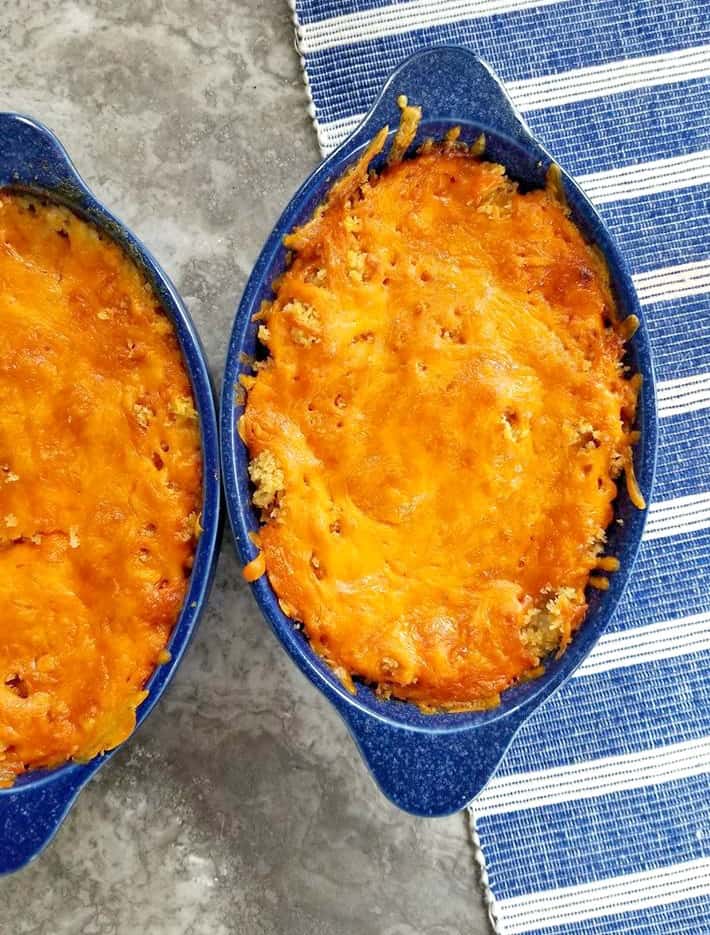
It is finished off in the oven or under the broiler till it gets perfectly browned.
HOW TO MAKE NEWFOUNDLAND COD AU GRATIN?
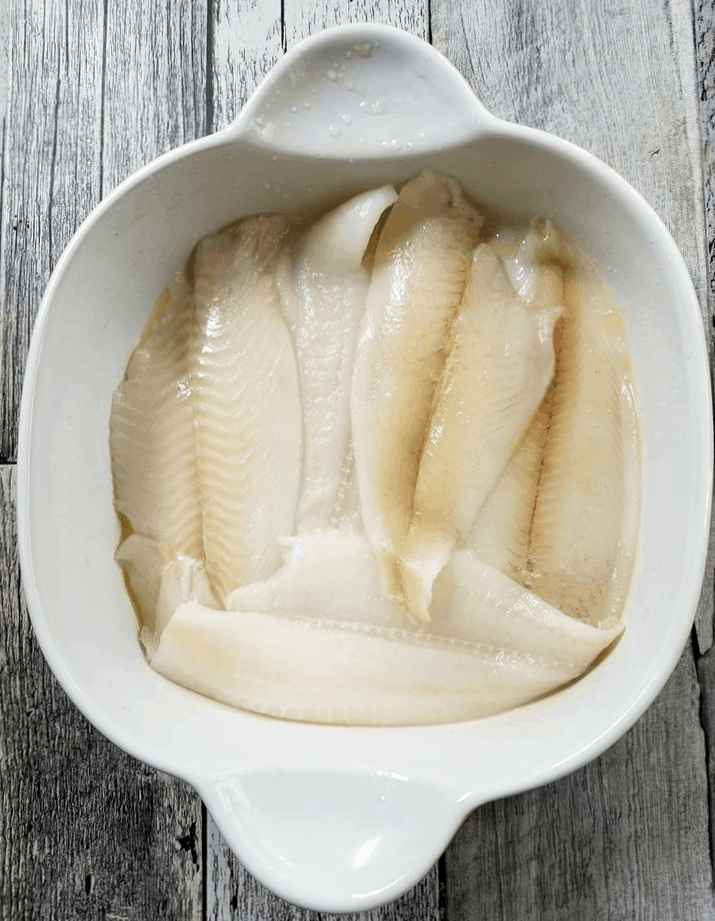
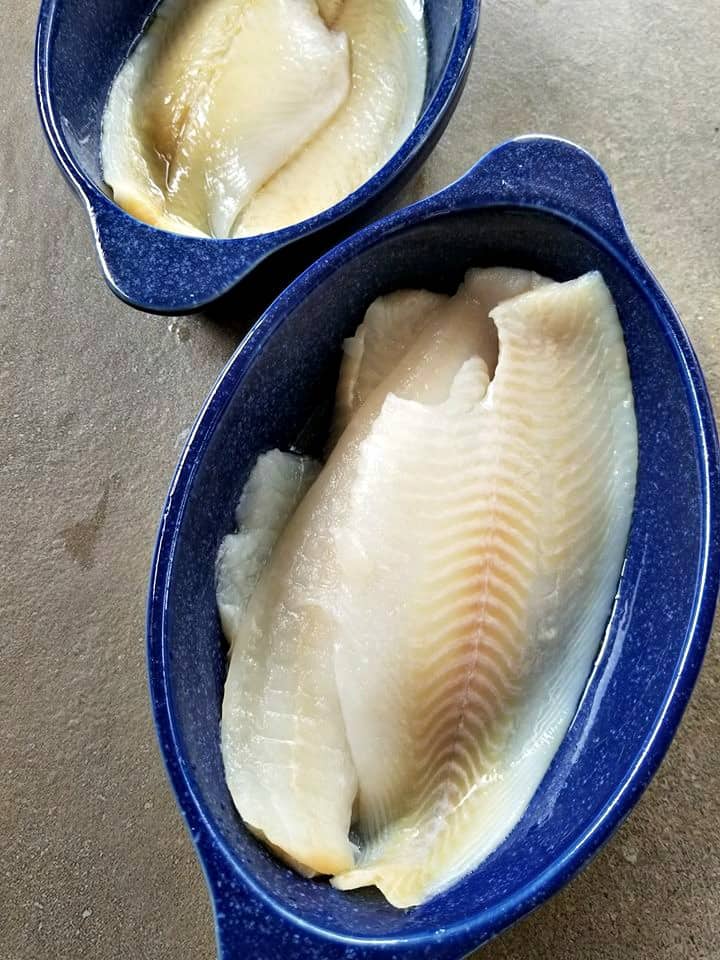
You will want to start with some fresh cod or frozen that has been defrosted and patted dry.
Then you will want to set aside some shredded cheddar cheese and parmesan cheese.
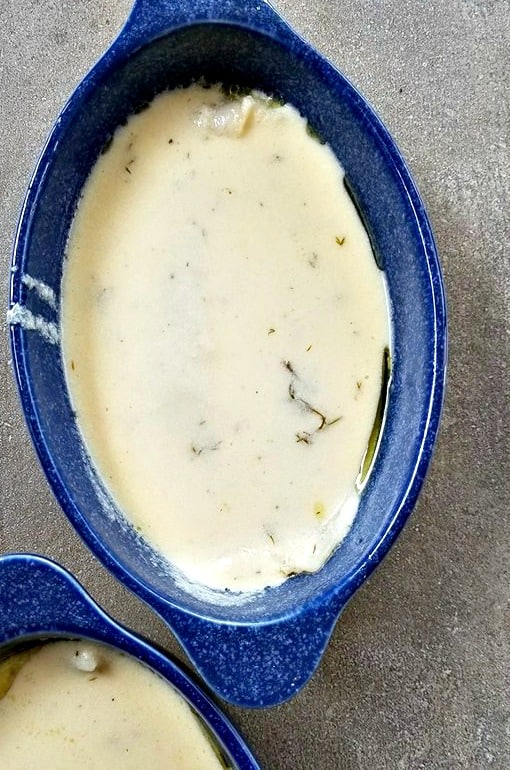
You will start by heating some milk in a small saucepan till hot, once the milk has reached that hot consistency. Remove it from the heat and create the roux.
Create a roux by heating the butter first then flour then whisking the milk in with a whisk to create a smooth texture.
Turn up the heat to medium heat before adding in the parmesan cheese and dijon mustard. Then remove from the heat and set aside.
Place the fish in the bottom of a shallow baking dish and toss with olive oil then season with onion powder and salt + pepper.
Once the fish has been seasoned, simply pour over the roux and season with fresh dill.
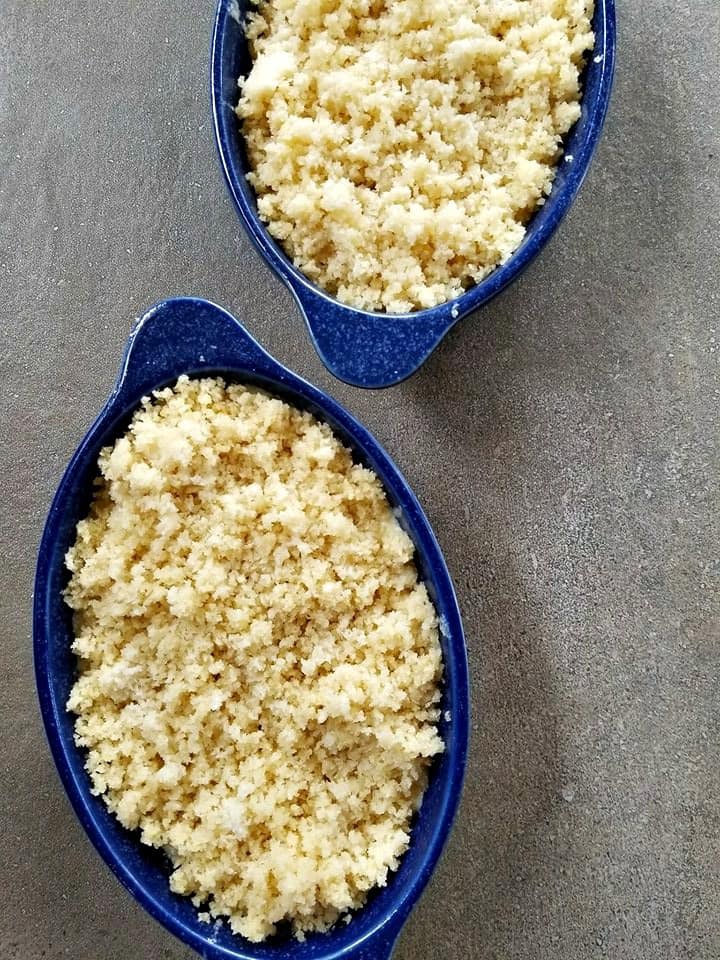
In a small bowl, mix the panko bread crumbs with olive oil and 2 tbsp of water and place overtop of the fish/roux.
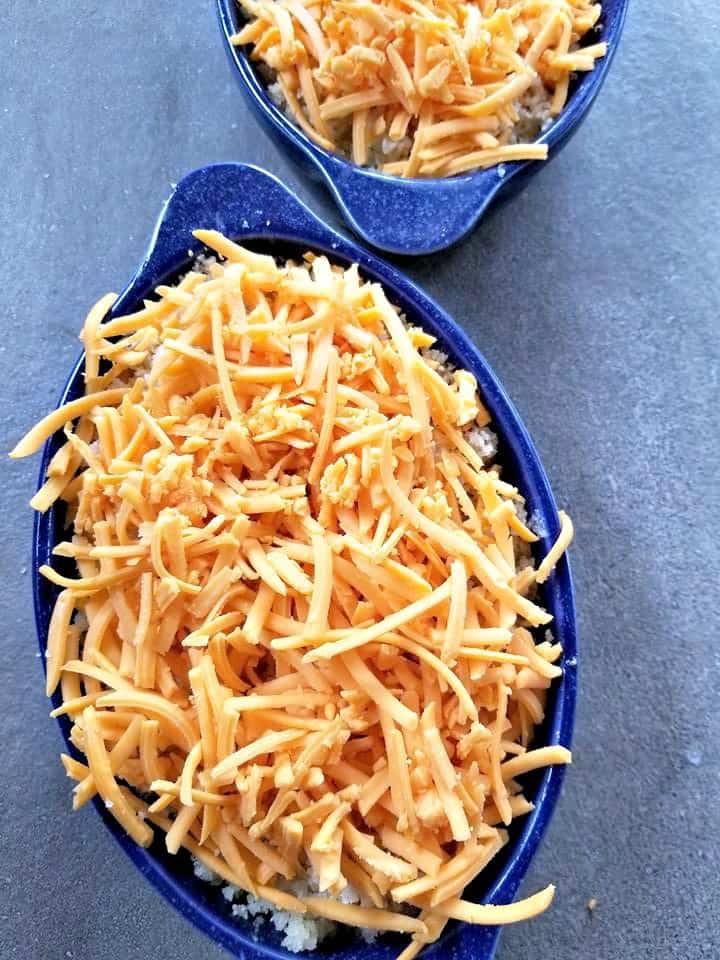
Cover with the shredded cheddar cheese and bake at 350 till done.
WHAT IS COD AU GRATIN
Cod Au Gratin is a dish that is topped with a white sauce, then cheese and or bread crumbs.
It also is a dish that originates from the maritime provinces in Canada, Newfoundland to be exact. It is a dish consisting of fresh cod, flour, bread crumbs, lemon juice, cheese, and other seasonings and spices.
Some people use breadcrumbs and onions, while others don’t.
For this dish we used onion powder, panko bread crumbs and a little Dijon mustard. It is all about personal preference when it comes to making this or any dish.
We ask our Direction of Operation what he thought, about the dishes original origins. He stated that it is a well known fact that Newfoundland has a deep connection to it’s Irish and English heritage.
However he thinks that the dish was introduced by the French. What do you think?
If anyone knows indefinitely, we would love to hear about it!
CAN I USE FROZEN COD FOR COD A GRATIN?
Yes, and that is what I used. Just be sure to defrost it and pat it dry prior to using. I find the best way to defrost fish is in a warm bath of water. Not hot and not cold, warm is perfect.
WHAT GOES WITH COD AU GRATIN?
Salad
Corn on the cob, frozen corn or another vegetable of your liking
After doing some more research on it, I learned their are slightly different ways to make it. And so I used what skills I have in the kitchen and made my own variation.
I hope you give it a try, because it is absolutely amazing!
CAN COD AU GRATIN BE FROZEN?
Yes, that is if you are using fresh cod to begin with. You will want to purchase the freshest cod possible, then you will make the dish exactly as stated.
However before freezing it, be sure to allow the roux to cool down completely before pouring over the fish and do not bake it. Safe that for the day you want to eat it. Remove from the freezer and simply bake at 350 for 45 minutes till done!
DID YOU MAKE THIS RECIPE?
If you make this recipe, I would love to hear about it! You can leave a 5 star review in the comments below! Thank you very much for reading and until next time see ya in the kitchen. Don’t want to miss a recipe? Sign up for our NEWSLETTER delivered right to your inbox!
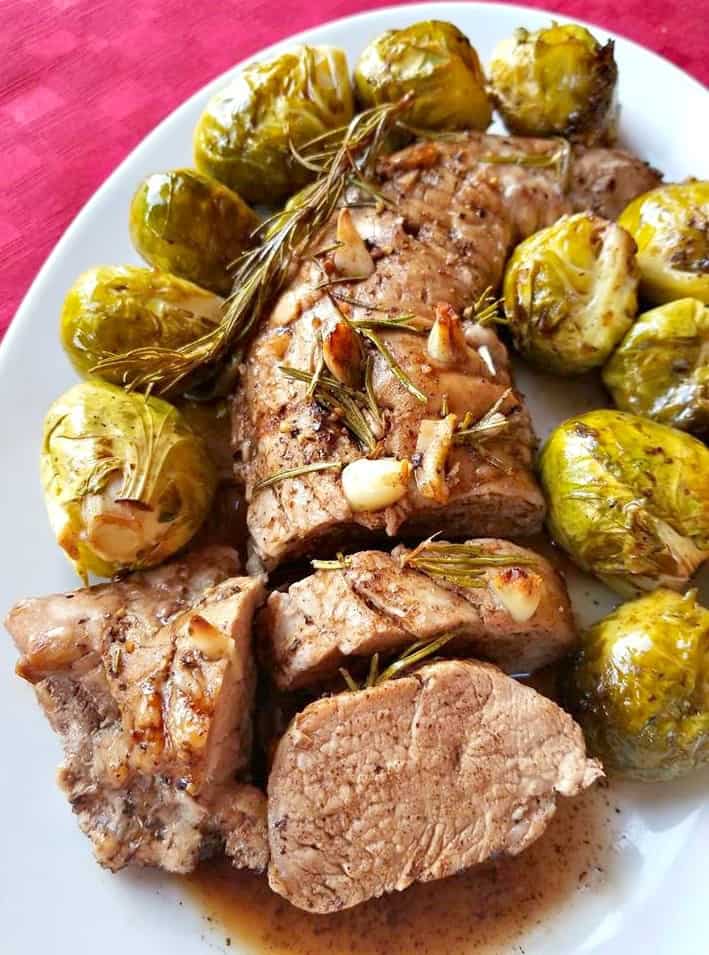
This super simple to make Balsamic Rosemary Pork Tenderloin will save you from cooking in the kitchen all day.
Wanting to serve this with some rice or potatoes? Feel free to add 1/2 cup of chicken stock to this recipe and that will create more of a broth at the end.
I saw a similar recipe done by Rachel Ray a while back and knew it was only a matter of time before I gave it a go!
Paired this delicious tenderloin with a bunch of brussel sprouts, they go great well with balsamic vinegar.
You can always try asparagus, carrots or potatoes as well.
There really is not much too it, your basically seasoning the tenderloin and then stuffing it with some fresh garlic and rosemary.
Then drizzling more olive oil over top and balsamic vinegar which helps to caramelize the meat.
Then place into a oven safe dish and baking it along with your favorite vegetable of choice.
Easy peezie weeknight dinner that can easily feed a family of 3.
Wanting to feed more people simply double up the recipe with my easy to use recipe adjust above.
I am so thrilled you are reading one of my recipes, if you made this recipe i’d love to hear about it! Thank you very much for reading and until next time see ya in the kitchen. Don’t want to miss a recipe? Sign up for our NEWSLETTER delivered right to your inbox every Month!
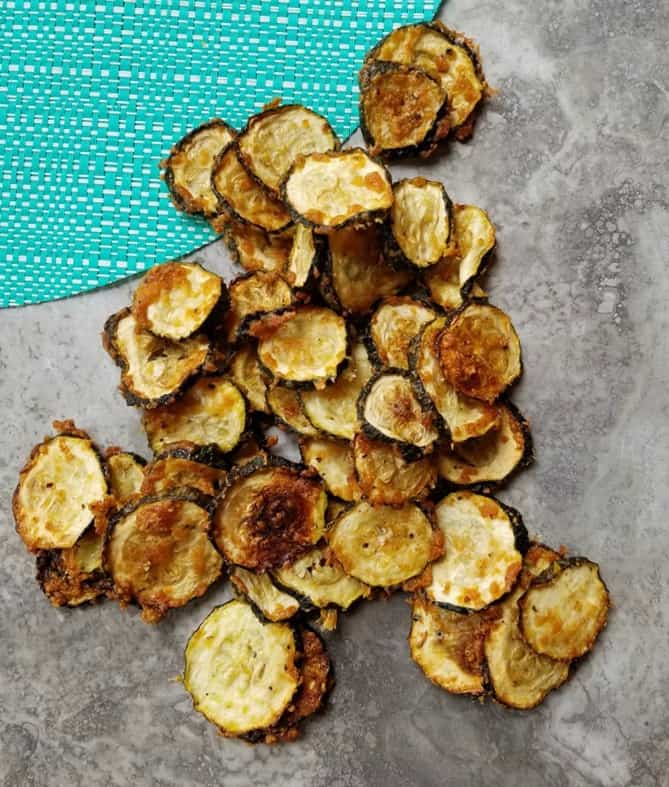
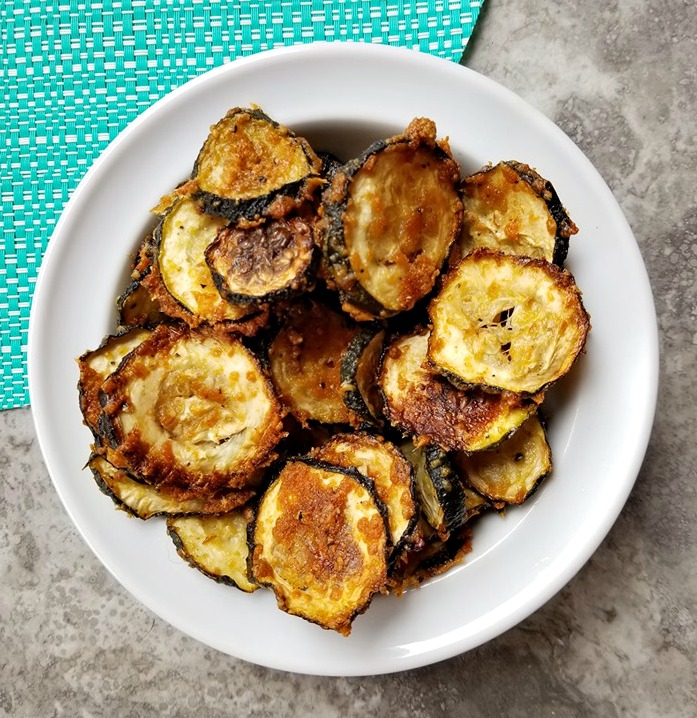
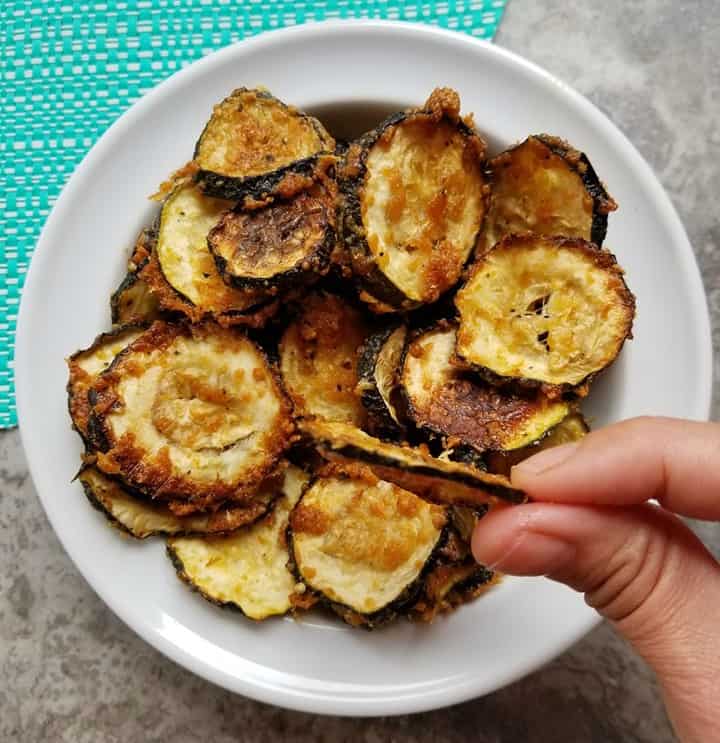
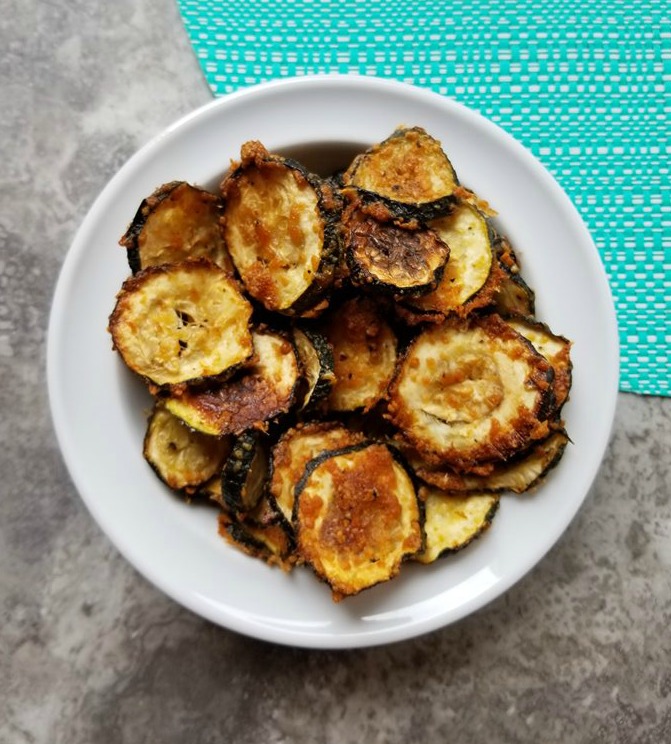
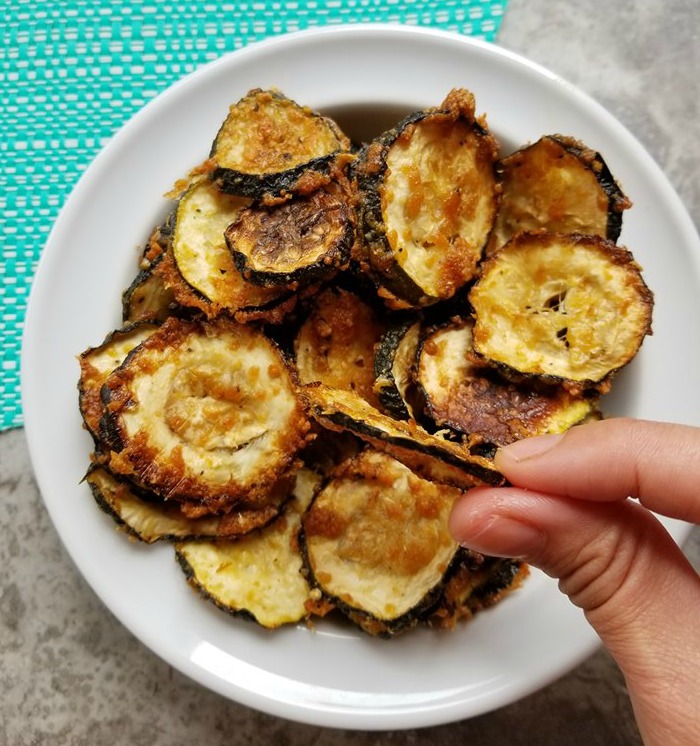
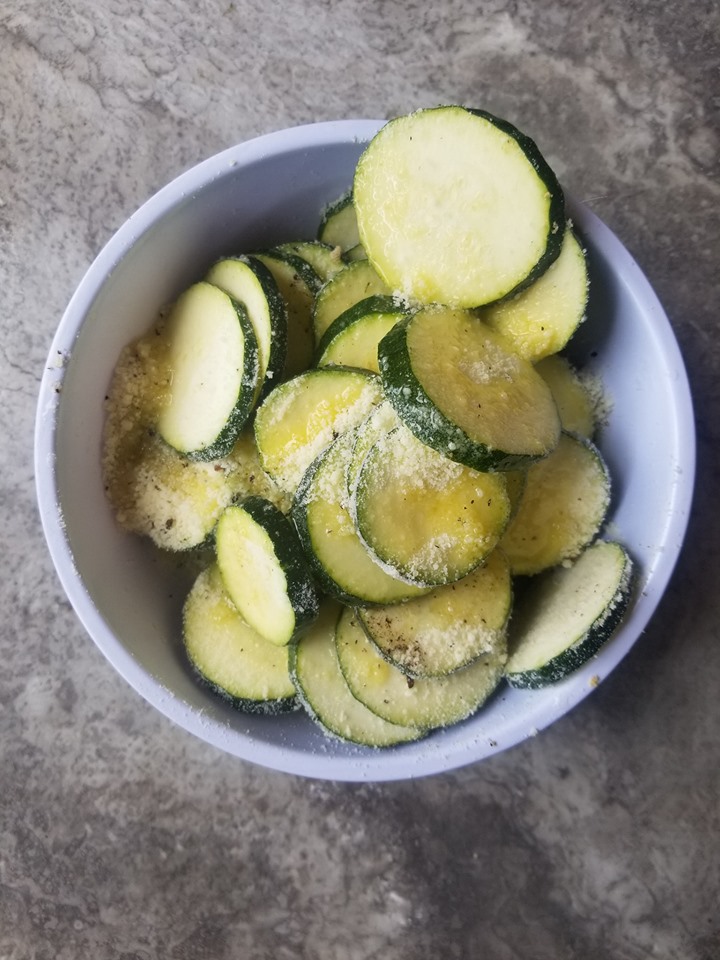
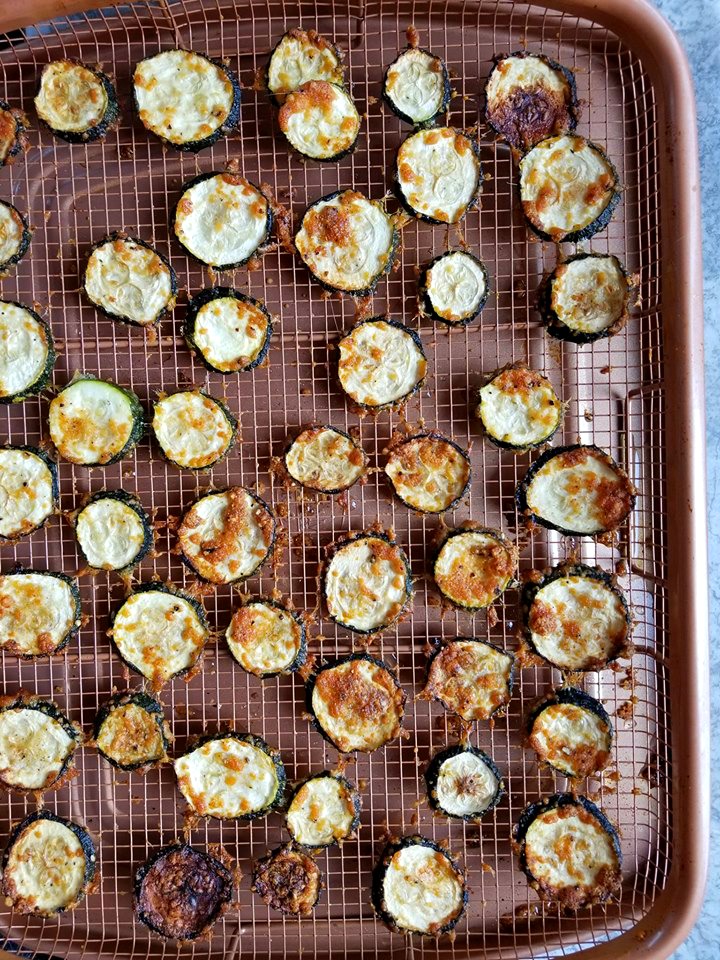
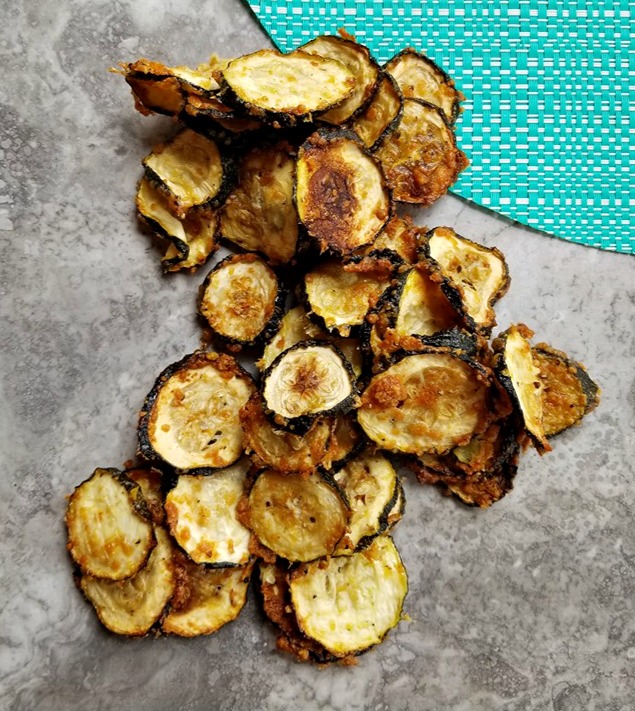
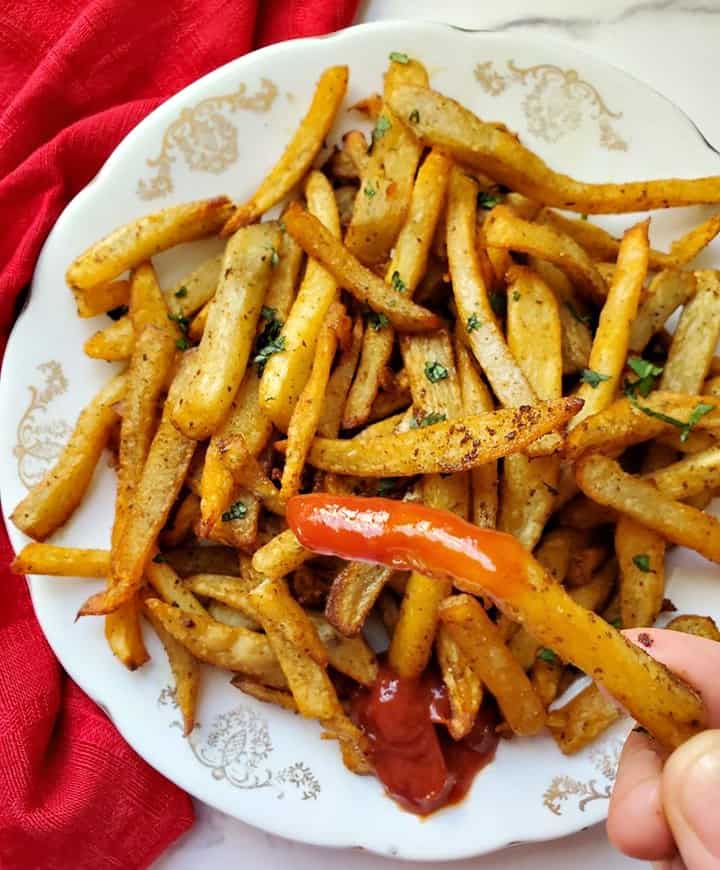
These Air Fryer Zucchini Chips are a healthy and delicious low carb snack that is super easy to make.
Looking for more vegetable based air fryer snacks? Then your going to want to try my oh so popular Air Fryer Eggplant Chips.
These Zucchini chips are seasoned with just a few ingredients, that being of olive oil, rosemary, salt and pepper, garlic powder and parmesan cheese. They will have you rethinking your snack craving and having you eating healthier.
HOW TO MAKE ZUCCHINI CHIPS KETO
A lot of air fryer recipes will have you breading these chips prior with breadcrumbs and then dipping them in eggs before seasoning them.
I like to skip that whole process, which makes these keto.
You will find a lot of tips to prepare Keto friendly foods.
ARE ZUCCHINI CHIPS HEALTHY
Depends on what your using to cook them, I use OLIVE OIL vs REGULAR cooking oil. And when making them this way, you really are using very little.
Then these chips are just simply seasoned with salt and pepper, rosemary, garlic powder and then are sprinkled with some parmesan cheese.
They are much better this way and lower in calories and really crisp up nice on their own, no breading needed!
As you may know I have been on the fence for the past year about buying an air fryer.
Mainly because I do not eat a lot of deep fried foods and also because I could not fathom spending $150 + for ONE.
So recently when I came across the Gotham air fryer, that does the exact same thing as an air fryer. I knew that I had to try it!
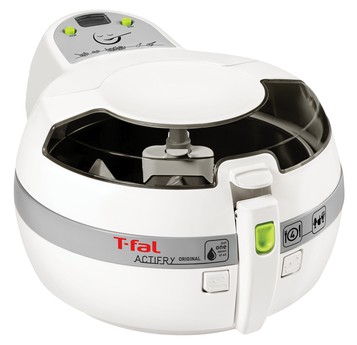
Then once I tried that, i took the leap and bought a T fal active fryer. I’m now an active air fryer lady, I love air frying now more than I ever could have thought.
WHAT IS AIR FRYING?
Air frying is a healthy alternative to deep frying food.
And most air fryers have been marketed in a way to make you think that this cooking technique is best for those who make a lot of those at home.
Well I am here to tell you that you do not need to just be a deep fried food lover to want to use this cooking method.
RATHER if you love to bake food, then this is also a great alternative. And in most cases is much healthier than traditional baking methods.
Because air frying mimics deep fried foods but uses little to no oil. And if your cooking something fatty, the fat will drip away and off the food.
So you can enjoy all the same deep – fried or baked foods that we have all come to know and love again but in a healthy way.
HOW TO AIR FRY ZUCCHINI CHIPS
Making air fryer Zucchini chips is easy, first you will need either a Tabletop Air Fryer or a Gotham Air Crisper Tray.
Start by slicing the Zucchini into 1/4 inch slices on a cutting board.
HOW TO AIR FRY ZUCCHINI WITHOUT BREADCRUMBS
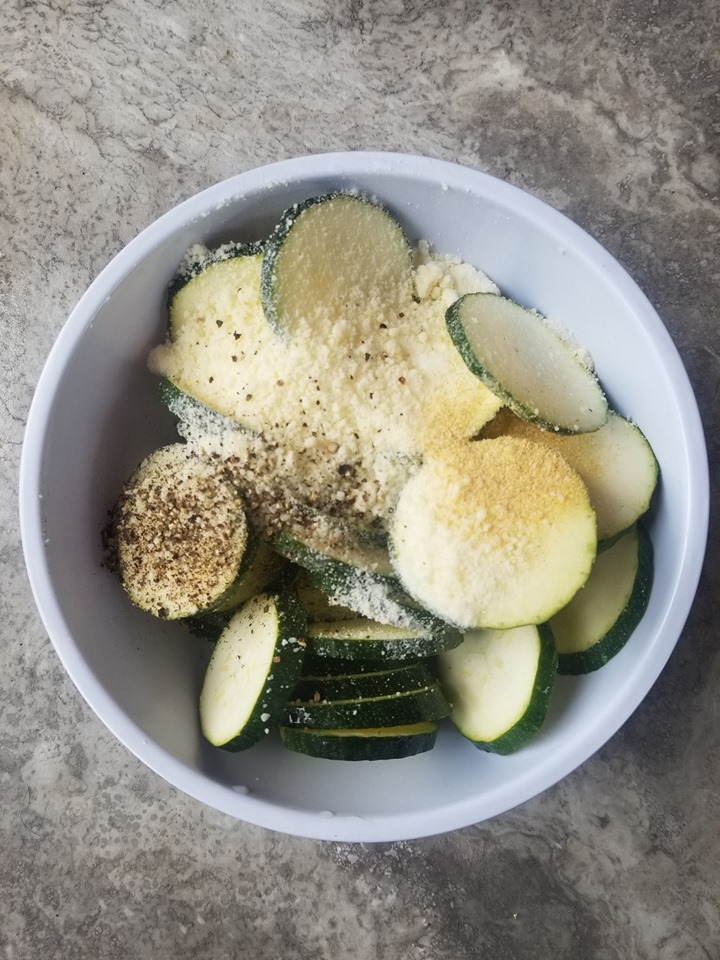
Once the Zucchini is sliced, place them into a large bowl and toss with olive oil, parmesan cheese, garlic powder, salt and pepper along with fresh rosemary.
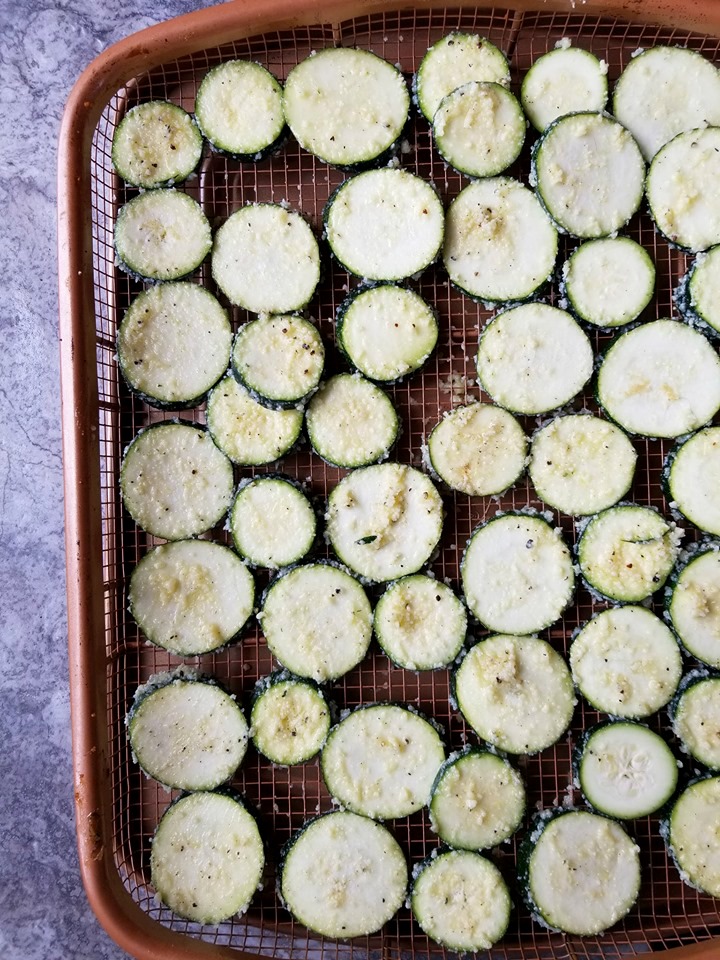
Place the Zucchini chips in or on the Air Fryer making sure they are not crowded, then allow it to do the Cooking.
My T fal active fryer has them cooked in 15 – 20 minutes.
Remove and allow to cool down 10 minutes prior to serving.
AIR FRYER COOKING TIMES
I use the T-Fal air fryer and put them on for 15-20 minutes, please check with your air fryers cooking instructions.
However, to convert an oven-cooked recipe to an air-fryer one, the general rule of thumb is to reduce the suggested temperature by 25°F or 3.889 C and then cut the cook time by about 20%
CAN I USE ANY KIND OF AIR FRYER?
YES!
I currently have and use the T-fal ActiFry Fryer and the Gotham Air Crisper
Both tools work well for this recipe! Cooking times vary with each air fryer, so best to check your settings.
HOW TO MAKE AIR FRY ZUCCHINI CHIPS ON THE GOTHAM AIR CRISPER TRAY?
SPREAD OUT AND AIR FRY FOR 30 MINUTES!
They are going to shrink down, just like this.
Then you will want to allow them to cool so that they become extra crispy!
If your using the Gotham Air Crisper Tray I would advise to turn your oven to Conventional bake, which will make the chips more crispy.
Otherwise, if your oven does not have that setting you can simply place the crisper on the middle rack.
The air hot air is what cooks the food not the oil. If you have some frozen foods on hand, feel free to throw out any deep fryer you may have because the air fryer can now do the same job.
But it is not only frozen food that can be cooked this way, pretty much any food you can think of can.
This is my forth AIR FRYER recipe that I have shared on this blog. And I hope you like it!
WHAT MAKES ZUCCHINI CRISPY?
The air flow that is create under and around the Zucchini. The more dryer they become the more crispy they will become.
Also the thinner the fries the easier it is for them to become crispy, I like to cut mine about 1/4 to 1/2 of a inch thick.
CAN I USE ANY KIND OF AIR FRYER?
YES! Air fryers promise that you can get that deep fried texture without all the grease.
If you have a table top Air Fryer all these recipes will work the same. Because Air Fryers all use the same type of cooking techniques = AIR.
IS AIR FRYER FRIES HEALTHY?
Yes, very. Since the hot air is doing all the frying, saving you from using oil. But also giving you a deep fried taste without all those trans fats.
The food ends up crispy on the outside and moist on the inside.
If you have never used an air fryer, now is the best time to start.
Because they are more affordable now than ever before.
Plus if you use the Gotham Air Fryer it is super simple to clean, I am talking hard sticky food at the bottom of the tray just slides right off.
No scrubbing at all is needed, it couldn’t be more simpular that this guys.
Another reason I like the Gotham Air Fryer is because it cooks more food than the typical table top Air Fryers.
Because it has a lot of space on that large tray !
Wanting some more AWESOME Air Fryer recipes? See below for some more inspiration!
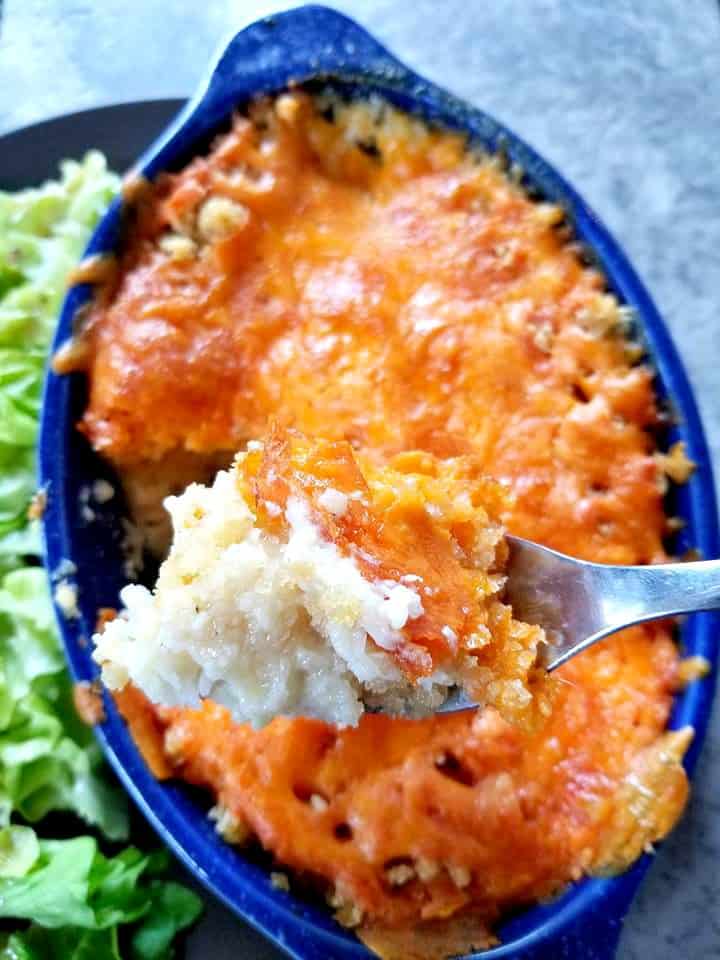
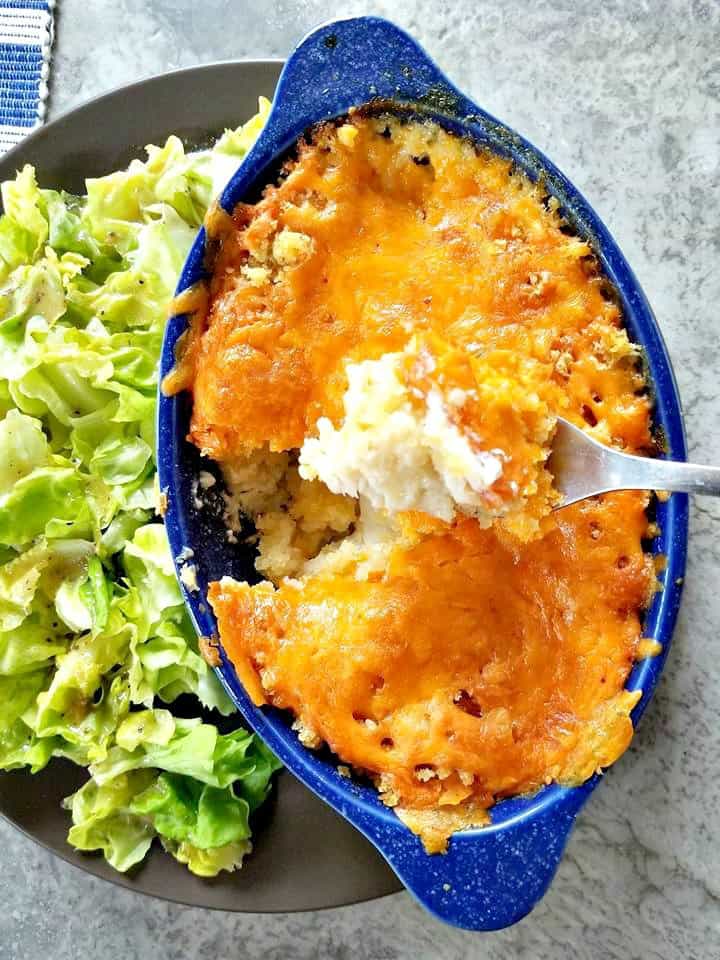
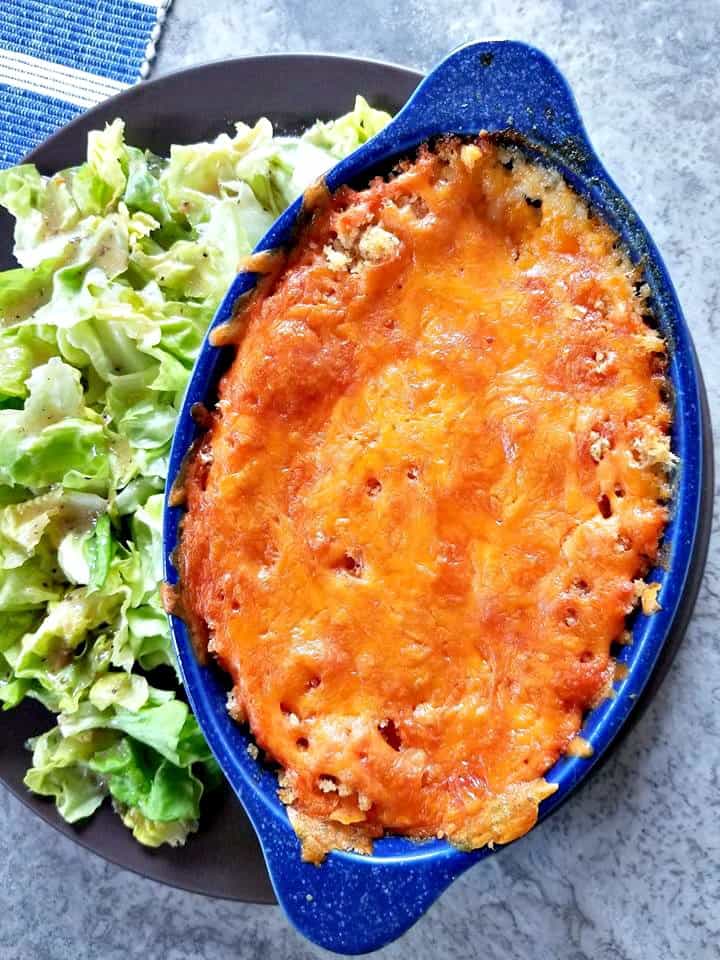
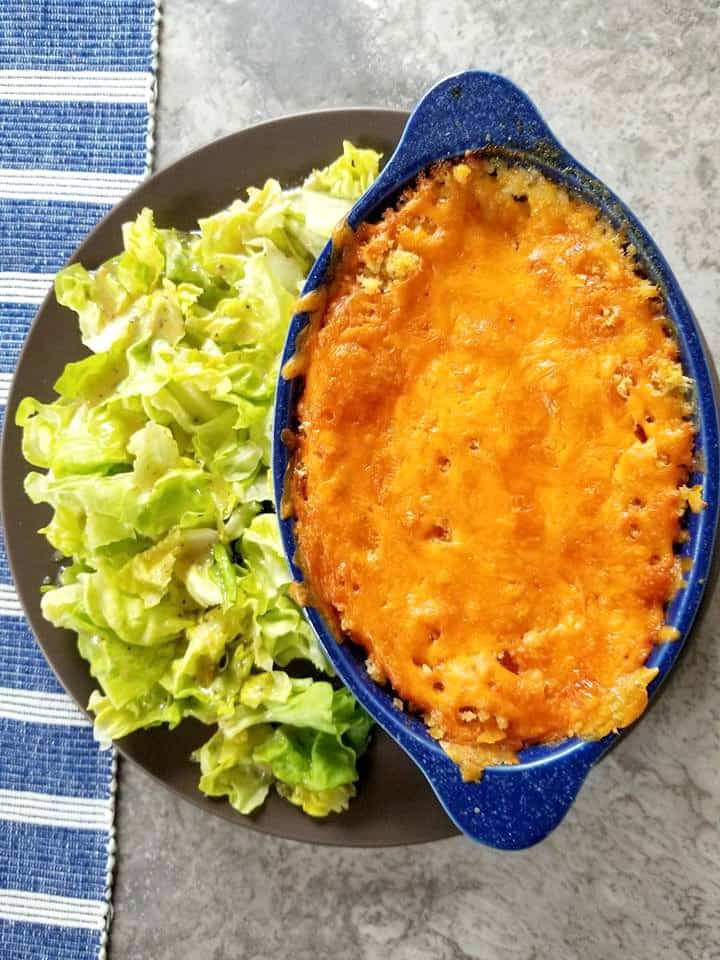
Newfoundland Cod Au Gratin is a traditional recipe that comes from the Maritimes in Eastern Canada. It’s also super easy to make and absolutely delicious!
Newfoundland Cod Au Gratin
If you’re looking for a excellent recipe that utilizes fresh or frozen cod fish, then you have just found it!
It is finished off in the oven or under the broiler till it gets perfectly browned.
I made my cod au gratin in two oven safe baking dishes, however you can also make this exact recipe in a 8.1in X 2.1in baking dish.
Wanting to make more? Simply double the recipe with my easy to use recipe adjuster above in the ingredients section! Then you can use a large baking dish and serve more people with that!
WHAT IS COD AU GRATIN?
Cod Au Gratin is a dish that originates from the maritime provinces in Canada, Newfoundland to be exact. It is a dish consisting of fresh cod, flour, bread crumbs, lemon juice, cheese, and other seasonings and spices.
Some people use breadcrumbs and onions, while others don’t. For this dish we used onion powder, panko bread crumbs and a little dijon mustard. It is all about personal preference when it comes to making this or any dish.
We ask our Direction of Operation what he thought, about the dishes original origins. He stated that it is a well known fact that Newfoundland has a deep connection to it’s Irish and English heritage.
However he thinks that the dish was introduced by the French. What do you think?
If anyone knows indefinitely, we would love to hear about it!
CAN I USE FROZEN COD FOR COD A GRATIN?
Yes, and that is what I used. Just be sure to defrost it and pat it dry prior to using. I find the best way to defrost fish is in a warm bath of water. Not hot and not cold, luke warm is perfect.
HOW TO MAKE NEWFOUNDLAND COD AU GRATIN?
HOW LONG TO COOK COD AU GRATIN
You will want to start with some fresh cod or frozen that has been defrosted and patted dry.
Then you will want to set aside some shredded cheddar cheese and parmesan cheese.
You will start by heating some milk in a small saucepan till hot, once the milk has reached that hot consistency. Remove it from the heat and create the roux.
Create a roux by heating the butter first then flour then whisking the milk in with a whisk to create a smooth texture.
Turn up the heat to medium heat before adding in the parmesan cheese and dijon mustard. Then remove from the heat and set aside.
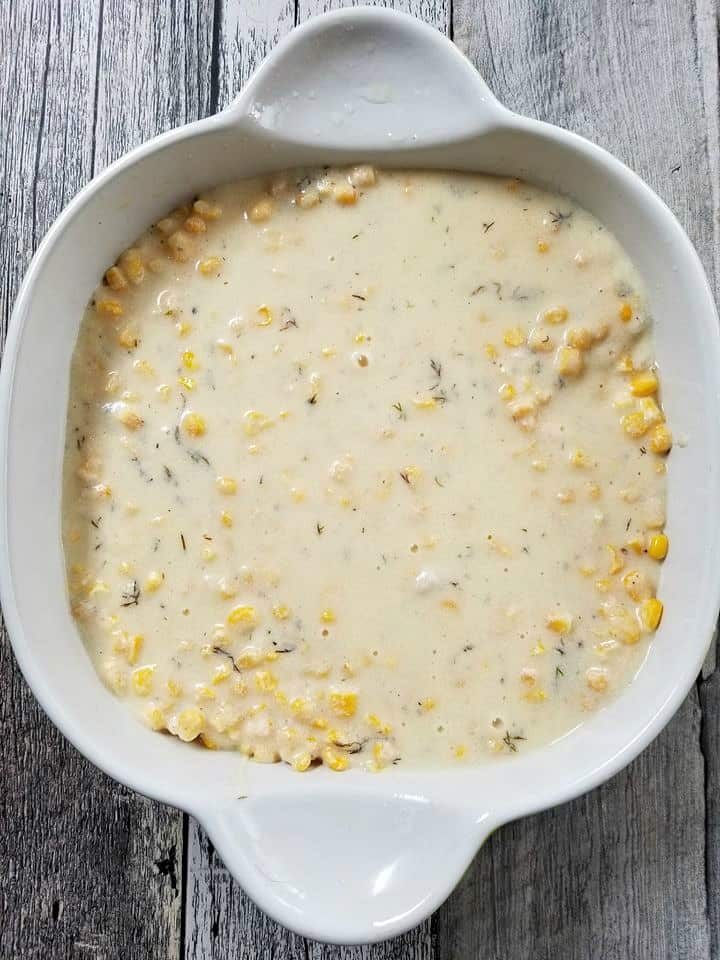
Place the fish in the bottom of a shallow baking dish and toss with olive oil then season with onion powder and salt + pepper.
Once the fish has been seasoned, simply pour over the roux and season with fresh dill.
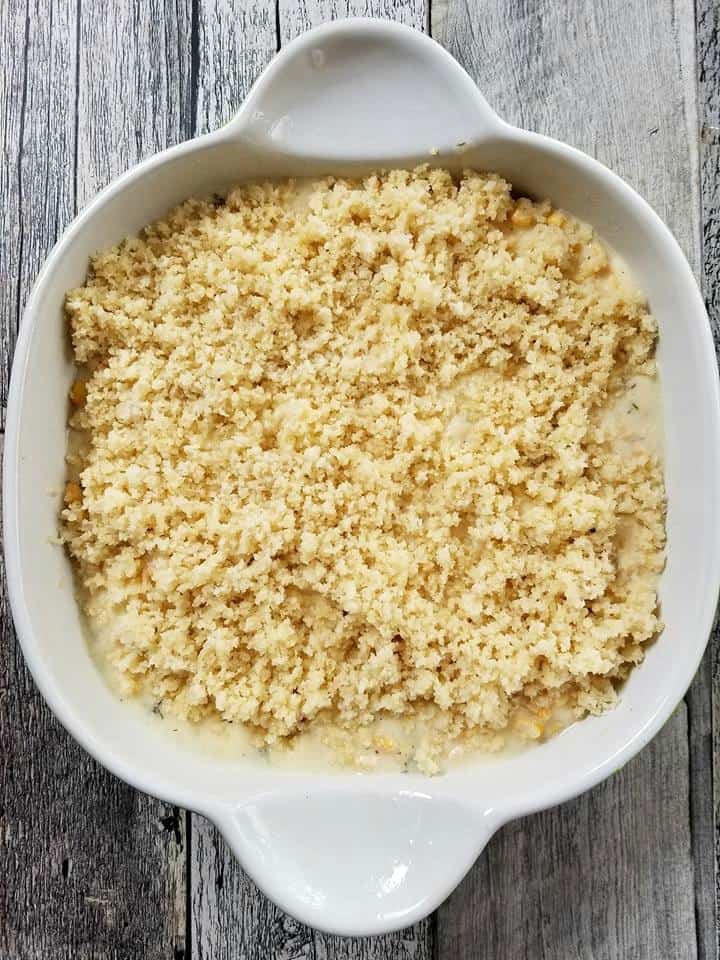
In a small bowl, mix the panko bread crumbs with olive oil and 2 tbsp of water and place overtop of the fish/roux.
Cover with the shredded cheddar cheese and bake at 350
Individual cod au gratin dishes should take about 30 minutes.
Larger dishes take a bit longer, be sure to check the center of the dish to ensure the fish is flaky and cooked before serving!
I’m really surprised that I have never heard of this dish before, however Canada is a BIG Country.
And Newfoundland is located on the far east and I on the West. So I guess it makes sense, but now that I know of it.
I am forever hooked!! It is not only super simple to make and it is also a very healthy and a hearty meal that can be enjoyed by the whole family.
WHAT GOES WITH COD AU GRATIN?
Salad
Corn on the cob, frozen corn or another vegetable of your liking
I recently learned about this dish from another Canadian food blogger named Dawn who is over at Girl Heart Food.
She actually lives in Newfoundland and shared her recipe on her instagram feed last week, I was immediately intrigued and vowed to try it.
After doing some more research on it, I learned their are slightly different ways to make it. And so I used what skills I have in the kitchen and made my own variation.
I hope you give it a try, because it is absolutely amazing!
CAN COD AU GRATIN BE FROZEN?
Yes, that is if you are using fresh cod to begin with. You will want to purchase the freshest cod possible, then you will make the dish exactly as stated.
However before freezing it, be sure to allow the roux to cool down completely before pouring over the fish and do not bake it. Safe that for the day you want to eat it. Remove from the freezer and simply bake at 350 for 45 minutes till done!
DID YOU MAKE THIS RECIPE?
If you make this recipe, I would love to hear about it! You can leave a 5 star review in the comments below! Thank you very much for reading and until next time see ya in the kitchen. Don’t want to miss a recipe? Sign up for our NEWSLETTER delivered right to your inbox!
Inspired by two Newfoundland Canadian Bloggers, you can find their recipes here: Cod Au Gratin & cod au grati
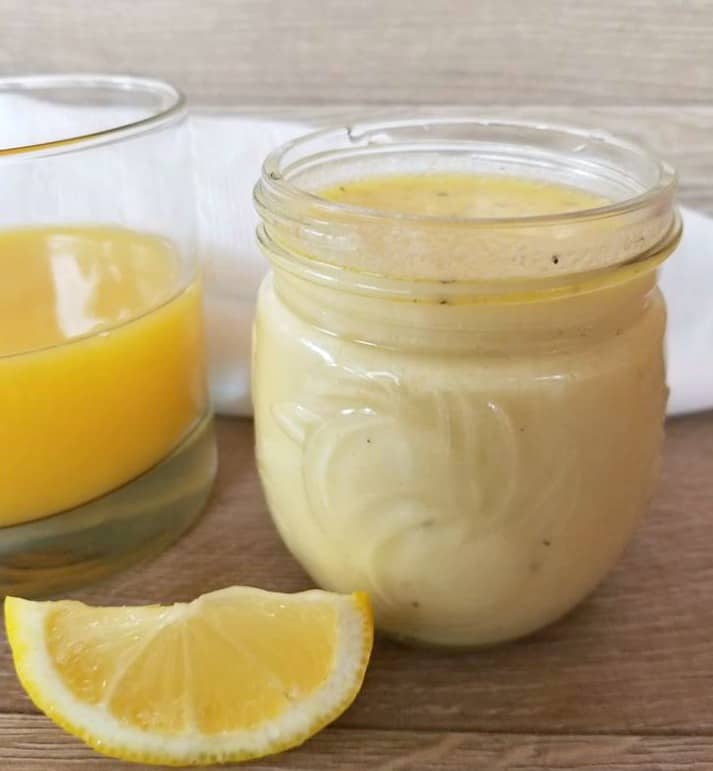
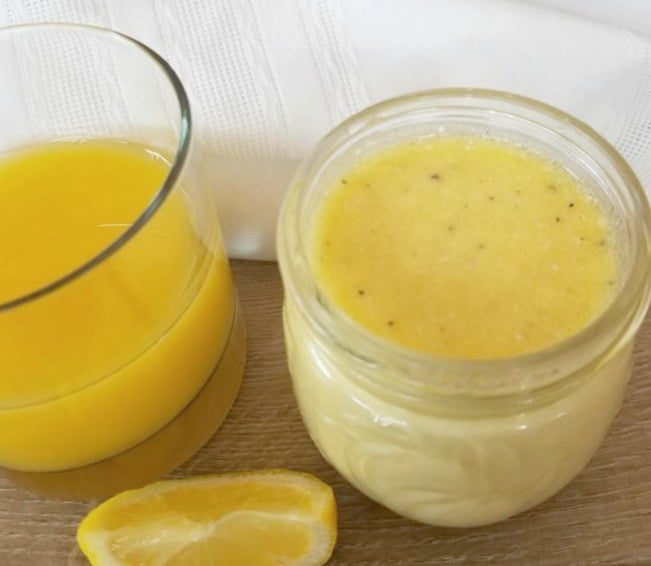
This Healthy Creamy Citrus Ginger Vinaigrette is made with plain yogurt, orange juice, lemon juice, ground ginger, minced garlic olive oil and a few spices.
This Vinaigrette is the start to a line of Healthy Vinaigrette recipes that I will be featuring on my blog over the next few weeks.
So if you liked this one, then be sure to follow me as I will be releasing more of my favorite homemade vinaigrettes in the coming weeks.
This type of vinaigrette goes well on many different types of salads. Think shrimp, white fish, chicken or chick pea type salads and of course with avocados, cabbage, cucumbers, tomatoes and pretty much any type of veggie.
So what makes this a healthy vinaigrette?
Well it is the Plain Yogurt, then I mix that delicious yogurt with fresh orange and lime juice along with some minced fresh ginger, ginger powder, olive oil and salt to taste.
I know longer purchase those store bought salad vinaigrette or dressings, because I have learned to make these better and healthier ones at home.
This Vinaigrette pairs really well with all types of vegetables and proteins.I like to use mason jars for my dressings.
Then you can simply shake everything together and wulla it’s ready to enjoy! You will find a few of my recipes below that feature this dressing in them!
Citrus Explosion = Delicious!
Stores in the fridge up to 3 weeks!
Also if you prefer more sweet than tangy vinaigrette feel free to add anywhere from 1 tsp to 1 tbsp of honey to sweeten it up. Personally I like it without!
Then store in the fridge for a minimum of one hour to allow the flavors to merge.
LOOKING FOR MORE AWESOME DIP/DRESSINGS? Try some of my favorite Homemade Creations below!
I am so thrilled you are reading one of my recipes, if you made this, I want to see! Follow Canadian Cooking Adventures Instagram, snap a photo, and tag and hashtag it with @canadiancookingadventures and #canadiancookingadventures.
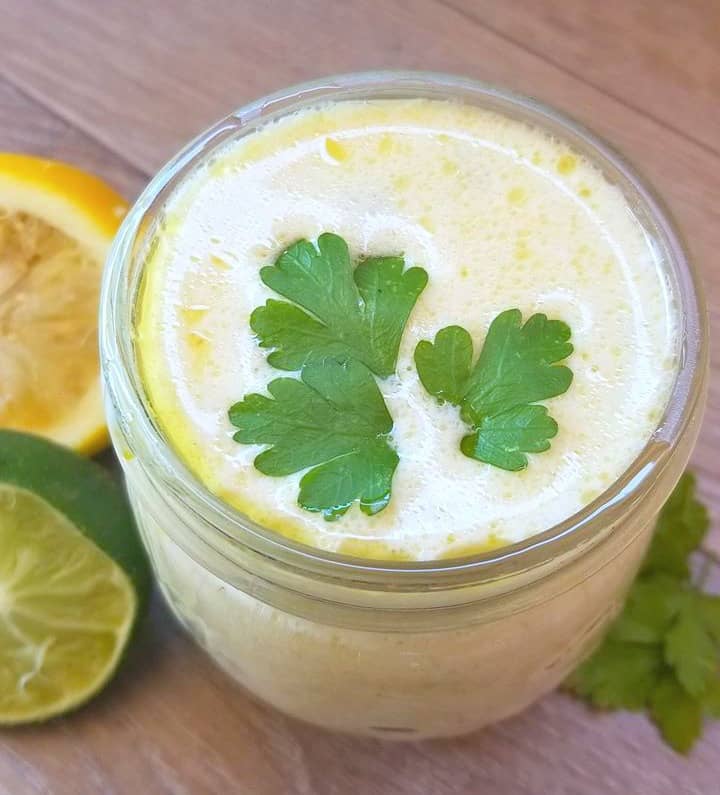
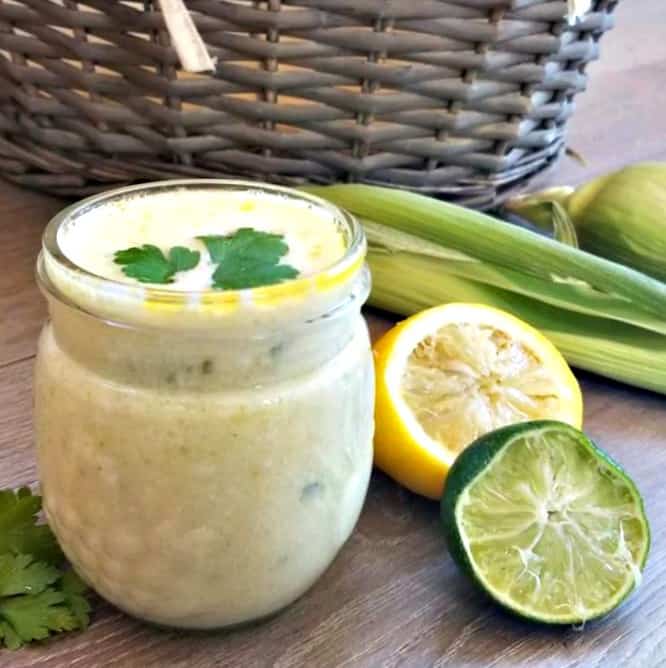
This Healthy Creamy Lemon and Lime Vinaigrette goes well on many different types of salads.
Think shrimp, white fish, chicken or chick pea type salads and of course with avocados, cabbage, cucumbers, tomatoes and pretty much any type of veggie.
This is the start to a line of “Healthy Vinaigrette” recipes that I will be sharing on this blog over the next few weeks, so if you liked this one.
Then be sure to follow me as I will be releasing more of my favorite homemade vinaigrettes in the coming weeks.
So what makes this a healthy vinaigrette? Well it is the Plain Yogurt, then I mix that delicious yogurt with fresh limes and lemons, cilantro, minced garlic, olive oil and salt to taste.
I know longer by those store bought salad vinaigrette or dressings, because I have learned to make even better ones at home.
This Vinaigrette pairs really well with all types of vegetables and proteins. And can be stored in mason jars in your fridge for up to 3 weeks.
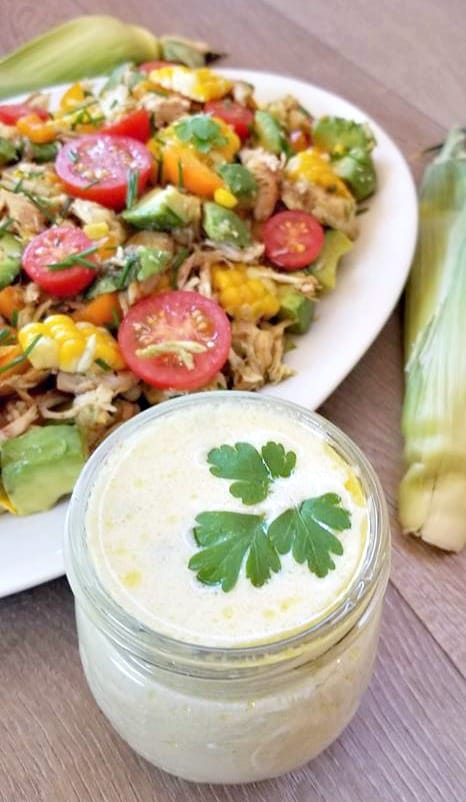
One of my favorite ways to use this dressing would be on fish tacos and over a fresh Corn on the Cob salad. See below for that full recipe!
I like to use mason jars for my dressings. Then you can simply shake everything together and wulla it’s ready to enjoy!
Healthy Creamy and Light = Perfection!
Note: Stores in the fridge up to 3 weeks! Also if you prefer more sweet than tangy vinaigrette feel free to add anywhere from 1 tsp to 1 tbsp of honey to sweeten it up.
Personally I like it without!
I am so thrilled you are reading one of my recipes, if you made this recipe i’d love to hear about it! Thank you very much for reading and until next time see ya in the kitchen. Don’t want to miss a recipe? Sign up for our NEWSLETTER delivered right to your inbox every month!
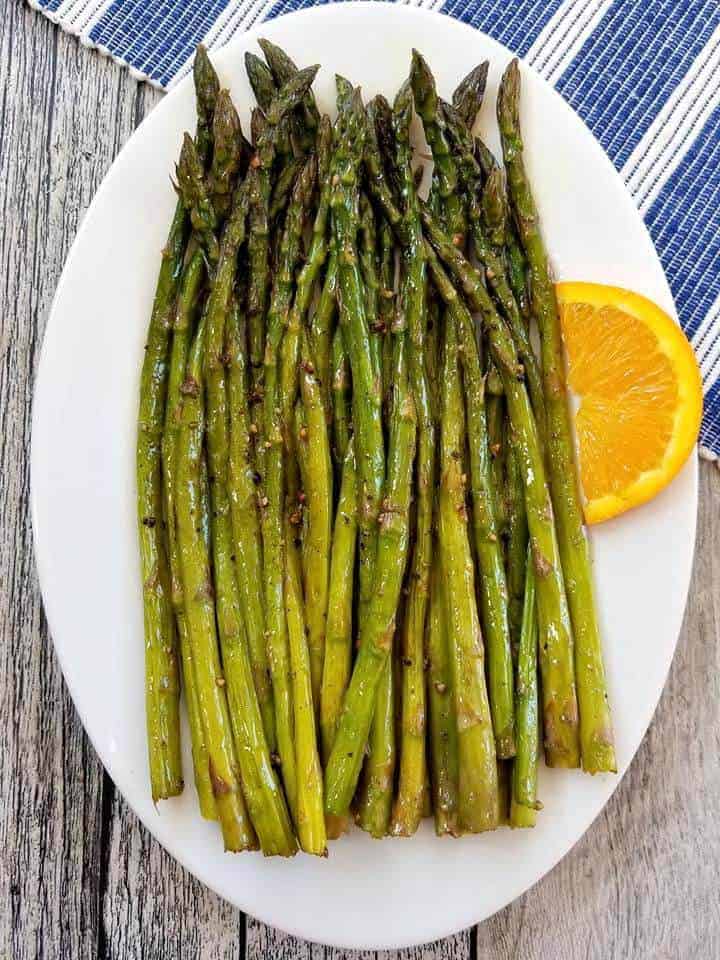
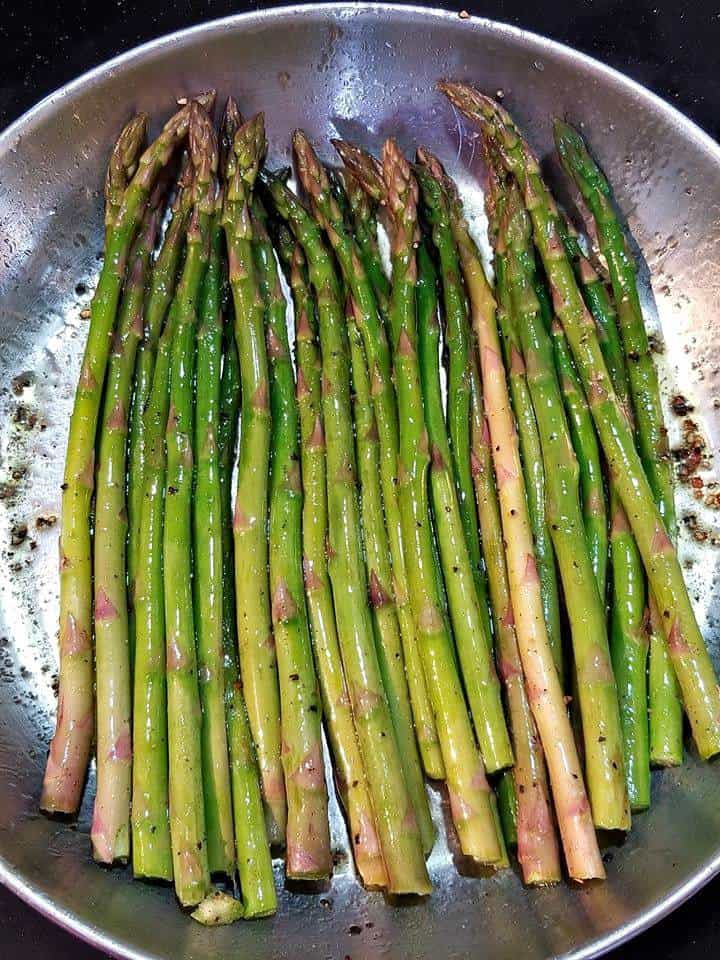
This Simple Sauteed Asparagus recipe is my go to recipe for whenever I’m making Asparagus.
It is panned fried and ready in less than 20 minutes!
Asparagus is best when prepared simply like this, if you ask me.
Plus, you really don’t need to add anything extra special to it.
IS SAUTEED ASPARAGUS HEALTHY
Yes, asparagus is low in calories and is a proven food item that works well for those trying to loss weight. Plus it is is packed full of great source of nutrients, including fiber, folate and vitamins A, C and K.
It makes for one tasty and healthy snack, that is for sure.
HOW TO MAKE SAUTEED ASPARAGUS
For this recipe, I used olive oil and one tablespoon of butter. The mixture makes for a really crispy and tasty asparagus dish.
It is then lightly fried over medium heat till tender yet crisp.
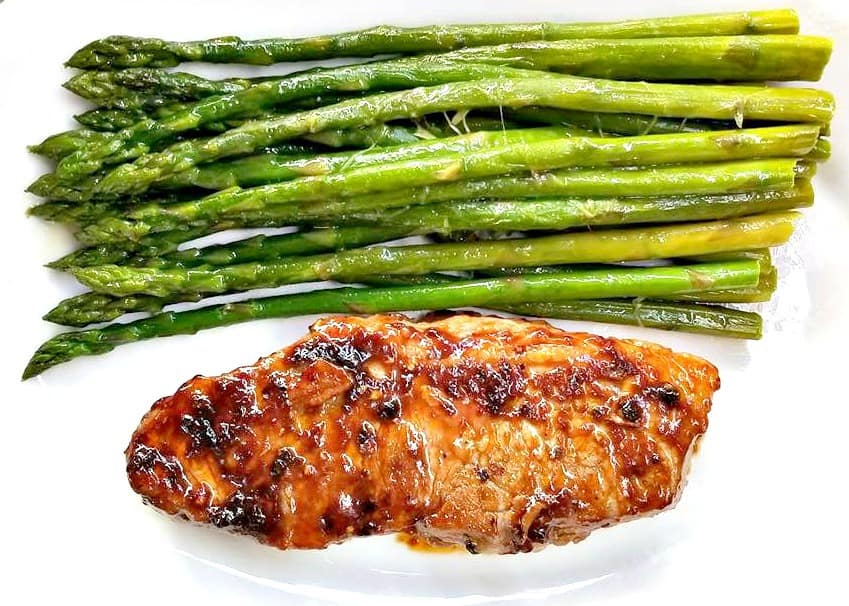
Asparagus goes well alongside many different types of dishes though. So this recipe can be served with just about any type of main course if your liking.
I have included a few recipes suggestions below! I hope you find what you’re looking for tonight.
Wanting to feed more people? Simply double the recipe up, easy enough eh?
That is it, simple and super tasty side dish that will have you coming back for more!
You can of course add crushed garlic to the asparagus during the last 2 minutes of sauteing if desired.
So, if you’re looking for a healthy and satisfying side dish to your dinner tonight or just a better way to prepare Asparagus. You just found it!
You can also bake the asparagus, however that takes longer to cook and turns out less crispy.
I much prefer my asparagus sauteed as I can cook it just to my liking.
What way is your favorite way to make asparagus?
Will you give this recipe a try?
SIMPLE SAUTEED ASPARAGUS
If this recipe looks good to you, please pin it and share it.
★ Did you make this recipe? Please give it a star rating below! ★ Thank you very much for reading and until next time see ya in the kitchen. Don’t want to miss a recipe? Sign up for our NEWSLETTER delivered right to your inbox!
I’m thrilled you are reading one of my recipes, if you made this recipe i’d love to hear about it! Don’t want to miss a recipe? Sign up for our NEWSLETTER delivered right to your inbox!