Crispy Fried Shrimp

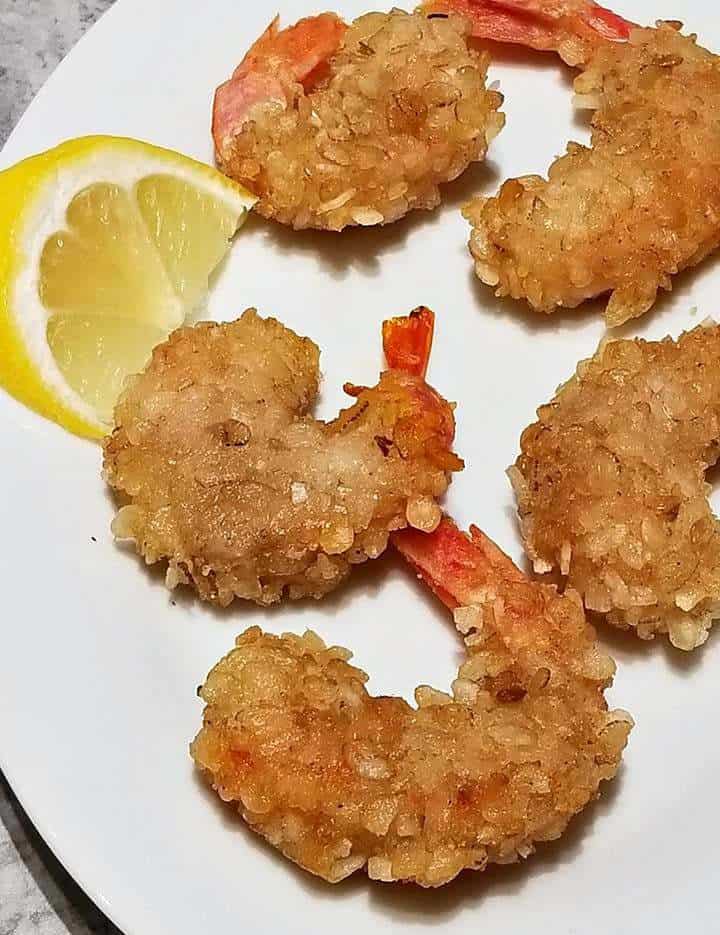
This Crispy Fried Shrimp recipe is made with rice crispy and coconut flakes then is deep fried in a little oil that crisps it up just right. 

This whole recipe can be made in less than 20 minutes, your going to love it!

Crispy fried shrimp is out of this world juicy on the inside and crispy on the outside. 

Looking for a salad to serve alongside? I would recommend my Quinoa and Avocado Salad which would go very well with this appetizer. 

It’s, Monday which means we have a long haul to the weekend. And so I wanted to come up with a quick and delicious recipe for a weeknight.

And took a look in my freezer and found a large bag of shrimp and came up with this delicious recipe.

Which has turned out to be one of our new favorite shrimp recipes of all time. 

These shrimp can be served as is or alongside just about any other dish.

As well you can serve them with your favorite sauce, such as tartar sauce or cocktail sauce.

Which would make these a great option to serve a crowd as an appetizer.

I also like to serve them with fresh lemon wedges as you can see in the recipes pictures. Once you try these shrimp, you will be hooked.

You can always substitute the rice Krispie’s for panko breadcrumbs if you do not have them on hand. However the rice Krispie’s are truly the better option.  

Inspired byseriosuseats

Did you like this recipe? Try my other fan favorite shrimp recipes. Such as my “Garlic and Lime Shrimp” or my ”  ” it’s delicious too!

I am so thrilled you are reading one of my recipes, if you made this recipe I’d love to hear about it! Thank you very much for reading and until next time see ya in the kitchen. Don’t want to miss a recipe? Sign up for our NEWSLETTER delivered right to your inbox every Month!
Chinese Beef Pepper Steak

Skip the takeout tonight and try this “Chinese Beef Pepper Steak” instead. 

It is absolutely delicious and so healthy for you. So feel free to indulge and sharing is not mandatory! 

I like good quality chinese food and will seek it out when the craving hits. 

I lean more towards those authentic type dishes than those americanized sweet ones.

This dish definitely delivers on those authentic flavors. 

So if your like me and prefer a more authentic stir fry too then you’re definitely going to want to add this recipe collection!

Sauteed in the most delicious sauce your family won’t believe this didn’t come from delivery.

So what is in that secret sauce anyway? Well it’s a simple combination of  oyster sauce, soya sauce, cornstarch, sugar, rice vinegar and some great spices.

You are sure to be reminded of your best dining experience at your favorite asian restaurant with this one.

Your wanting to use a fast fry steak here and simple marinade it for 15 minutes prior to ensure it is as tender as possible.

To do that slice the steak against the grain and marinade it in a bit of baking soda then after the 15 minutes is up your going to run that clean under cold water.

Then add all the “sauce” ingredients back into a bowl with the cleaned steak and now your ready to pull it all together in the wok!

Meanwhile, while the steak is marinating in the sauce you can get your rice going either on the stove or in your rice cooker and also chop up all the vegetables = Red and Green peppers, onions, garlic and ginger.

Then the rest of the dish takes less than 15 minutes to pull together, talk about easy enough eh? 

For this recipe you can throw in practically any type of vegetable in, sometimes will throw broccoli and snap peas for another version.

However this version is definitely my all time favorite, I could eat this once per week or more and sometimes i do 🙂

I like to serve this with some cooked jasmine rice on the side, I hope you give it I would love to know what you think?

If you liked this recipe? Then you will want to try my other ASIAN inspired recipes below!

Looking for more Chinese style recipes? search the blog’s Skip The Takeout” section for some more inspiration. 

I am so thrilled you are reading one of my recipes, if you made this recipe i’d love to hear how it turned out! Thank you very much for reading and until next time see ya in the kitchen. Don’t want to miss a recipe? Sign up for our NEWSLETTER delivered right to your inbox!


Black Pepper Beef Broccoli Stir Fry

Does your family like authentic chinese food as much we do? Well then you’re definitely going to want to add this Black Pepper Beef Broccoli Stir Fry to your recipe collection!

I’m now happy to share with you my family’s favorite way to make black pepper beef stir fry. 

This recipe is not only super delicious, it’s also quick and healthy for you, win win!

Also this dish can be made for a fraction of the cost of what you would pay for takeout.

So if your trying to get your family to eat healthier, try this recipe tonight.  

Sauteed in the most delicious sauce your family won’t believe this didn’t come from delivery.

If you tried my Black Pepper Chicken stir fry and liked it then your sure to like this one too.

There are a few different techniques to making it with beef, which I will teach you below.

First off the beef needs to be first tenderized first and foremost. 

I learned to do this recipe through much trial and error and found the type of beef that works best is “flank steak” however you could use tenderloin or new york strip as well.

Then you will want to thinly slice the beef against the grain and allow it to marinade in baking soda for a minimum of 20 minutes to tenderizes it.

You can throw in practically any type of vegetable, I sometimes will use just peppers, other times I will use snow peas.

I hope you give it a try and if you do I would love to know what you think, just let me know in the comments below.  

I like to serve this Black Pepper Beef with some cooked jasmine rice on the side, and will use a mini rice cooker to cook the rice.

Just set it and it will be ready when the dish is completed. I hope you give it a try there really isn’t much too it!

Meal Prep Idea: Make enough to create a few meal prep bowls for the week ahead, this recipe will feed two for dinner and create two meal preps.


If you liked this recipe? Then you will want to try my other ASIAN inspired recipes below!

Notes:  You may use any other vegetables you have on hand such as snow peas, green peppers etc.  Also feel free to use anywhere from 1 tsp to 3 tsp of black pepper depending on your households preference. 

I am so thrilled you are reading one of my recipes, if you made this recipe i’d love to hear how it turned out! Thank you very much for reading and until next time see ya in the kitchen. Don’t want to miss a recipe? Sign up for our NEWSLETTER delivered right to your inbox!

Chocolate Chunk Nut Banana Bread

I have been told on numerous occasions that my Chocolate Chunk Nut Banana bread is Amazing. I will let you be the decider on that though!

This bread is kind of like eating a cake and a cookie all at once, but way more healthier than a cake or cookie.

Because are omitting the oil and using 3 ripe Bananas (the riper the better) + Macadamia & Walnut pieces that makes this a very nutritious and satisfying snack.

Soft and Moist on the inside, and slightly crunchy on the outside. This is the stuff dreams are made of if you ask me 🙂 I hope you give it a try!

Note: You can substitute chopped pecans, hazelnuts or almonds if you prefer.


I am so thrilled you are reading one of my recipes, if you made this recipe i’d love to hear about it! You can post a review/picture below or tag us on social media at #canadiancookingadventures and let me know how it turned out. And by doing so you will be automatically entered into our seasonal CONTEST to win one of our great prizes. Winner will be notified via email within a week after the contest closes. Thank you very much for reading and until next time see ya in the kitchen. Don’t want to miss a recipe? Sign up for our NEWSLETTER delivered right to your inbox!

PIN IT FOR LATER


White Chocolate Macadamia Nut Cookies

T’was the night before Christmas, when all through the house, not a creature was stirring, not even a mouse. And that’s because the mice know that these cookies are for Santa and his reindeer. 

WHO INVENTED WHITE CHOCOLATE MACADAMIA NUT COOKIES

White chocolate chips were invented by Nestle in the 30’s, but macadamia nuts weren’t available to the public until 1975. Sometime after that these delicious flavors found each other, and history was made. 

I just love Macadamia Nuts and putting them in cookies is Amazing.

Plus these are Santa’s favorite cookies, so make sure save some for him too.

There are various recipes online that claim to be the best, I have tried a few. I have also tried a few from cookbooks and magazines that I have in my library.  I’ve come up with this recipe that makes the best large chewy cookies that everyone is sure to love.

CAN YOU FREEZE WHITE CHOCOLATE MACADAMIA NUT COOKIES

Yes, once you make the dough you can freeze in into small balls in the fridge for up to 3 months. Covered of course, then simply defrost them and smash them down before baking. 

HOW TO MAKE White Chocolate Macadamia Nut Cookies

The key is the ingredient ratio; along with using butter and shortening in the recipe. So be sure to follow this one to a tea and you will be sure to have the best cookies this time of year.

Christmas is just right around the corner, so I am getting my holiday baking done early this time. That way I have plenty of time to do all the other things that are at hand.

These cookies are simple to make and really go well with a cup of milk, rather rumor has it.

These White Chocolate Macadamia Nut Cookies are one of Santa’s favorite cookies.

So if you leave them by the chimney this Christmas he may leave behind something extra special for the baker.

Wishing you and your’s a wonderful and very merry Christmas.

Super easy to make, you can have these done in under 30 minutes.

Notes: After cookies are completely cooled, place in airtight container or plastic freezer bag.  Keep the dough refrigerated if you are going to be making these in batches.

Don’t forget to leave them by the fireplace with a glass of milk for Santa. 

LOOKING FOR MORE CHRISTMAS DESSERTS?

I am so thrilled you are reading one of my recipes, if you made this, I want to see! Follow Canadian Cooking Adventures Instagram, snap a photo, and tag and hashtag it with @canadiancookingadventures and #canadiancookingadventures

Stay connected and follow along on FacebookPinterest, and Instagram for all of my latest recipes!

Elf Cookies

Merry Christmas and Happy Hanukkah! If you have not tried Elf Cookies you are in for a treat. 

Right about now, Santa is up in the North Pole working hard in his workshop to ensure all the good boys and girls receive their toys on time. 

These cookies are very similar to the cookies Mrs. Claus would serve the Elves in Santa’s workshop during the Christmas season.

Mrs. Claus is baking up the most delicious foods  that will help to sustain everyone during this busy time of year. Ever wonder how the elves get their energy? It’s by eating elf cookies of course.

Not only are these cookies super moist and tasty they’re also very healthy for you.

Packed full of  antioxidants, from the The Matcha powder which also known to enhance a calming effect because of the amino acid L-Theanine, which helps with the production of dopamine and serotonin. 

These two chemicals serve to enhance mood, improve memory, and promote better concentration something that can benefit everyone! This offers just the right amount of sustainable energy that helps to keep the elves going all night long. Serve with a light cream cheese topping, and some green sprinkles, just make sure you allow the cookies to fully cool down before hand. Otherwise the cream topping will melt and drip down the cookie.

We hope you enjoy them as much as we do.

Wishing you and yours a joyful, peaceful and warm, holiday season!


Serve them with a pre-made or homemade whipped cream frosting!


Super easy to make, you can have these done in under 30 minutes.

Notes: Make sure the cookies are completely cooled, before placing the whip cream topping on.


I am so thrilled you are reading one of my recipes, if you made this recipe i’d love to hear about it! Thank you very much for reading and until next time see ya in the kitchen. Don’t want to miss a recipe? Sign up for our NEWSLETTER delivered right to your inbox every Month!


Healthy Peach Sweet Tea

There are many ways to prepare traditional southern sweet tea, one has you cooking down those peaches and straining them afterward.

Personally I do not like that method to much because you are also straining out the peach pulp and throwing away a lot of your peaches, that is a crime if you ask me!

Also allot have you adding more than a cup of refined sugar… no way i am not doing that.

Now I am not saying i don’t consume refined sugar ever, i’m just saying that I try not to don’t drink it. Bubba just came back from our local farmer’s market earlier today with a basket of the plumpest peaches that worked perfect for this recipe.  

He says, if you can’t get your hands on fresh peaches then just make sure to boil out any excess water from the frozen variety before adding your honey for the initial steps and it will work just the same. 

So please forget that American sweet tea, which is filled with refined sugar and is not very good for you and give this healthy version a try, I’m calling this recipe my “Healthy Peach Sweet tea”.

It tastes very similar to the American kind, however it’s much better for you because we are blending the peaches whole, and thIs keeping all of the peach.


Also we use organic green tea bags and omit the refined sugar by replacing it with raw honey or agave syrup. Did you know that Choosing RAW honey will also help your immune system stay tough during seasonal allergy attacks, as it has a natural antibacterial nature? If that’s not more reason to sip this all year- long I don’t know what is. Well enjoy ya’ll… wait,  why am i talking like an American? Must be the sweet tea doing that…

HOW TO MAKE PEACH SWEET TEA

  1. Place 3 chopped up peaches in a blender and blend till smooth. 
  2. Now let’s make a simple syrup, pour those purred peaches into a medium sauce pan and add your honey, over low to medium heat cook them down together for about 4 mins.
  3. Make 1 gallon of unsweetened Tea, I use Organic Green Tea
  4. To make the tea, boil your water and add it to an unbreakable pitcher.
  5. Add in a pinch of baking soda (this takes away any bitterness)
  6. Steep your tea, by adding 6 tea bags into the hot water for 5-10 mins and be careful not to over steep otherwise your tea will be bitter.
  7. Remove tea bags and discard.
  8. Add in your purred peaches/honey and stir till dissolved.
  9. Once cooled, place in the fridge and allow it to chill.
  10. Serve over ice, and add some peach slices or mint if you’d like.
  11. Enjoy!

If you liked this recipe, check out my Healthy Raspberry ice tea recipe

Note: Allow your tea to cool before adding to any type of glassware and before placing it in the fridge. You don’t want a shattered pitcher or fridge shelf. Also you can use black tea or green tea for this recipe, both work great. I hope you enjoy!

I am so thrilled you are reading one of my recipes, if you made this, I want to see! Follow Canadian Cooking Adventures Instagram, snap a photo, and tag and hashtag it with @canadiancookingadventures and #canadiancookingadventures

Stay connected and follow along on FacebookPinterest, and Instagram for all of my latest recipes!