This Dill Pickle Potato Salad is made with garlicky dill pickles and it’s juices, egg, russet potatoes, mayonnaise, plain yogurt, dijon mustard and fresh dill.
Let me tell you, this recipe is a sure WINNER!
This salad can be thrown together in no time at all.
I brought this to a potluck recently and obviously did not make enough to feed the 10 people there.
It was gone in no time at all, so if you’re wanting to prepare this for a group of 10 or more double it up, it’s easy to do so anyway.
Wanting to serve a larger crowd? Simply double up the ingredients!
To make this vegetarian omit the mayo and eggs and use a vegetarian mayo.
Personally I like using Hellman’s mayo, it’s my favorite!
I am so thrilled you are reading one of my recipes, if you made this recipe i’d love to hear about it!Thank you very much for reading and until next time see ya in the kitchen. Don’t want to miss a recipe? Sign up for our NEWSLETTER delivered right to your inbox!
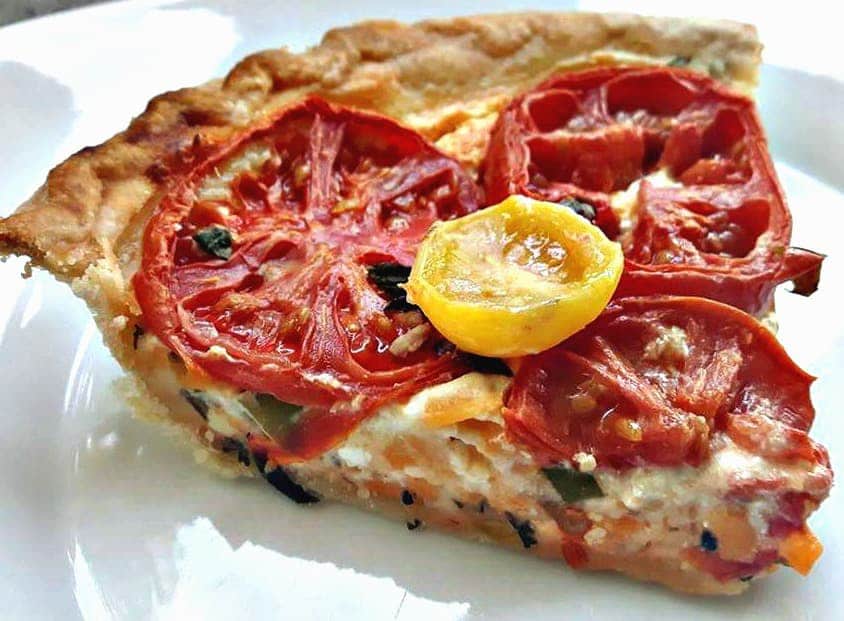
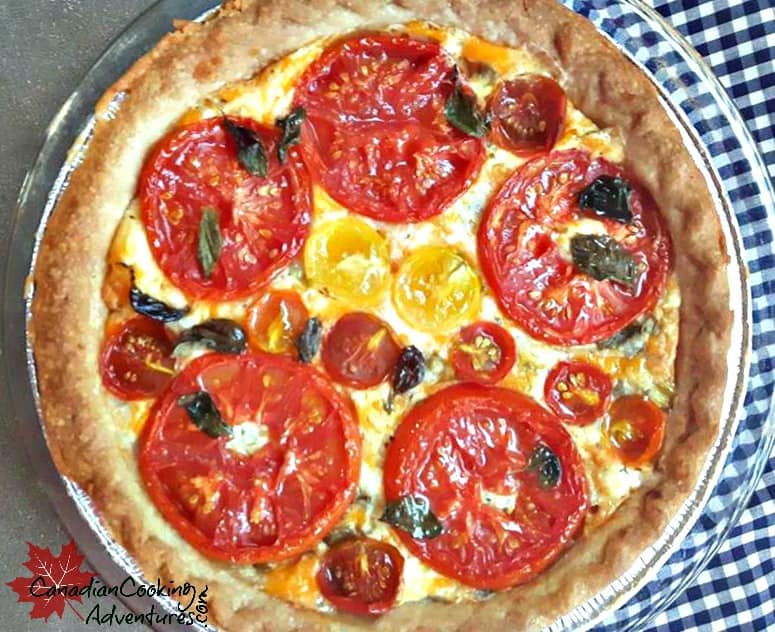
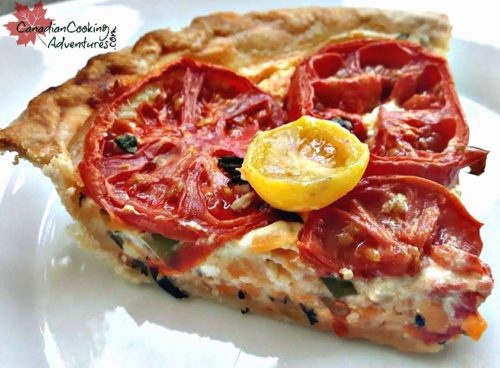
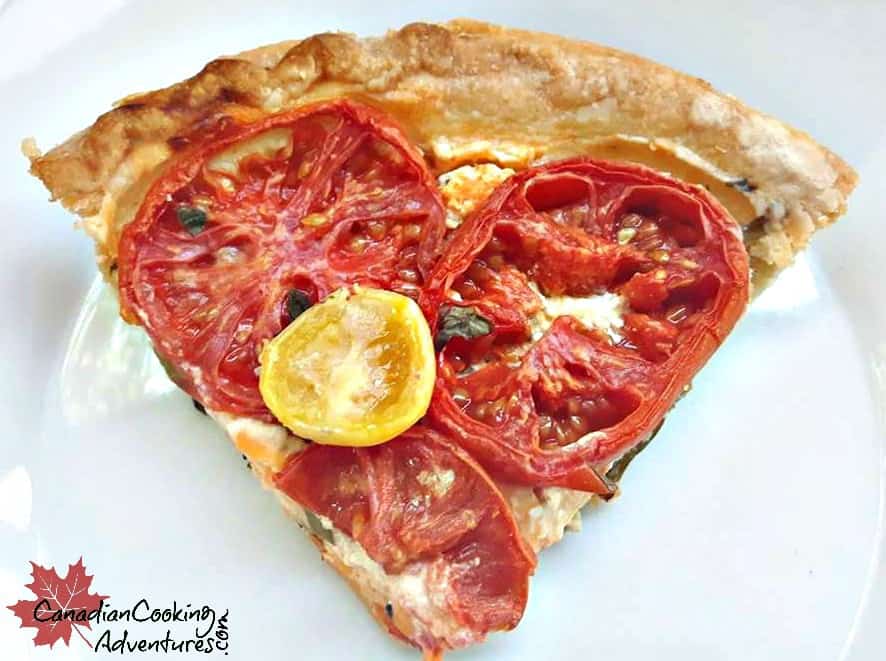
It’s that time of year, where our gardens are bursting with tomatoes. So why not make a tomato pie? I love tomatoes, don’t you? I also have a pre-made pie crust in the freezer, so I thought why not make this delicious pie and share it with my readers. You can make your pie crust of course, or just buy a pre-made one and have this on the dinner table in under 45 minutes. It’s great for breakfasts or dinner and you can add any kind of tomatoes you like. Looking for a more vegetarian type tomato pie, simply omit the eggs and add some sauté asparagus it will be just as good. I hope you give it a try, I’d love to hear how you liked it in the comments below!!
In a mixing bowl, combine the cheeses, sour cream, eggs, chopped green onion, mayonnaise, and whisk together till blended.
Next, on cutting board slice garden tomatoes, pat dry with a paper towl to remove excess moisture
Season generously with salt, pepper, thyme, basil.
Pre-heat oven to 425F.
Sprinkle a little flour on the pie shell, to ensure the shell.
Then pour your cheese mixture into the pie shell and then top with you garden tomatoes, drizzle a little olive oil on top and season lightly with salt and pepper.
Bake for 30 minutes until crust has completely browned and the tomatoes have roasted.
Serve immediately, enjoy!
Note: You can pre-cook some bacon and crumble it over the pie if desired.
I am so thrilled you are reading one of my recipes, if you made this recipe id love to hear about it! You can post a review, picture below or via Instagram and let me know how it turned out. And by doing so you will be automatically entered into our seasonal CONTEST to win one of our great prizes. Winner will be notified via email within a week after the contest closes. Thank you very much for reading and until next time see ya in the kitchen. Don’t want to miss a recipe? Sign up for our NEWSLETTER delivered right to your inbox every Month!
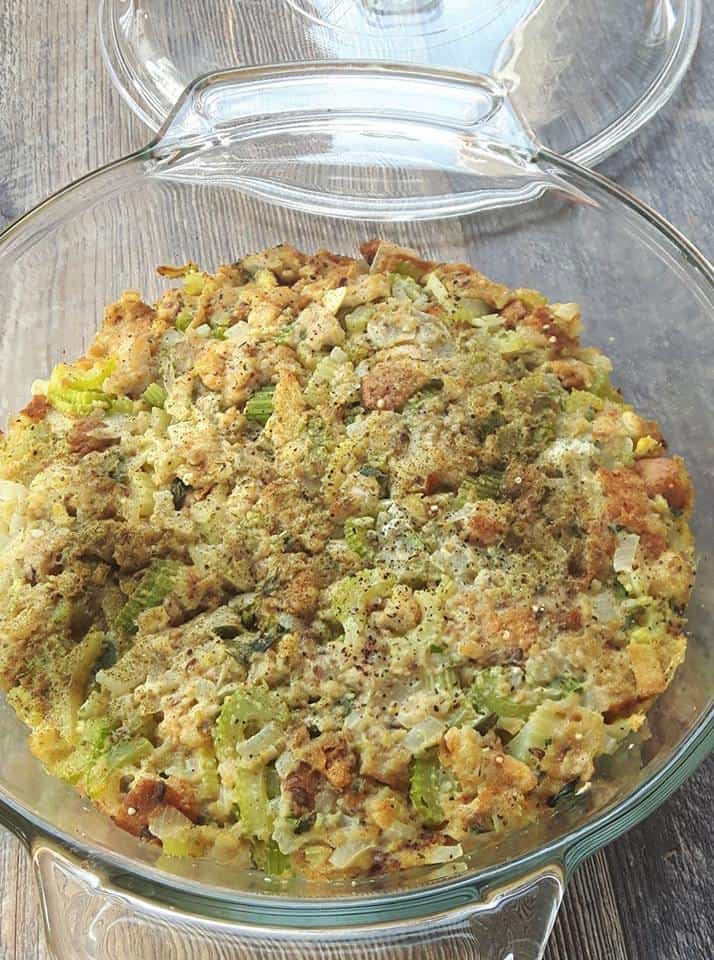
This Flax & Quinoa Dressing is vegan since we are using vegetable stock vs chicken and omitting the eggs.
Did you know that a stuffing that is not stuffed into a bird is called dressing? Some people like to make a dressing outside the bird and some like to make it inside the bird. It is completely up to you, however keep in mind the cooking times will vary.
Today, I’m making a dressing and on occasion I will make this same dressing and stuff it inside a bird when baking a Turkey. You may find the dressing a bit dry when baking outside the turkey and in that case you can prepare a gravy on the side and serve it alongside if desired.
I will do this sometimes if I want to serve turkey, because I just use the turkey drippings to make a perfect gravy. I find my Turkey cooks better without it stuffed inside anyway.
This dressing is so tasty, I could eat it all to myself. Now take note the dryer the bread the more tastier it will be also using a bread with other things in it only adds extra flavor. That is why I like to use Flax & Quinoa bread, which gives it a nice nutty flavor.
However you can use any type of bread of course, just make sure it’s dried out some before you tear it apart to ensure the stuffing is not soggy. You can also add less or more celery/onions as well, depending on your preference.
This recipe makes enough for roughly four servings, so if you want to serve more people just add a few more bread slices and adjust the other ingredients according to your taste, there really is not much to it. Enjoy!
It’s going to be so GOOD!
Note: You can add flax seeds, diced apples, cranberries or sunflower seeds to this stuffing if you desire to make it more hearty.
I am so thrilled you are reading one of my recipes, if you made this recipe id love to hear about it! You can post a review, picture below or via Instagram and let me know how it turned out. And by doing so you will be automatically entered into our seasonal CONTEST to win one of our great prizes. Winner will be notified via email within a week after the contest closes. Thank you very much for reading and until next time see ya in the kitchen. Don’t want to miss a recipe? Sign up for our NEWSLETTER delivered right to your inbox!
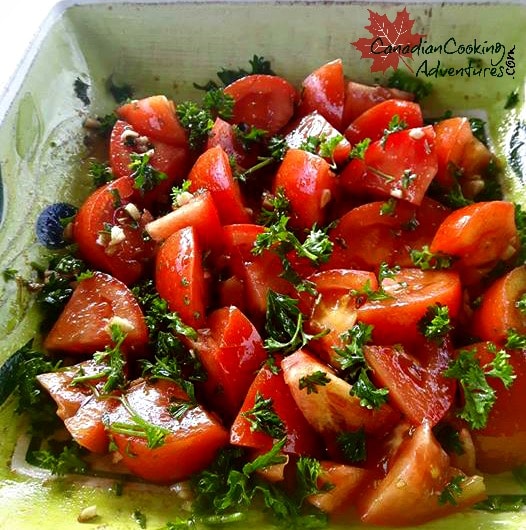
I like to make this salad all year long, however it truly tastes best made during the summer. When tomatoes are there freshest here in Canada. Preferably straight from the garden, those can’t be beat.
It’s a great salad because it’s quick to make and also very healthy, bursting with fresh tomatoes, balsamic vinegar, parsley, olive oil and garlic salt this recipe is sure to be a hit. Give it a try, you may be surprised that this simple little salad is so good.
I am so thrilled you are reading one of my recipes, if you made this recipe id love to hear about it! You can post a review, picture below or via Instagram and let me know how it turned out. And by doing so you will be automatically entered into our seasonal CONTEST to win one of our great prizes. Winner will be notified via email within a week after the contest closes. Thank you very much for reading and until next time see ya in the kitchen. Don’t want to miss a recipe? Sign up for our NEWSLETTER delivered right to your inbox every Month!
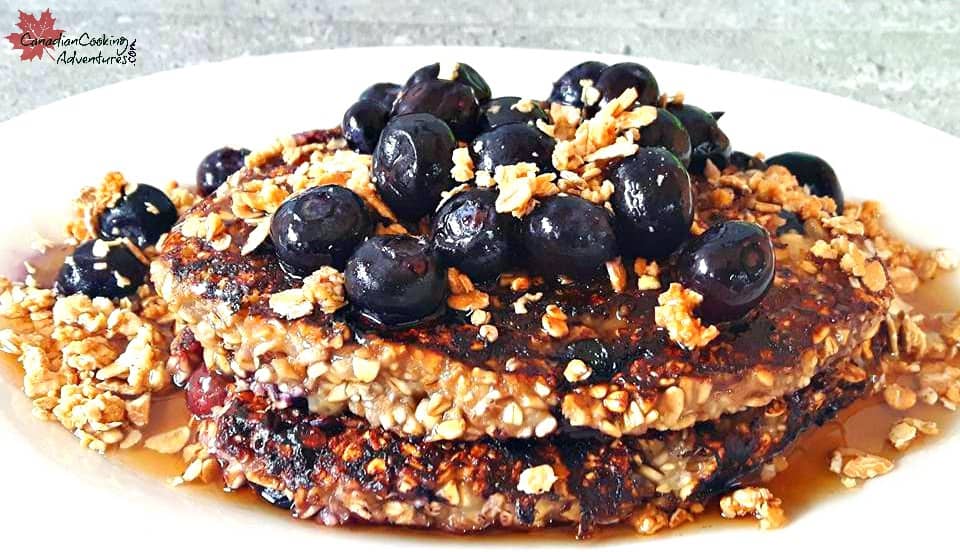
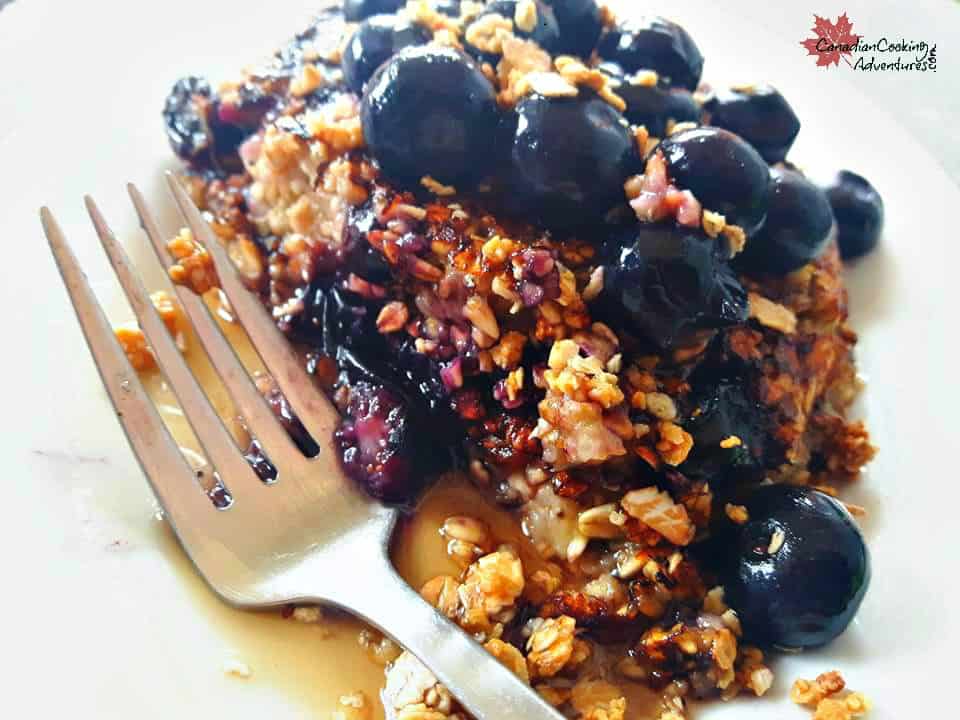
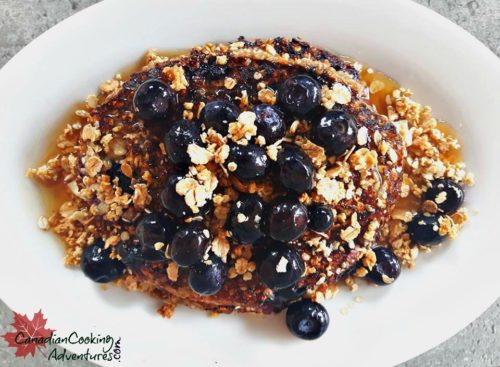
Honestly I am not a huge pancake fan, but Jason is. He requests pancakes at least once a month and I always give in and make him a batch usually on those lazy Saturday mornings. The main reason I’m not a huge fan of pancakes is probably because after eating them you just feel even more lazy. All that flour and sugar can be intoxicating. So i decided to try something different and came up with this much more healthy alternative to those boxed pancake mixes everyone is so accustom to. I omitted the eggs and substituted them for ground flax and water. If you prefer eggs, go ahead. Now i can say these pancakes are made allot more often in our home, and that’s because its packed full of healthy ingredients.
Add in your vanilla, blueberries, oatmeal and mix to combine
Heat your pan to medium heat and scoop two scoops per pancake of batter into pan.
Cook for 3 minutes on each side, until golden brown on one side. “Watching carefully” for bubbling and that they are browning on one side before flipping over to cook on the other side.
Once cooked, plate and top with granola and the left over blueberries, then drizzle with maple syrup before serving.
Notes: They are more fragile than regular pancakes, and require careful lifting onto the spatula when turning. Make sure your using a non stick pan otherwise they will fall apart when turning over.
I am so thrilled you are making one of my recipes, if you made this recipe id love to hear about it! You can post a Review, Picture below or via Instagram and let me know how it turned out. And by doing so you will be automatically entered into our seasonal CONTEST to win one of our great prizes. Winner will be notified via email within a week after the contest closes. Thank you very much for reading and until next time see ya in the kitchen. Don’t want to miss a recipe? Sign up for our NEWSLETTER delivered right to your inbox!
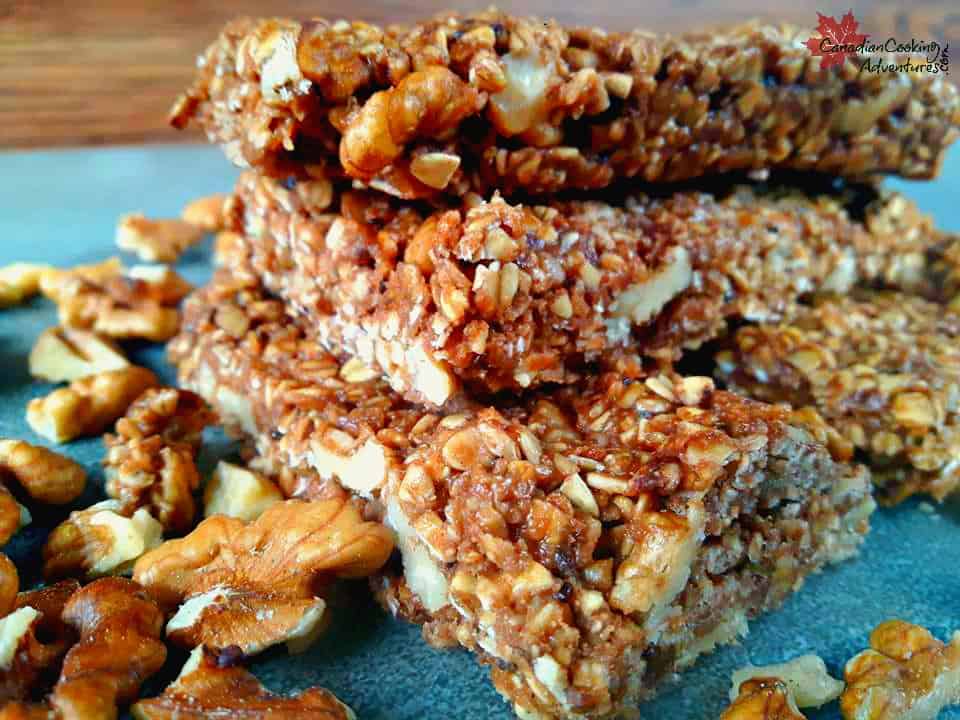
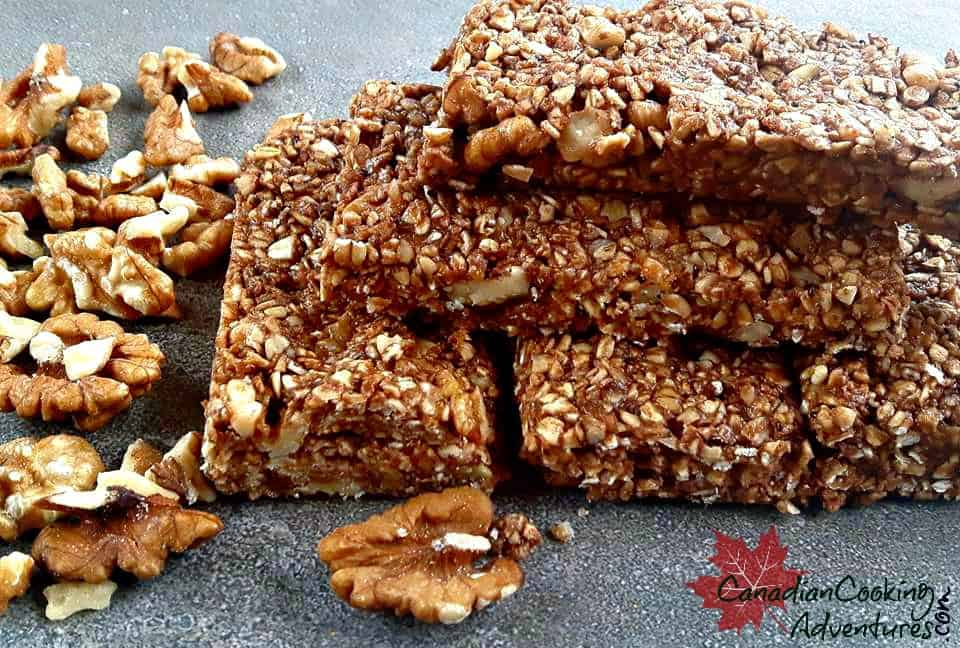
So many granola bars types out there today on the market, MOST contain a bunch of sugar and OTHER fillers. And are no where as good for you as these homemade! I have tried a few recipes throughout the years, trying to prefect the best bar. Not to CHEWY but not to HARD and I found for this TYPE of recipe simple is Best. These no sugar bars can be made with just 5 ingredients, cost half of what the store bought variety would and take less than 10 minutes to prepare. With just some good old ingredients of “Oatmeal, Honey, Coca powder, Walnuts and your favorite Peanut butter variety, you to can enjoy homemade Granola bars too. I like to use Organic peanut butter with chia seeds in it, its less sweet than regular peanut butter, but the type you use is completely up to you but its best to use one without all the added oils & sugar. Whipping these up on a lazy Sunday is best BECAUSE you can store them covered in the fridge for an easy Quick on the Go breakfast throughout the week. Or if your heading into the great outdoors these can be excellent for that kind of adventure. Me and Jason, tend to eat one a day and so they go by end week!
A pastry scraper or sharp knife, I like this Pastry Scraper
To make the Walnut Granola Bars:
make the Walnut Granola Bars:
In a large bowl add in your honey and peanut butter mix till creamy.
In a small bowl mash half the banana and pour that into your peanut butter and honey mixture.
Then add in your oats, coca powder and walnuts and mix till everything is combined.
Press the granola bar mixture into a medium sized pan lined with tinfoil and press it till its flat and compact.
Put in the fridge for a min of 1 hour and then cut into bars before serving.
Additions: Chia seeds, Flax Seeds, Dried fruit, Chocolate chips, any kind of nuts, etc
Note: Store covered in the fridge for up two a week or pack some outdoor adventure.
I am so thrilled you are reading one of my recipes, if you made this recipe id love to hear about it! You can post a review, picture below or via Instagram and let me know how it turned out. And by doing so you will be automatically entered into our seasonal CONTEST to win one of our great prizes. Winner will be notified via email within a week after the contest closes. Thank you very much for reading and until next time see ya in the kitchen. Don’t want to miss a recipe? Sign up for our NEWSLETTER delivered right to your inbox every Month!
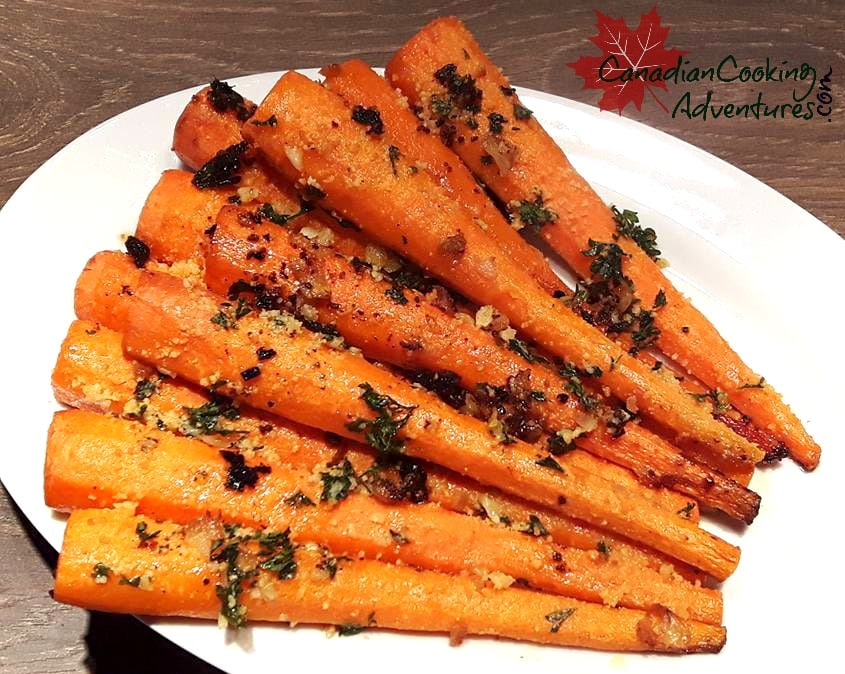
I just love carrots, but that wasn’t always the case. I guess it’s because I grew up eating them the wrong way, boiled and tossed in butter after. Boring!
So there was a time that I hated carrots, so much so that I never bought them in my adult years at all.
But I knew I had to find a way to eat them since they’re packed with beta-carotene a vitamin that is very important to have in your diet according to the eye doctors.
Not to mention the fiber alongvitamin A, Vitamin C, Vitamin K, vitamin B8, folate, potassium, iron, copper, and manganese, proves just how important it is to get this vitamin rich food in your diet as much as possible.
This recipe is super simple, you don’t even have to peel the carrots if you don’t want too. However if you decide to, they can be a good thing to add to your dog’s next meal.
To make this simple side, you will want to wash the carrots well then chop off the ends, and lay them out on a non stick pan.
Drizzle all over with olive oil and a few tsp of butter, along with thyme, basil and oregano and parmesan cheese then let your oven do it’s thing. Serve as a side dish to any meal, goes great during the holidays too!
If you are peeling your carrots, then don’t waste those Nutritious peels, save them and top your dogs next meal with them for a couple of days of added nutrition!! Carrot peels contain an excellent source of Fiber and Vitamins. Read more about the benefits here Benefits Of Carrots For Your Dog
I am so thrilled you are reading one of my recipes, if you made this recipe i’d love to hear about it! You can post a review, picture below or via Instagram and let me know how it turned out. Thank you very much for reading and until next time see ya in the kitchen. Don’t want to miss a recipe? Sign up for our NEWSLETTER delivered right to your inbox every Month!
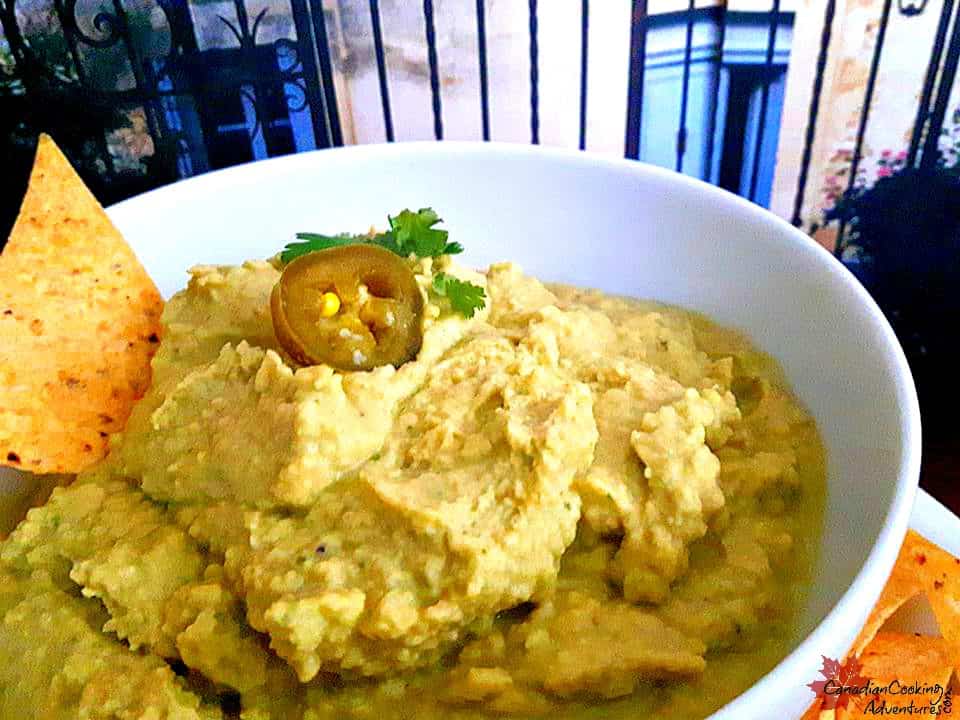
YOU won’t believe how fresh this Cilantro and Jalapeno Hummus tastes!! If you’re tired of those expensive store bought varieties and thought that was the stuff! Well your in for a pleasant surprise!
I always like to make a fresh batches of hummus early in the. So that I can then store it in an airtight container for the unlimited guilt free munching!
Which usually happens at night, watching the food network or something! Enjoy this Hummus with tortilla chips or pita bread, super healthy and delicious.
HOW TO MAKE HUMMUS
Preparing Beans from Dry: Cover you garbanzo beans in water and allow to soak over night. The next day cook your garbanzo beans in a pot with 2 inches of water to cover, and bring to a boil. Cook for 1 1/2 hours or until they are soak. Drain and place in your blender or food processor Add your Cilantro, jalapeno, greek yogurt, garlic, olive oil, tahini and lime juice and purée. Then add in your garbanzo beans and blend till combined. Add in all your seasoning, and pulse for a few more seconds.
Preparing the Beans from the Can: Drain and rinse your chickpeas, add to your blender or food processor. Add your Cilantro, jalapeno, greek yogurt, garlic, olive oil, tahini and lime juice and purée. Then add in your garbanzo beans and blend till combined. Add in all your seasoning, and pulse for a few more seconds.
For best results chill it in an airtight container for up to 2 hours or more before serving.
The longer it chills in the fridge the thicker it becomes and the flavors really set in.
Serve this with some Homemade Pita Breadand enjoy!
I am so thrilled you are reading one of my recipes, if you made this recipe i’d love to hear about it! Thank you very much for reading and until next time see ya in the kitchen. Don’t want to miss a recipe? Sign up for our NEWSLETTER delivered right to your inbox!


")

")


")

")