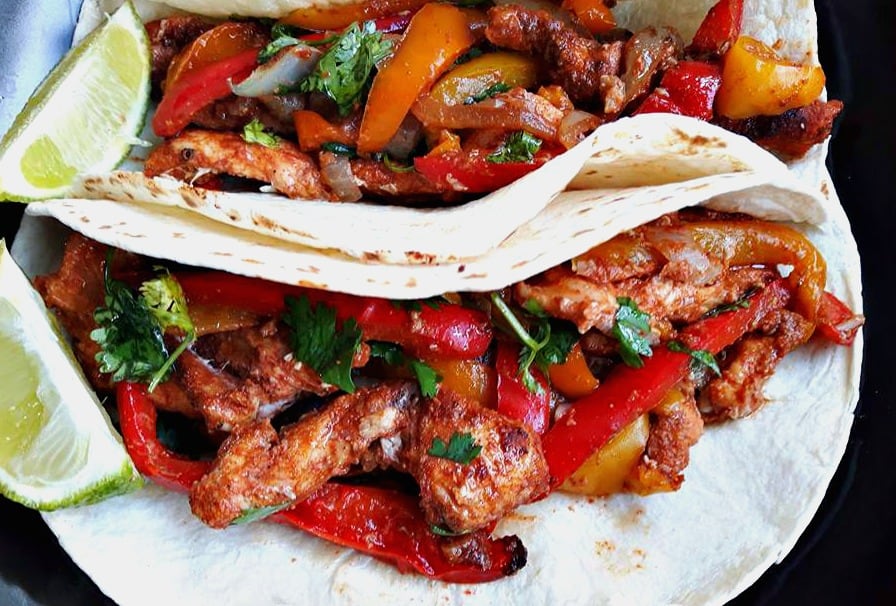
Easy One Pan Chicken Fajitas

Check out this Delicious recipe for “Easy One Pan Chicken Fajitas”. Takes less than 30 minutes to prepare and clean up is QUICK! Today is the first day of fall and if summer was not busy enough, fall is going to be just as busy. So I’m starting the season off by making some easy one pan meals. Think easy clean up, BIG flavor all with the ability to feed a crowd. Think Chicken Fajitas! The only thing pre – made you will want to buy here is the flour tortillas, doing this will save you a ton of time in the kitchen.  And don’t even think of buying pre made fajita seasoning, because I am certain you have all the right spices in your kitchen. Fajita seasoning is a combination of cumin, coriander, chili powder, paprika, cayenne pepper, garlic powder, onion powder with salt and black pepper. Then all you need is some fresh chicken breasts, and sweet red peppers, lime and your ready to rock and roll. With very little prep, you can have this dinner on the table in under 30 minutes. If you liked this recipe, check back soon for more one pan recipes that will  help you to get good dinner on the table in  jiffy, enjoy!

Kitchen Essentials:


To make the Easy One Pan Chicken Fajitas:

  1. Start by making your fajita seasoning. Mix together cumin powder, coriander powder, chili powder, paprika, onion powder, garlic powder, and pepper in a small bowl. Set aside.
  2. Next wash and slice your sweet bell peppers into thin strips, then your onions then placing them onto one side of your baking sheet.
  3. Next, slice your chicken breasts into strips and place on the other side of your baking sheet.
  4. Crush the garlic and place on-top of the chicken and onions.
  5. Prepare your fajita mix, stir everything together and pour over your fajita pan and stir so everything is covered with the mix.
  6. Bake in the over at 400 f for 25 minutes.
  7. Warm your tortillas up in the oven or microwave and serve  your chicken mixture directly from the pan onto your tortillas.
  8. Garnishes with sliced lemon wedges and chopped up cilantro.

Note: You can serve these fajitas with sour cream or a Mexican salsa called “Pic de gallo“, see recipe for that here.


I am so thrilled you are reading one of my recipes, if you made this recipe id love to hear about it!You can post a review, picture below or via Instagram and let me know how it turned out. And by doing so you will be automatically entered into our seasonal CONTEST to win one of our great prizes. Winner will be notified via email within a week after the contest closes. Thank you very much for reading and until next time see ya in the kitchen. Don’t want to miss a recipe? Sign up for our NEWSLETTER delivered right to your inbox every Month!


Farmers Sausage with Basil and Baby Tomatoes Pizza

I call this recipe “Farmer’s Sausage Pizza” because its made with Fresh Farmers Sausage, but also has some fresh cheese and some baby tomatoes that I pulled from my garden.

Now don’t just take my word for it but this pizza is something special, unless perhaps your in NYC and you stumble upon one of those great pizza places then maybe we will have competition.

I started to make homemade pizza a few years back, because I was just so tired of being disappointed when it came to ordering it from takeout. The sauce was always wrong or the toppings where few, the dough was undercooked or over and one of us always had a complaint. Sounds familiar?

Once you learn to make homemade pizza yourself you will never go back to ordering it or settling for that plain old box stuff either. Makes a large 14 inch thin crust pizza or a medium 12 inch, wanting to feed more people? Then just double the recipe up and cut the dough in half to make more pizza’s. 

STEP 1 & 2: First make sure you have the DOUGH and SAUCE part figured out. Either make both from scratch (recipes provided below) OR buy them pre-made. 

Note: Do you like some heat to your pizza? Simply sprinkle some hot red chili peppers over the sauce. Cook on a pizza pan to ensure even cooking, if you don’t have cook your pizza on the bottom rack. Also you can double or triple up the recipe ingredients, and freeze the dough for use within the month. And make sure don’t forget the sugar, the yeast feeds off it and that allows it to rise properly.

Bubba impatiently waiting for his first slice!


I am so thrilled you are reading one of my recipes, if you made this recipe i’d love to hear about it! You can post a review, picture below or via Instagram and let me know how it turned out. And by doing so you will be automatically entered into our seasonal CONTEST to win one of our great prizes. Winner will be notified via email within a week after the contest closes. Thank you very much for reading and until next time see ya in the kitchen. Don’t want to miss a recipe? Sign up for our NEWSLETTER delivered right to your inbox!


PIN IT FOR LATER


Garden Tomato Pie

It’s that time of year, where our gardens are bursting with tomatoes. So why not make a tomato pie? I love tomatoes, don’t you? I also have a pre-made pie crust in the freezer, so I thought why not make this delicious pie and share it with my readers. You can make your pie crust of course, or just buy a pre-made one and have this on the dinner table in under 45 minutes. It’s great for breakfasts or dinner and you can add any kind of tomatoes you like. Looking for a more vegetarian type tomato pie, simply omit the eggs and add some sauté asparagus it will be just as good.  I hope you give it a try, I’d love to hear how you liked it in the comments below!!

What you will need:

To make the Garden Tomato Pie:

  1. In a mixing bowl, combine the cheeses, sour cream, eggs, chopped green onion, mayonnaise, and whisk together till blended.
  2. Next, on cutting board slice garden tomatoes, pat dry with a paper towl to remove excess moisture
  3. Season generously with salt, pepper, thyme, basil.
  4. Pre-heat oven to 425F.
  5. Sprinkle a little flour on the pie shell, to ensure the shell.
  6. Then pour your cheese mixture into the pie shell and then top with you garden tomatoes, drizzle a little olive oil on top and season lightly with salt and pepper.
  7. Bake for 30 minutes until crust has completely browned and the tomatoes have roasted.
  8. Serve immediately, enjoy!

Note: You can pre-cook some bacon and crumble it over the pie if desired.


I am so thrilled you are reading one of my recipes, if you made this recipe id love to hear about it! You can post a review, picture below or via Instagram and let me know how it turned out. And by doing so you will be automatically entered into our seasonal CONTEST to win one of our great prizes. Winner will be notified via email within a week after the contest closes. Thank you very much for reading and until next time see ya in the kitchen. Don’t want to miss a recipe? Sign up for our NEWSLETTER delivered right to your inbox every Month!


Flax & Quinoa Dressing (Stuffing)

This Flax & Quinoa Dressing is vegan since we are using vegetable stock vs chicken and omitting the eggs. 

Did you know that a stuffing that is not stuffed into a bird is called dressing? Some people like to make a dressing outside the bird and some like to make it inside the bird. It is completely up to you, however keep in mind the cooking times will vary. 

Today, I’m making a dressing and on occasion I will make this same dressing and stuff it inside a bird when baking a Turkey. You may find the dressing a bit dry when baking outside the turkey and in that case you can prepare a gravy on the side and serve it alongside if desired. 

I will do this sometimes if I want to serve turkey, because I just use the turkey drippings to make a perfect gravy. I find my Turkey cooks better without it stuffed inside anyway.

This dressing is so tasty, I could eat it all to myself. Now take note the dryer the bread the more tastier it will be also using a bread with other things in it only adds extra flavor. That is why I like to use Flax & Quinoa bread, which gives it a nice nutty flavor. 

However you can use any type of bread of course, just make sure it’s dried out some before you tear it apart to ensure the stuffing is not soggy. You can also add less or more celery/onions as well, depending on your preference.

This recipe makes enough for roughly four servings, so if you want to serve more people just add a few more bread slices and adjust the other ingredients according to your taste, there really is not much to it. Enjoy!

It’s going to be so GOOD!


Note: You can add flax seeds, diced apples, cranberries or sunflower seeds to this stuffing if you desire to make it more hearty.


I am so thrilled you are reading one of my recipes, if you made this recipe id love to hear about it! You can post a review, picture below or via Instagram and let me know how it turned out. And by doing so you will be automatically entered into our seasonal CONTEST to win one of our great prizes. Winner will be notified via email within a week after the contest closes. Thank you very much for reading and until next time see ya in the kitchen. Don’t want to miss a recipe? Sign up for our NEWSLETTER delivered right to your inbox!

PIN IT FOR LATER


Easy Key Lime Pie

This Easy Key Lime Pie contains only 4 ingredients and no eggs.  

If you have never tried this delicious pie that hails from Sunny Seaside Florida, then you are in for a treat! It’s super fresh tasting, tangy and sweet.

And if you knew it was this easy to make, I’m certain you would be making it more often.

This is one of my favorite pies, next to some other berries kinds.

And with only 4 ingredients such as sweetened condensed milk, sour cream, key lime juice, and whip cream. This pie is easy to make.

And takes less than 30 minutes from start to finish! 

HOW TO MAKE KEY LIME PIE

  • Some people like to add 2 cans of condensed milk, so if you prefer you can do that too.
  • Personally I prefer it made with one can because it gives more of that tangy taste that I love.
  • Plus if you add 2 cans, you will find it makes to much filling.
  • So if you decide to do so, be prepared for some extra filling on the side. Which I guess isn’t so bad right? 

This is my favorite KEY LIME JUICE!

For my all time favorite pie recipe!

Key Lime Pie is always best the next day, so allow it to sit in the fridge overnight for the best flavor.

When your read to serve, add your whipped cream on-top otherwise it will melt all over the place.

LOVE KEY LIME PIE? Then you will want to try my other recipe below!


I am so thrilled you are reading one of my recipes, if you made this recipe i’d love to hear about it! Thank you very much for reading and until next time see ya in the kitchen. Don’t want to miss a recipe? Sign up for our NEWSLETTER delivered right to your inbox!

Greek Chicken and Potatoes

This Greek Chicken and Potato recipe is baked all in one dish. And really takes no effort at all from start to finish. 

Well unless you are the farmer… but i’m guessing not? If you are… from the bottom of my heart. Thank you!

In our home we like to eat Greek food every so often, it’s such a healthy cuisines and so very tasty.

This dish is made with a few simple seasonings that will bring in the depth of flavor you crave in Greek food. 

This is the fastest version of a traditional home cooked Greek meal, there is no BBQ or Kabobs involved here.

Just one baking pan and a few ingredients that you’re sure to have in your spice rack.

I prefer to use a mix of fresh and dry spices, however you can use whatever you have on hand.

Included below is my super delicious recipe for homemade Dill & Mint TZATZIKI sauce which goes excellent with this meal.

I will provide a link at the bottom for that recipe, if anybody is interested.

If you never had this before, I encourage you to give it a go as it’s a super simple meal and yet good enough to serve a crowd! 

Note: Homemade TZATZIKI sauce goes excellent with this dish.

I am so thrilled you are reading one of my recipes, if you made this recipe i’d love to hear about it! Thank you very much for reading and until next time see ya in the kitchen. Don’t want to miss a recipe? Sign up for our NEWSLETTER delivered right to your inbox!


Parmesan Roasted Carrots

I just love carrots, but that wasn’t always the case. I guess it’s because I grew up eating them the wrong way, boiled and tossed in butter after. Boring! 

So there was a time that I hated carrots, so much so that I never bought them in my adult years at all.

But I knew I had to find a way to eat them since they’re packed with beta-carotene a vitamin that is very important to have in your diet according to the eye doctors.

Not to mention the fiber along vitamin A, Vitamin C, Vitamin K, vitamin B8, folate, potassium, iron, copper, and manganese, proves just how important it is to get this vitamin rich food in your diet as much as possible.

This recipe is super simple, you don’t even have to peel the carrots if you don’t want too. However if you decide to, they can be a good thing to add to your dog’s next meal.

To make this simple side, you will want to wash the carrots well then chop off the ends, and lay them out on a non stick pan.

Drizzle all over with olive oil and a few tsp of butter, along with thyme, basil and oregano and parmesan cheese then let your oven do it’s thing. Serve as a side dish to any meal, goes great during the holidays too! 

If you are peeling your carrots, then don’t waste those Nutritious peels, save them and top your dogs next meal with them for a couple of days of added nutrition!! Carrot peels contain an excellent source of Fiber and Vitamins. Read more about the benefits here Benefits Of Carrots For Your Dog

ALSO here is an excellent recipe for Homemade Air Fryer Oatmeal, Corn and Carrots dog treats! That your dog is going to love. 

I am so thrilled you are reading one of my recipes, if you made this recipe i’d love to hear about it! You can post a review, picture below or via Instagram and let me know how it turned out. Thank you very much for reading and until next time see ya in the kitchen. Don’t want to miss a recipe? Sign up for our NEWSLETTER delivered right to your inbox every Month!