Strawberry Milkshake (Kefir)

I’m a sucker for Strawberry milkshakes and so is my mom. I think between the both of us, we have enjoyed well over 1000 shakes together, that does not include apart. 

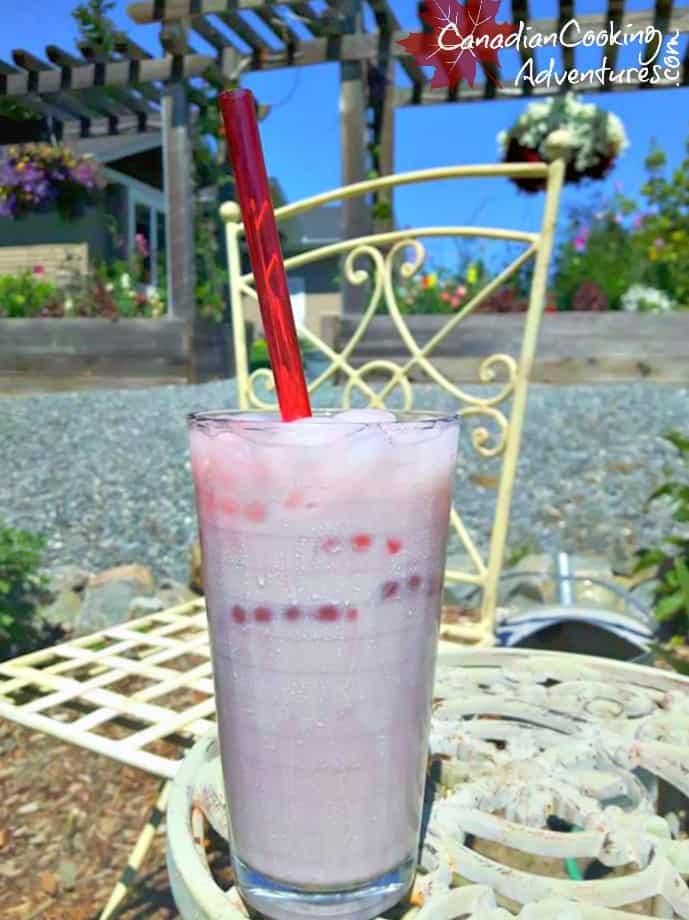
I like to brag these days that I like to enjoy a Strawberry Milkshake for breakfast. And that is the truth, and let me tell you I feel not one ounce of guilt. That’s because my Milkshake is super healthy for you, and does not compromise on taste.

The kefir gives it the right amount of creaminess we all crave and the fresh strawberries make it so fruity! So if you’re a sucker for Strawberry Milkshakes as well, then why not try this recipe out and let me know if you too could say goodbye those fattening shakes and say hello to the more healthy kefir shakes? 

I hope you enjoy like you’re a kid again! 


Go ahead an pour a Large Glass and RELAX!

Note: I like to put a fair amount of ice in mine, if you like it more creamy + add less.


I am so thrilled you are reading one of my recipes, if you made this recipe id love to hear about it! You can post a review, picture below or via Instagram and let me know how it turned out. And by doing so you will be automatically entered into our seasonal CONTEST to win one of our great prizes. Winner will be notified via email within a week after the contest closes. Thank you very much for reading and until next time see ya in the kitchen. Don’t want to miss a recipe? Sign up for our NEWSLETTER delivered right to your inbox!


Campfire Chili Poutine

This is one of our camping favorites and it’s really as easy as 1, 2, 3. As you may know Poutine originated in Quebec and has become popular Worldwide. It’s typically served with cheese curds and topped with hot gravy, I like to add chili to it when we go camping. To make this hearty recipe, all you need is some “french fries, canned chili and cheese”, Oh and you can’t forget the gravy. It may not look great but it sure is tasty, filling and is super easy to clean up. Just make sure you purchase the canned chili and gravy, after all this is camping and you want to make it as easy as possible. Also make sure to buy pre shredded cheese for this recipe too, think simple this is camping. Enjoy!

Camping Essentials:

To make the Campfire Chili Poutine:

  1. Lay out your tinfoil in two double layers for extra support.
  2. Cut open your bag of fries (its best not to use the skinny fries here) and pour them onto the tinfoil.
  3. Open your can of Chili, and your can of Gravy.
  4. Pour your Chili over the uncooked fries and then cover with  shredded cheese.
  5. Sprinkle with salt and pepper to taste and close up your package and allow it to cook on the grill for 30-40 minutes.
  6. Once your fries are half cooked, place your canned gravy on the grill and allow it to heat up. Make sure you open it prior to placing on the grill because it will be bubbling and hot once you remove it.
  7. Serve in the middle of the table with forks for all, and pour that hot gravy over-top.
  8. Enjoy!


Note: If you’re camping in bear country, take appropriate precautions to keep your campsite as unattractive to bears as possible. To do this simply purchase and properly use a bear-proof garbage container or ensure all your garage is placed in a sealed bin in your vehicle or at a designated dump once your done cooking, this helps keep our wildlife safe and you as well.


I am so thrilled you are reading one of my recipes, if you made this recipe id love to hear about it! You can post a review, picture below or via Instagram and let me know how it turned out. And by doing so you will be automatically entered into our seasonal CONTEST to win one of our great prizes. Winner will be notified via email within a week after the contest closes. Thank you very much for reading and until next time see ya in the kitchen. Don’t want to miss a recipe? Sign up for our NEWSLETTER delivered right to your inbox!

Rustic Cherry (Galette) pie

I absolutely love cherries and come summer when they are in season and ripe, I like to eat them by the dozen. I’m always finding new ways to cook with them too, however if it’s not summer you can always buy them pre pitted and frozen in your local grocer and make this type of gallette at home.

If you have never made a galette which is a term used in French cuisine to designate various types of flat round or freeform crusty cakes.

Then you are in for a treat, this pie is so easy to make. You are just filling and folding over to create the most delicious dessert, without all the hassle of a typical pie. I like to make this when we go camping, as it can be cooked over the open flame or on a camp stove.

You can also make this at home if you prefer in the oven, just make sure you have pre pitted cherries and pre frozen butter puff pastry prior to your camping trip otherwise pitting cherries or  making pie crust from scratch when camping is no fun.

Then simply allow it to caramelizes over open fire, once cooked drizzle some Maple Syrup over top to sweeten and eat it right from the tin pan. Clean up is a cinch because you will simply toss the tinfoil pie shells in a sealed garbage and then can sit back and watch the fire roar.

Give it a try, I would love to know if you will try it camping or prefer this sweet treat at home.

Note: If you’re camping  and preparing this in bear country, take appropriate precautions to keep your campsite as unattractive to bears as possible. To do this simply purchase and properly use a bear-proof garbage container or ensure all your garage is placed in a sealed bin in your vehicle or at a designated dump once your done cooking, this helps keep our wildlife safe and you as well.

I am so thrilled you are reading one of my recipes, if you made this recipe id love to hear about it! You can post a review, picture below or via Instagram and let me know how it turned out. And by doing so you will be automatically entered into our seasonal CONTEST to win one of our great prizes. Winner will be notified via email within a week after the contest closes. Thank you very much for reading and until next time see ya in the kitchen. Don’t want to miss a recipe? Sign up for our NEWSLETTER delivered right to your inbox!

PIN IT FOR LATER


Tomato Salad with Balsamic Parsley Dressing

I like to make this salad all year long, however it truly tastes best made during the summer. When tomatoes are there freshest here in CanadaPreferably straight from the garden, those can’t be beat. 

It’s a great salad because it’s quick to make and also very healthy, bursting with fresh tomatoes, balsamic vinegar,  parsley, olive oil and garlic salt this recipe is sure to be a hit. Give it a try, you may be surprised that this simple little salad is so good. 


I am so thrilled you are reading one of my recipes, if you made this recipe id love to hear about it! You can post a review, picture below or via Instagram and let me know how it turned out. And by doing so you will be automatically entered into our seasonal CONTEST to win one of our great prizes. Winner will be notified via email within a week after the contest closes. Thank you very much for reading and until next time see ya in the kitchen. Don’t want to miss a recipe? Sign up for our NEWSLETTER delivered right to your inbox every Month!

PIN IT FOR LATER

Durban Mutton Curry

Are you a curry lover like me? If so then this Durban Mutton is sure to knock your socks off it’s that good. 

Durban Curry hails from a city inside South Africa, originally it was said that the East Indians where the ones to bring it over and the story goes that they were seen eating it often while on the work sites. 


I am so thrilled you are reading one of my recipes, if you made this recipe id love to hear about it! You can post a review, picture below or via Instagram and let me know how it turned out. And by doing so you will be automatically entered into our seasonal CONTEST to win one of our great prizes. Winner will be notified via email within a week after the contest closes. Thank you very much for reading and until next time see ya in the kitchen. Don’t want to miss a recipe? Sign up for our NEWSLETTER delivered right to your inbox!

Easy Key Lime Pie

This Easy Key Lime Pie contains only 4 ingredients and no eggs.  

If you have never tried this delicious pie that hails from Sunny Seaside Florida, then you are in for a treat! It’s super fresh tasting, tangy and sweet.

And if you knew it was this easy to make, I’m certain you would be making it more often.

This is one of my favorite pies, next to some other berries kinds.

And with only 4 ingredients such as sweetened condensed milk, sour cream, key lime juice, and whip cream. This pie is easy to make.

And takes less than 30 minutes from start to finish! 

HOW TO MAKE KEY LIME PIE

  • Some people like to add 2 cans of condensed milk, so if you prefer you can do that too.
  • Personally I prefer it made with one can because it gives more of that tangy taste that I love.
  • Plus if you add 2 cans, you will find it makes to much filling.
  • So if you decide to do so, be prepared for some extra filling on the side. Which I guess isn’t so bad right? 

This is my favorite KEY LIME JUICE!

For my all time favorite pie recipe!

Key Lime Pie is always best the next day, so allow it to sit in the fridge overnight for the best flavor.

When your read to serve, add your whipped cream on-top otherwise it will melt all over the place.

LOVE KEY LIME PIE? Then you will want to try my other recipe below!


I am so thrilled you are reading one of my recipes, if you made this recipe i’d love to hear about it! Thank you very much for reading and until next time see ya in the kitchen. Don’t want to miss a recipe? Sign up for our NEWSLETTER delivered right to your inbox!

Greek Chicken and Potatoes

This Greek Chicken and Potato recipe is baked all in one dish. And really takes no effort at all from start to finish. 

Well unless you are the farmer… but i’m guessing not? If you are… from the bottom of my heart. Thank you!

In our home we like to eat Greek food every so often, it’s such a healthy cuisines and so very tasty.

This dish is made with a few simple seasonings that will bring in the depth of flavor you crave in Greek food. 

This is the fastest version of a traditional home cooked Greek meal, there is no BBQ or Kabobs involved here.

Just one baking pan and a few ingredients that you’re sure to have in your spice rack.

I prefer to use a mix of fresh and dry spices, however you can use whatever you have on hand.

Included below is my super delicious recipe for homemade Dill & Mint TZATZIKI sauce which goes excellent with this meal.

I will provide a link at the bottom for that recipe, if anybody is interested.

If you never had this before, I encourage you to give it a go as it’s a super simple meal and yet good enough to serve a crowd! 

Note: Homemade TZATZIKI sauce goes excellent with this dish.

I am so thrilled you are reading one of my recipes, if you made this recipe i’d love to hear about it! Thank you very much for reading and until next time see ya in the kitchen. Don’t want to miss a recipe? Sign up for our NEWSLETTER delivered right to your inbox!


Blueberry Banana Oatmeal Pancakes

Honestly I am not a huge pancake fan, but Jason is. He requests pancakes at least once a month and I always give in and make him a batch usually on those lazy Saturday mornings. The main reason I’m not a huge fan of pancakes is probably because after eating them you just feel even more lazy. All that flour and sugar can be intoxicating. So i decided to try something different and came up with this much more healthy alternative to those boxed pancake mixes everyone is so accustom to. I omitted the eggs and substituted them for ground flax and water. If you prefer eggs, go ahead. Now i can say these pancakes are made allot more often in our home, and that’s because its packed full of healthy ingredients.

What you will need: A non stick frying pan, I like to use my Heritage The Rock Non-Stick Frypan, 10″ / 26cm and large Spatula along with an ice-cream scooper.

To make Blueberry Pancakes

  1. In a large bowl, mash 3 medium sized bananas. 
  2. Add in your vanilla, blueberries, oatmeal and mix to combine
  3. Heat your pan to medium heat and scoop two scoops per pancake of batter into pan.
  4. Cook for 3 minutes on each side, until golden brown on one side. “Watching carefully” for bubbling and that they are browning on one side before flipping over to cook on the other side.  
  5. Once cooked, plate and top with granola and the left over blueberries, then drizzle with maple syrup before serving.

Notes: They are more fragile than regular pancakes, and require careful lifting onto the spatula when turning. Make sure your using a non stick pan otherwise they will fall apart when turning over.

I am so thrilled you are making one of my recipes, if you made this recipe id love to hear about it! You can post a Review, Picture below or via Instagram and let me know how it turned out. And by doing so you will be automatically entered into our seasonal CONTEST to win one of our great prizes. Winner will be notified via email within a week after the contest closes. Thank you very much for reading and until next time see ya in the kitchen. Don’t want to miss a recipe? Sign up for our NEWSLETTER delivered right to your inbox!