Simple Walnut Granola Bars (No Bake)

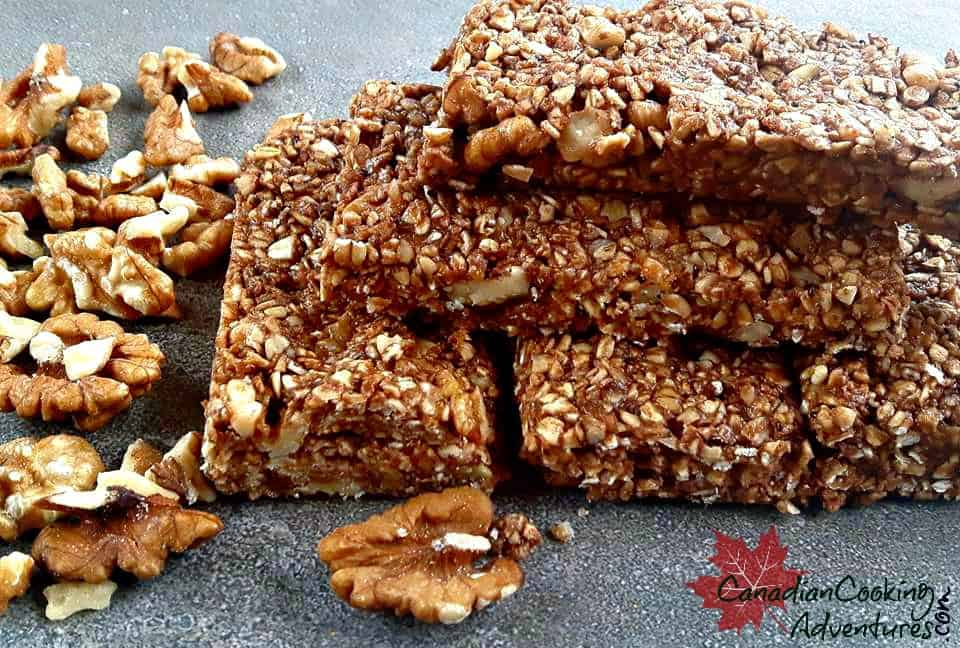
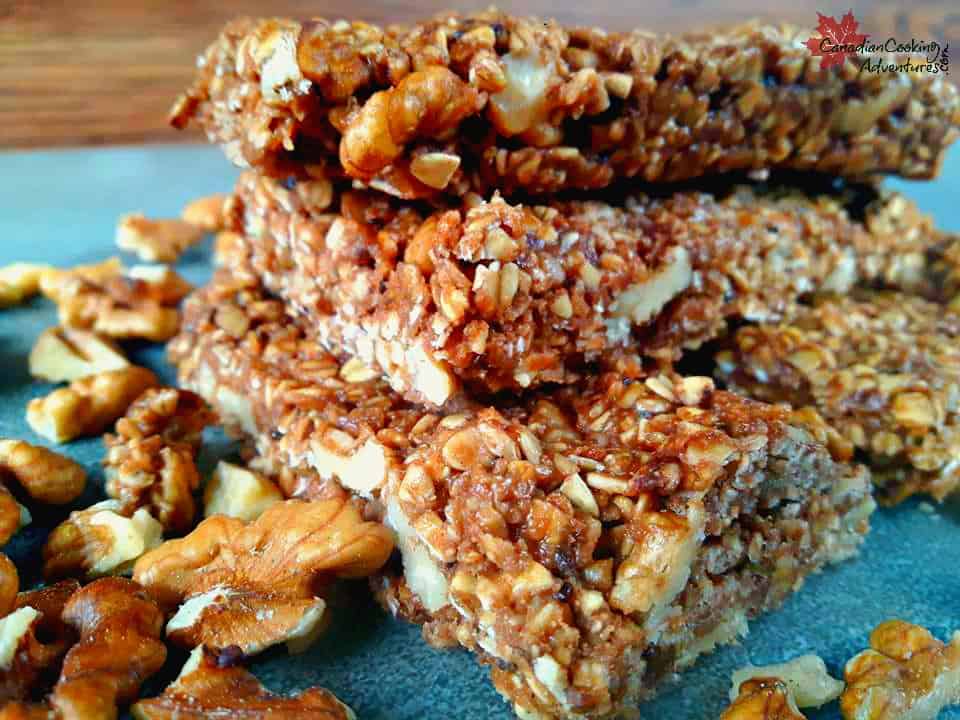
So many granola bars types out there today on the market, MOST contain a bunch of sugar and OTHER fillers. And are no where as good for you as these homemade! I have tried a few recipes throughout the years,  trying to prefect the best bar. Not to CHEWY but not to HARD and I found for this TYPE of recipe simple is Best. These no sugar bars can be made with just 5 ingredients, cost half of what the store bought variety would and take less than 10 minutes to prepare.  With just some good old ingredients of “Oatmeal, Honey, Coca powder, Walnuts and your favorite Peanut butter variety, you to can enjoy homemade Granola bars too. I like to use Organic peanut butter with chia seeds in it, its less sweet than regular peanut butter, but the type you use is completely up to you but its best to use one without  all the added oils & sugar.  Whipping these up on a lazy Sunday is best BECAUSE you can store them covered in the fridge for an easy Quick on the Go breakfast throughout the week. Or if your heading into the great outdoors these can be excellent for that kind of adventure. Me and Jason, tend to eat one a day and so they go by end week!

Kitchen Essentials:

To make the Walnut Granola Bars:

  1. make the Walnut Granola Bars:
    1. In a large bowl add in your honey and peanut butter mix till creamy.
    2. In a small bowl mash half the banana and pour that into your peanut butter and honey mixture.
    3. Then add in your oats, coca powder and walnuts and mix till everything is combined.
    4. Press the granola bar mixture into a medium sized pan lined with tinfoil and press it till its flat and compact.
    5. Put in the fridge for a min of 1 hour and then cut into bars before serving.

Additions: Chia seeds, Flax Seeds, Dried fruit, Chocolate chips, any kind of nuts, etc

Note: Store covered in the fridge for up two a week or pack some outdoor adventure.


I am so thrilled you are reading one of my recipes, if you made this recipe id love to hear about it! You can post a review, picture below or via Instagram and let me know how it turned out. And by doing so you will be automatically entered into our seasonal CONTEST to win one of our great prizes. Winner will be notified via email within a week after the contest closes. Thank you very much for reading and until next time see ya in the kitchen. Don’t want to miss a recipe? Sign up for our NEWSLETTER delivered right to your inbox every Month!


Parmesan Roasted Carrots

I just love carrots, but that wasn’t always the case. I guess it’s because I grew up eating them the wrong way, boiled and tossed in butter after. Boring! 

So there was a time that I hated carrots, so much so that I never bought them in my adult years at all.

But I knew I had to find a way to eat them since they’re packed with beta-carotene a vitamin that is very important to have in your diet according to the eye doctors.

Not to mention the fiber along vitamin A, Vitamin C, Vitamin K, vitamin B8, folate, potassium, iron, copper, and manganese, proves just how important it is to get this vitamin rich food in your diet as much as possible.

This recipe is super simple, you don’t even have to peel the carrots if you don’t want too. However if you decide to, they can be a good thing to add to your dog’s next meal.

To make this simple side, you will want to wash the carrots well then chop off the ends, and lay them out on a non stick pan.

Drizzle all over with olive oil and a few tsp of butter, along with thyme, basil and oregano and parmesan cheese then let your oven do it’s thing. Serve as a side dish to any meal, goes great during the holidays too! 

If you are peeling your carrots, then don’t waste those Nutritious peels, save them and top your dogs next meal with them for a couple of days of added nutrition!! Carrot peels contain an excellent source of Fiber and Vitamins. Read more about the benefits here Benefits Of Carrots For Your Dog

ALSO here is an excellent recipe for Homemade Air Fryer Oatmeal, Corn and Carrots dog treats! That your dog is going to love. 

I am so thrilled you are reading one of my recipes, if you made this recipe i’d love to hear about it! You can post a review, picture below or via Instagram and let me know how it turned out. Thank you very much for reading and until next time see ya in the kitchen. Don’t want to miss a recipe? Sign up for our NEWSLETTER delivered right to your inbox every Month!


Rhubarb & Strawberry Cheesecake Frozen Yogurt

Hello Summer Fresh Rhubarb, i have been waiting all year for you. The trick to making the perfect Rhubarb and Strawberry Frozen Yogurt is to puree your Rhubarb. This is done by cooking down the Rhubarb in a saucepan with a little water and sugar till tender and then you simply mash it with a fork and or blend in a food processor if its stringy. And don’t forget, this freezes a lot quicker than store-bought frozen yogurt. Because it contains no extra fillers, so if your going to freeze overnight you can add in some corn starch or vodka to make scooping easier. Also, if you want more tart frozen yogurt, feel free to decrease the sugar in step 3!” 

What you will need:

To make the Rhubarb and Strawberry Frozen Yogurt:

  1. In a saucepan add in your cubed Rhubarb, with 3tbsp of sugar. Cook on medium/high heat for 15 minutes or until fork tender, and mash. If you find it easier you can transfer it to your food processor to puree to a smoother consistency once its been cooked down.
  2. Once your Rhubarb is done transfer it to the fridge for 2 hours to cool.
  3. Next lets make the Yogurt, if your yogurt if its not GREEK, you will need to strain the water out. If its GREEK omit this step. “In a strainer lined with 2 coffee filters allow your plain yogurt to strain by placing it in the fridge for 2 hours, you should get about 1/2 cup of water and discard of that.
  4. Now, lets prepare that delicious cream cheese mixture. In a food processor add your cream cheese icing, and powdered sugar. MAKE sure your food processor is cleaned out because you will be pulsing your strawberries in it next. Once the cream cheese is smooth “light and fluffy”, set aside on the counter so it reaches room temperature.
  5. Now in the same food processor, chop up 3 cups of frozen strawberries and then whisk them into your Greek yogurt. Then add in your rhubarb, condensed milk, milk, vanilla extract, maple syrup, and red food coloring and whisk till everything is combined.
  6. Now, pour your yogurt mixture into your “frozen ice cream maker” and process for 20 minutes or according to manufacturer’s instructions.
  7. Now comes the fun part, grab a large plastic container will a lid (you will be using this to freeze your frozen yogurt in) after letting it sit for 20 minutes in the (Cuisinart machine to make it easier to remove) you then can start by pouring half your “Rhubarb & Strawberry mixture” in your container and then add in all of your room temperature cream cheese icing (To fill the middle of the container). Top with the remaining “Rhubarb & Strawberry mixture”. You also can mix the cream cheese directly into the ice cream if you desire, it will just look different then the picture.
  8. You can eat it soft as is or put in the freezer to allow it to freeze more for about 2 hours before serving
  9. Before scooping, remove from the freezer for about 10 minutes to scoop.

Note: This can store in the freezer up to one month.

I am so thrilled you are reading one of my recipes, if you made this recipe id love to hear about it! You can post a review, picture below or via Instagram and let me know how it turned out. And by doing so you will be automatically entered into our seasonal CONTEST to win one of our great prizes. Winner will be notified via email within a week after the contest closes. Thank you very much for reading and until next time see ya in the kitchen. Don’t want to miss a recipe? Sign up for our NEWSLETTER delivered right to your inbox every Month!


Skillet Lobster Mac and Cheese

This Skillet Lobster Mac and Cheese is such a delicious and comforting meal for two. 

I had something similar at a restaurant last year and had to make it for myself. This is sophisticated version of  the old fashioned macaroni and cheese that you may be familiar with. 

So why not treat yourself and someone special, to a warm bowl of mac and cheese, infused with some grilled lobster.

LOBSTER MAC AND CHEESE RECIPE

  1. Start buy cutting your lobster down the middle and then directly in half so you can remove the meat and use the tales in the dish.
  2. Cook your macaroni according to the instructions, rinse and drain once cooked.

Prepare your White sauce:

  1. On low heat, place your sliced in “half lobsters” with the meat still inside in a cast iron skillet. Allow them to cook for a few minutes on each side, and remove from heat before they are fully cooked and set aside.
  2. Allow the lobster to cool, and remove the meat with your thumbs and set the shells aside (to be cooked later with the pasta)
  3. In the same skillet melt your butter on medium to low heat and slowly add in your flour stirring constantly.
  4. Be careful not to burn your flour, watch to make sure the FLOUR is becoming a light brown color, still continuing to stir constantly. This may take 5 minutes or more. If this is not done properly you will either have under cooked flour or you will burn it.
  5. Once the butter and flour has retched a light brown color, and your sauce has cooled for 5 minutes slowly add in  your “COLD” milk and stir till combined. Next, turn down the burner to low heat and add in your thyme, old bay seasoning and nutmeg into the white sauce and whisk it all together for 2 minutes or until fragrant. Then your Worcestershire sauce, some salt and continue stirring for 5 minutes. Time to add in your “Old Shredded Cheddar Cheese” a bit at a time while stirring it over a low heat until the cheese melts into the white sauce. Now add 1/2 tsp of your Dijon Mustard and let it sit to combine.
     

Baking the Macaroni and Cheese:

  1. Now add your lobster shells to the boiling water and cook your paste, once cooked drain it off (keep the shells for baking in the oven)
  2. And in your pre cooked macaroni to cast iron skillet (add a few drops of water so its not to dry) and toss to coat with the old cheddar cheese and lobster meat. Add salt and pepper if needed, taste as you go.
  3. Now is the time to add in those lobster shells, place around the outside of the skillet (for presentation) and sprinkle your Panko breadcrumbs mixture all over the top and season with salt and pepper, once more.
  4. Bake at 4oo degrees for 20-25 minutes on the middle rack or until golden brown.
  5.  

I am so thrilled you are reading one of my recipes, if you made this recipe i’d love to hear about it! You can post a review, picture below or via Instagram and let me know how it turned out. And by doing so you will be automatically entered into our seasonal CONTEST to win one of our great prizes. Winner will be notified via email within a week after the contest closes. Thank you very much for reading and until next time see ya in the kitchen. Don’t want to miss a recipe? Sign up for our NEWSLETTER delivered right to your inbox every Month!

Best Pumpkin Pie Ice Cream

Do you like Pumpkin Pie? Well I do, so much so that I can eat a whole pie to myself. So I decided to recreate the same pie with this Pumpkin Pie Ice Cream.

Have you ever added vanilla ice cream to your Pumpkin Pie? It becomes even more AMAZING, don’t you agree?

That is what this ice cream becomes. 

I grew up eating Pumpkin pie, it was always served as the main dessert around Thanksgiving, Christmas and sometimes on Halloween.

As a kid I never could get enough of it. And so I wanted to recreate this pie and make it into an ice-cream. 

My family loves Pumpkin pie too, so I made this inspired ice-cream, and boy oh boy this stuff is delicious.

Don’t believe me? 

Well then you’re just gonna have to try it yourself!

Maybe you will even skip the actually pie this year and serve this up and your next family gathering. I’m sure your guests won’t mind! 

I am so thrilled you are reading one of my recipes, if you made this, I want to see! Follow Canadian Cooking Adventures Instagram, snap a photo, and tag and hashtag it with @canadiancookingadventures and #canadiancookingadventures

Stay connected and follow along on FacebookPinterest, and Instagram for all of my latest recipes!


Strawberry & Red Velvet Kefir Milkshake

Got a Craving for a Milkshake?

How about a RED VELVET Milkshake?

One day I was having a serious sweet tooth and was craving Red Velvet Cake, then i thought why not make a Red Velvet Milkshake. So i did, and now this recipe is on my list of all time favorite “Red Velvet” creations.  Plus its much healthier than any regular milkshake since it contains Kefir Yogurt as opposed to ice cream. Kefir Yogurt is great, because it contains plenty of nutrients and probiotics that are good for you gut health. The secret is adding in a whole cup of Strawberry Kefir, and 3/4 cup of milk to make this the up most creamiest shake for 2. I hope you enjoy!!

Kitchen Essentials:

To make the Milkshake:

  1. Start by baking your Red Velvet cake according to its directions, allow it to cool down before crumbling one cup into your blender.
  2. Add in all your ingredients to the blender and blend untill smooth.
  3. Pour into a tall glass and enjoy!


I am so thrilled you are reading one of my recipes, if you made this recipe id love to hear about it! You can post a review, picture below or via Instagram and let me know how it turned out. And by doing so you will be automatically entered into our seasonal CONTEST to win one of our great prizes. Winner will be notified via email within a week after the contest closes. Thank you very much for reading and until next time see ya in the kitchen. Don’t want to miss a recipe? Sign up for our NEWSLETTER delivered right to your inbox!


Cilantro and Jalapeno Hummus

YOU won’t believe how fresh this Cilantro and Jalapeno Hummus tastes!! If you’re tired of those expensive store bought varieties and thought that was the stuff! Well your in for a pleasant surprise!

I always like to make a fresh batches of hummus early in the. So that I can then store it in an airtight container for the unlimited guilt free munching!

Which usually happens at night, watching the food network or something! Enjoy this Hummus with tortilla chips or pita bread, super healthy and delicious.

HOW TO MAKE HUMMUS

  • Preparing Beans from Dry: Cover you garbanzo beans in water and allow to soak over night. The next day cook your garbanzo beans in a pot with 2 inches of water to cover, and bring to a boil. Cook for 1 1/2 hours or until they are soak. Drain and place in your blender or food processor Add your Cilantro, jalapeno, greek yogurt, garlic, olive oil, tahini and lime juice and purée. Then add in your garbanzo beans and blend till combined. Add in all your seasoning, and pulse for a few more seconds.
  • Preparing the Beans from the Can: Drain and rinse your chickpeas, add to your blender or food processor.  Add your Cilantro, jalapeno, greek yogurt, garlic, olive oil, tahini and lime juice and purée. Then add in your garbanzo beans and blend till combined. Add in all your seasoning, and pulse for a few more seconds.

For best results chill it in an airtight container for up to 2 hours or more before serving.

The longer it chills in the fridge the thicker it becomes and the flavors really set in.

Serve this with some Homemade Pita Bread and enjoy!

I am so thrilled you are reading one of my recipes, if you made this recipe i’d love to hear about it! Thank you very much for reading and until next time see ya in the kitchen. Don’t want to miss a recipe? Sign up for our NEWSLETTER delivered right to your inbox!


Matcha Green Tea and Coconut Frozen Yogurt

Do you like Pina Colada’s and dancing in the rain? Well then, you might just like this recipe for Matcha Green Tea and Coconut Frozen Yogurt better! I remember where and when i tried this first, it was last summer on a patio somewhere in downtown Vancouver, and to my surprise it was absolutely delicious and hit my sweet tooth. Shortly after i picked up some match powder and came up with my own version. Matcha is packed full of antioxidants and health benefits, so you just can’t go wrong with indulgence in this dessert every other day. I like to make this a couple times throughout the summer months, as its just another delicious excuse to get in all those amazing healthy benefits  that matcha Green powder offers.
Kitchen Essentials:

To make the Matcha Green tea and Coconut Frozen Yogurt: 

  1. In a food processor combine your greek yogurt, full fat coconut milk, milk, condensed milk, and matcha powder.
  2. And blend together until smooth.
  3. Pour into your pre frozen ice cream maker and let it do its magic for about 25 minutes.
  4. Scoop out and serve soft, or place inside a sealable airtight container and place in the freezer anywhere from 2-24 hours and enjoy!

If you don’t have an ice cream maker, check this post out
Note: Make sure the yogurt your using Greek yogurt otherwise it won’t turn out as creamy. Also if you want a stronger green tea flavor add 1- 2 more tbsp of matcha.
I am so thrilled you are reading one of my recipes, if you made this recipe id love to hear about it! You can post a review, picture below or via Instagram and let me know how it turned out. And by doing so you will be automatically entered into our seasonal CONTEST to win one of our great prizes. Winner will be notified via email within a week after the contest closes. Thank you very much for reading and until next time see ya in the kitchen. Don’t want to miss a recipe? Sign up for our NEWSLETTER delivered right to your inbox every Month!