Easy One Pan Chicken Fajitas

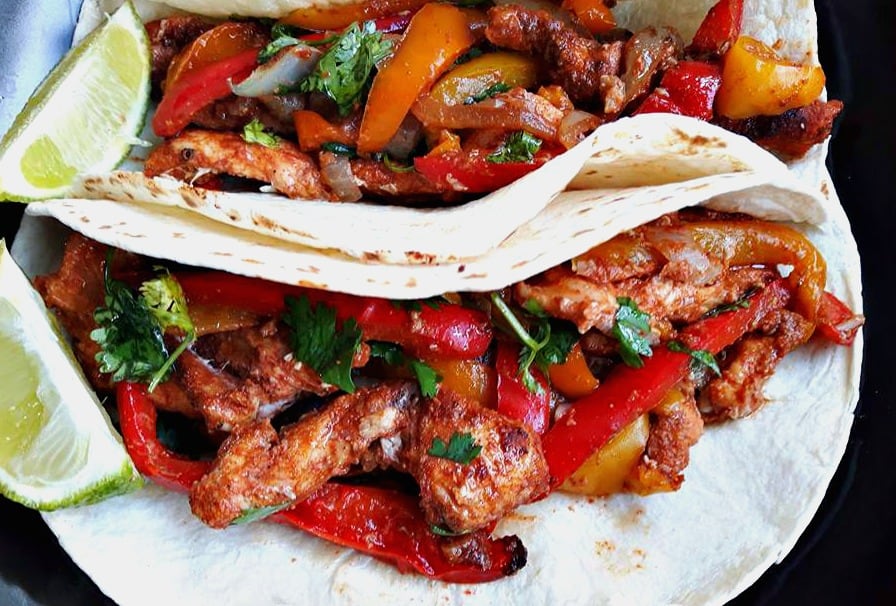
Check out this Delicious recipe for “Easy One Pan Chicken Fajitas”. Takes less than 30 minutes to prepare and clean up is QUICK! Today is the first day of fall and if summer was not busy enough, fall is going to be just as busy. So I’m starting the season off by making some easy one pan meals. Think easy clean up, BIG flavor all with the ability to feed a crowd. Think Chicken Fajitas! The only thing pre – made you will want to buy here is the flour tortillas, doing this will save you a ton of time in the kitchen.  And don’t even think of buying pre made fajita seasoning, because I am certain you have all the right spices in your kitchen. Fajita seasoning is a combination of cumin, coriander, chili powder, paprika, cayenne pepper, garlic powder, onion powder with salt and black pepper. Then all you need is some fresh chicken breasts, and sweet red peppers, lime and your ready to rock and roll. With very little prep, you can have this dinner on the table in under 30 minutes. If you liked this recipe, check back soon for more one pan recipes that will  help you to get good dinner on the table in  jiffy, enjoy!

Kitchen Essentials:


To make the Easy One Pan Chicken Fajitas:

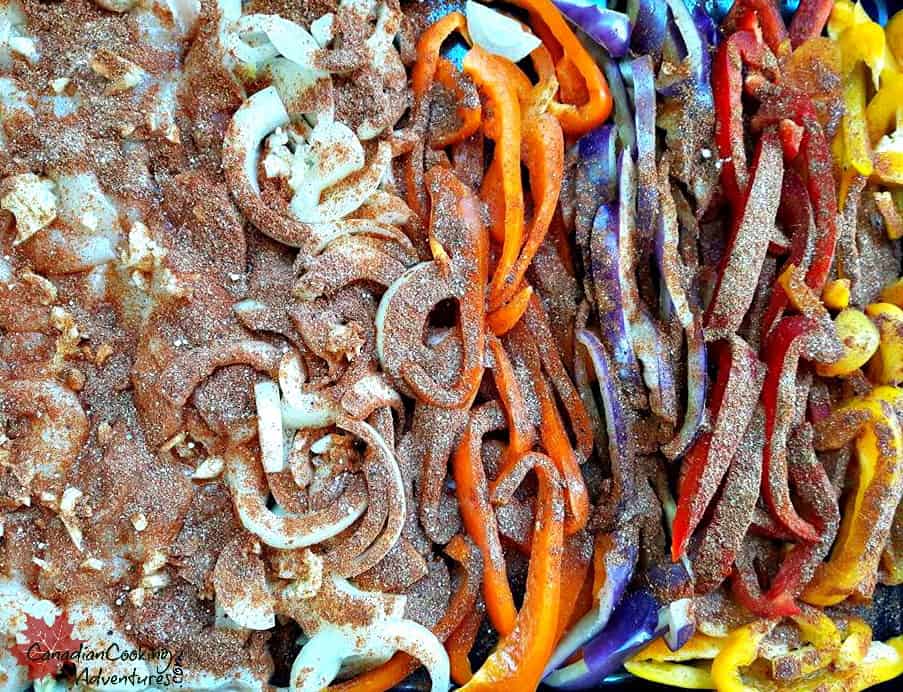
  1. Start by making your fajita seasoning. Mix together cumin powder, coriander powder, chili powder, paprika, onion powder, garlic powder, and pepper in a small bowl. Set aside.
  2. Next wash and slice your sweet bell peppers into thin strips, then your onions then placing them onto one side of your baking sheet.
  3. Next, slice your chicken breasts into strips and place on the other side of your baking sheet.
  4. Crush the garlic and place on-top of the chicken and onions.
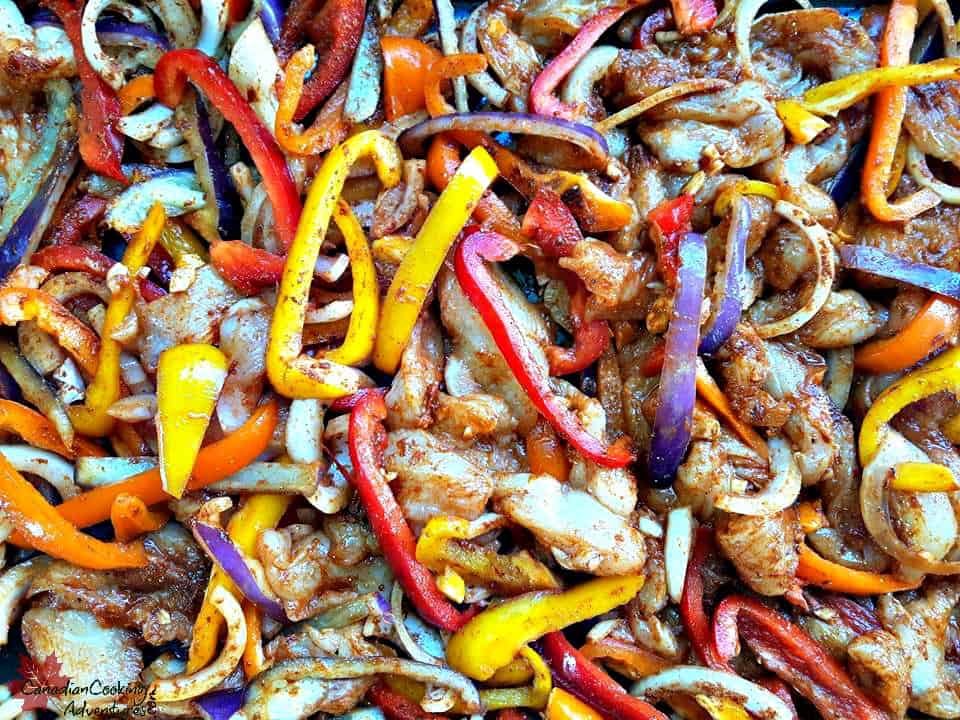
  5. Prepare your fajita mix, stir everything together and pour over your fajita pan and stir so everything is covered with the mix.
  6. Bake in the over at 400 f for 25 minutes.
  7. Warm your tortillas up in the oven or microwave and serve  your chicken mixture directly from the pan onto your tortillas.
  8. Garnishes with sliced lemon wedges and chopped up cilantro.

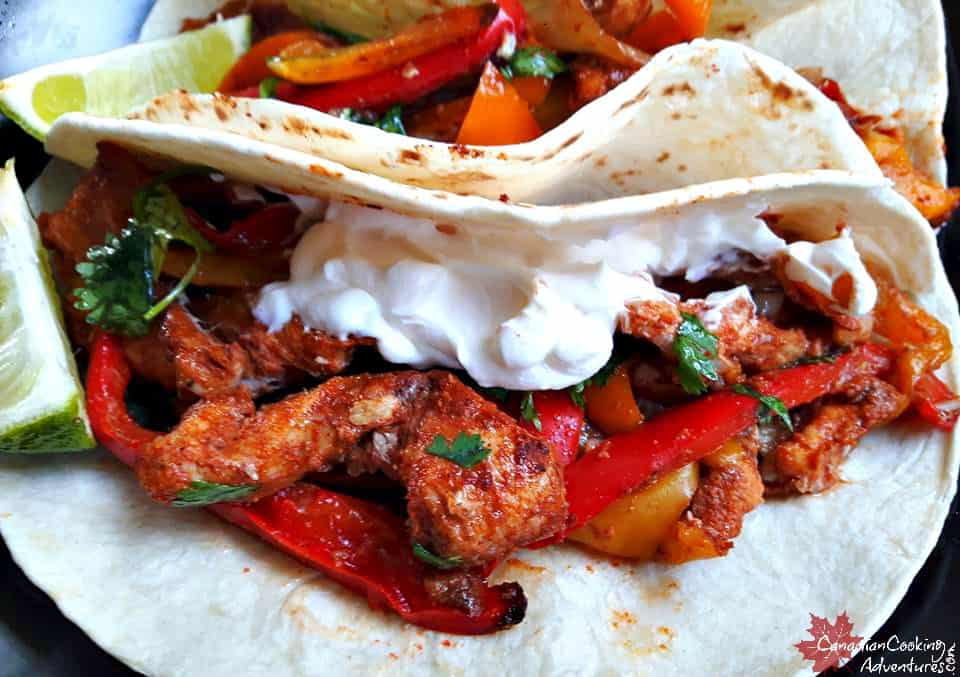
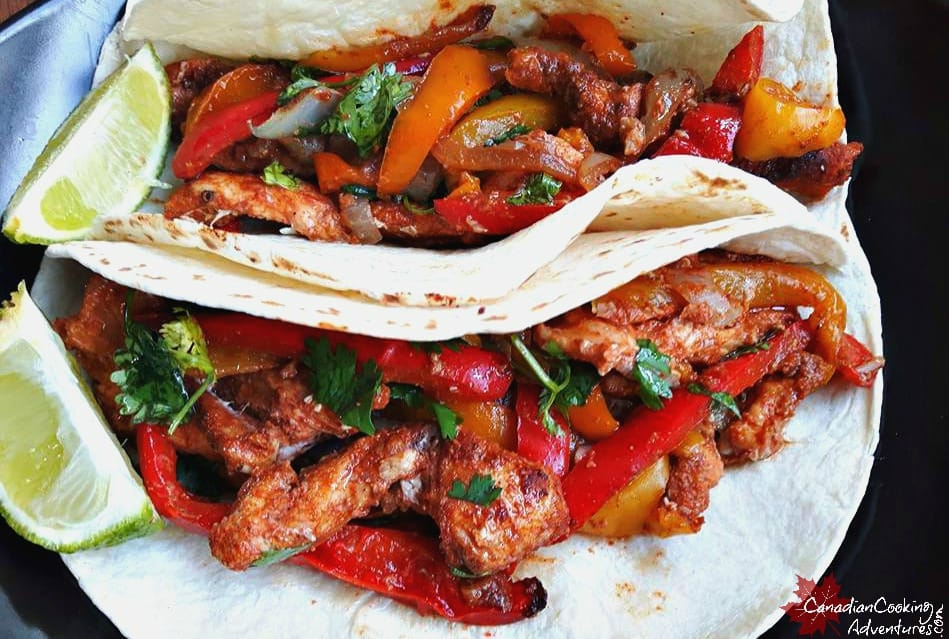
Note: You can serve these fajitas with sour cream or a Mexican salsa called “Pic de gallo“, see recipe for that here.


I am so thrilled you are reading one of my recipes, if you made this recipe id love to hear about it!You can post a review, picture below or via Instagram and let me know how it turned out. And by doing so you will be automatically entered into our seasonal CONTEST to win one of our great prizes. Winner will be notified via email within a week after the contest closes. Thank you very much for reading and until next time see ya in the kitchen. Don’t want to miss a recipe? Sign up for our NEWSLETTER delivered right to your inbox every Month!


Ukrainian Borscht

Indulge in the rich and hearty flavors of authentic Ukrainian Borscht. Allow those delicious red beets come to life! And learn the secrets to creating a bowl of soup that will transport you directly to the heart of Ukraine.

Ukrainian Borscht soup can be also made with beef chunks if desired as well, You can find my recipe for Beef Borscht Soup here. 

Ukrainian Borscht soup is one of my favorite things to make going into the colder months. The bright red beets carry so many health benefits, it’s no wonder I feel so great after eating this. 

Traditionally borscht is made with chunks of beef, however you can omit that as I have in this recipe. I like this particular recipes because it REALLY highlight the beets and cabbage more than anything. 

I did make this soup with beef stock however as it does give a really nice broth however vegetable and chicken broth will work too. Whatever you have on hand!

CAN BORSCHT BE FROZEN

This recipe will make a fairly large pot of soup, so if you have any any leftovers “which is highly unlikely” then yes you can freeze it for another time. Think meal prep, make a big pot and store it away in the freezer for some healthy grab and go lunches!

HOW LONG WILL BORSCHT KEEP IN THE FRIDGE

Up to 5 days, the longer it is stored the deeper the flavors that will develop. However if you add meat to your soup, you will want to eat it up in 2 days.

WHO INVENTED BORSCHT 

Some people think Borscht soup originated in Russia, however it’s actually from the Ukraine. When searching the web and cook books, you will find there are several ways to make borscht.

I prefer it just like this, with my vegetables chopped up very finely as opposed to the chunky versions, after all this is a soup not a stew.

To do this you will want a food processor, which will saves you a ton of time otherwise you can use a grater to get the job done. Sunflower oil is traditionally used also, so if you have some on hand I recommend using it.

I hope you like this recipe for authentic borscht soup, it’s my favorite way to make it.  

Also you can save yourself allot of time and hassle by letting your food processor chop up your beets and cabbage. Also this will gives the soup a great consistency, leaving it very creamy vs chunky.

HOW TO MAKE BORSCHT SOUP

Borscht can be made several different ways, so it all comes down to personal preferences. But one thing is for certain, you want to use beets. Fresh is always best, however pre frozen can work too. 

Example: Borscht Soup can be made vegetarian or not. Also it can have cabbage, carrots, red beans and potatoes in it or not.

  • Can be made with large SLICES OF BEETS, see recipe here > Creamy Beet Soup
  • Can also be made with sausage, chopped potatoes and kidney beans, see that recipe here > coming soon.
  • Can be made with Beef, see that recipe here > Beef Borscht

Welcome to borscht heaven!

BORSCHT HOW TO SERVE

Serve alongside some crusty bread and  a dollop of sour cream if  desired! Fresh dill also goes very well in the soup or on top of each bowl served. 

Notes: Keep in mind, as with all my recipes. If you want to make more or less of this soup, simple adjust the serving size in the ingredients section above and the servings will automatically adjust for you.

Love BORSCHT?

Check out my other recipes here for Beef BorschtCreamy Beet Soup.

Love BEETS?

my Air Fryer Beets & my oh so popular Beet Feta Salad

I am so thrilled you are reading one of my recipes, if you made this, I want to see! Follow Canadian Cooking Adventures Instagram, snap a photo, and tag and hashtag it with @canadiancookingadventures and #canadiancookingadventures

Stay connected and follow along on FacebookPinterest, and Instagram for all of my latest recipes!

Flax & Quinoa Dressing (Stuffing)

This Flax & Quinoa Dressing is vegan since we are using vegetable stock vs chicken and omitting the eggs. 

Did you know that a stuffing that is not stuffed into a bird is called dressing? Some people like to make a dressing outside the bird and some like to make it inside the bird. It is completely up to you, however keep in mind the cooking times will vary. 

Today, I’m making a dressing and on occasion I will make this same dressing and stuff it inside a bird when baking a Turkey. You may find the dressing a bit dry when baking outside the turkey and in that case you can prepare a gravy on the side and serve it alongside if desired. 

I will do this sometimes if I want to serve turkey, because I just use the turkey drippings to make a perfect gravy. I find my Turkey cooks better without it stuffed inside anyway.

This dressing is so tasty, I could eat it all to myself. Now take note the dryer the bread the more tastier it will be also using a bread with other things in it only adds extra flavor. That is why I like to use Flax & Quinoa bread, which gives it a nice nutty flavor. 

However you can use any type of bread of course, just make sure it’s dried out some before you tear it apart to ensure the stuffing is not soggy. You can also add less or more celery/onions as well, depending on your preference.

This recipe makes enough for roughly four servings, so if you want to serve more people just add a few more bread slices and adjust the other ingredients according to your taste, there really is not much to it. Enjoy!

It’s going to be so GOOD!


Note: You can add flax seeds, diced apples, cranberries or sunflower seeds to this stuffing if you desire to make it more hearty.


I am so thrilled you are reading one of my recipes, if you made this recipe id love to hear about it! You can post a review, picture below or via Instagram and let me know how it turned out. And by doing so you will be automatically entered into our seasonal CONTEST to win one of our great prizes. Winner will be notified via email within a week after the contest closes. Thank you very much for reading and until next time see ya in the kitchen. Don’t want to miss a recipe? Sign up for our NEWSLETTER delivered right to your inbox!

PIN IT FOR LATER


Campfire Chili Poutine

This is one of our camping favorites and it’s really as easy as 1, 2, 3. As you may know Poutine originated in Quebec and has become popular Worldwide. It’s typically served with cheese curds and topped with hot gravy, I like to add chili to it when we go camping. To make this hearty recipe, all you need is some “french fries, canned chili and cheese”, Oh and you can’t forget the gravy. It may not look great but it sure is tasty, filling and is super easy to clean up. Just make sure you purchase the canned chili and gravy, after all this is camping and you want to make it as easy as possible. Also make sure to buy pre shredded cheese for this recipe too, think simple this is camping. Enjoy!

Camping Essentials:

To make the Campfire Chili Poutine:

  1. Lay out your tinfoil in two double layers for extra support.
  2. Cut open your bag of fries (its best not to use the skinny fries here) and pour them onto the tinfoil.
  3. Open your can of Chili, and your can of Gravy.
  4. Pour your Chili over the uncooked fries and then cover with  shredded cheese.
  5. Sprinkle with salt and pepper to taste and close up your package and allow it to cook on the grill for 30-40 minutes.
  6. Once your fries are half cooked, place your canned gravy on the grill and allow it to heat up. Make sure you open it prior to placing on the grill because it will be bubbling and hot once you remove it.
  7. Serve in the middle of the table with forks for all, and pour that hot gravy over-top.
  8. Enjoy!


Note: If you’re camping in bear country, take appropriate precautions to keep your campsite as unattractive to bears as possible. To do this simply purchase and properly use a bear-proof garbage container or ensure all your garage is placed in a sealed bin in your vehicle or at a designated dump once your done cooking, this helps keep our wildlife safe and you as well.


I am so thrilled you are reading one of my recipes, if you made this recipe id love to hear about it! You can post a review, picture below or via Instagram and let me know how it turned out. And by doing so you will be automatically entered into our seasonal CONTEST to win one of our great prizes. Winner will be notified via email within a week after the contest closes. Thank you very much for reading and until next time see ya in the kitchen. Don’t want to miss a recipe? Sign up for our NEWSLETTER delivered right to your inbox!

Tomato Salad with Balsamic Parsley Dressing

I like to make this salad all year long, however it truly tastes best made during the summer. When tomatoes are there freshest here in CanadaPreferably straight from the garden, those can’t be beat. 

It’s a great salad because it’s quick to make and also very healthy, bursting with fresh tomatoes, balsamic vinegar,  parsley, olive oil and garlic salt this recipe is sure to be a hit. Give it a try, you may be surprised that this simple little salad is so good. 


I am so thrilled you are reading one of my recipes, if you made this recipe id love to hear about it! You can post a review, picture below or via Instagram and let me know how it turned out. And by doing so you will be automatically entered into our seasonal CONTEST to win one of our great prizes. Winner will be notified via email within a week after the contest closes. Thank you very much for reading and until next time see ya in the kitchen. Don’t want to miss a recipe? Sign up for our NEWSLETTER delivered right to your inbox every Month!

PIN IT FOR LATER