Canned Clam Linguine

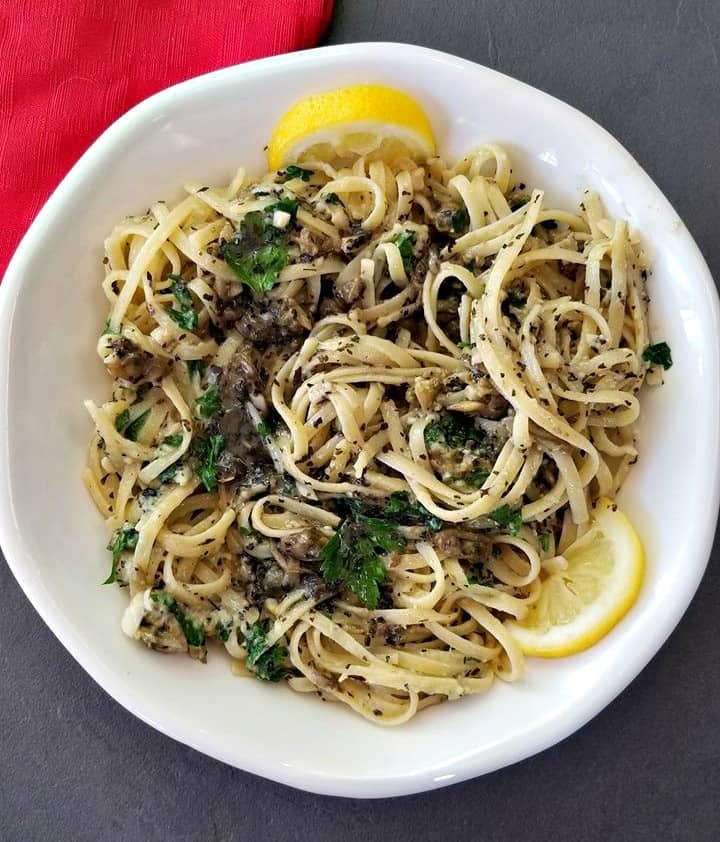
With this Clam Linguine you can enjoy a delicious meal that’s packed with flavor, texture, and richness. Whether you’re making it for a weeknight dinner or a special occasion, this recipe is sure to become a new family favorite.

Looking for more seafood pasta dishes? Try my Canned Salmon PastaCajun Garlic Scallop PastaShrimp and Broccoli Pasta.

Who doesn’t love a delicious bowl of linguine? Add a can of clams and your in for a dish that you will crave time and time again.

This Clam Linguine recipe has been past down from my aunt. I’m so excited to share this recipe with you!

Now I don’t know about you, but I love a good pasta dish now and then. And this recipe is one of those top 10 pasta dishes you must try if you do too. 

Because it is so simple yet so delicious! Do not forget those fresh LEMONS, they make a World of difference.

WHAT GOES WITH LINGUINE AND CLAMS

A glass of white wine for sure!

You can cook with the bottle of white wine and have enough left over to serve two glasses along side.

I can picture it now, you and your partner enjoying this and a glass of white wine by candlelight. Can’t you? 

I have five aunts and one of them is a chef, the one who passed down this recipe to me is not.

However everyone knows that this aunt makes the best Linguine and Clam pasta.

It is so good, that she makes it pretty much every time she has company over.

And even those who claim to not care much for clams want seconds. 

CAN YOU EAT LINGUINE AND CLAMS WHEN PREGNANT

Since the clams are cooked, yes you can.

Last month my aunt was over for a visit and I said, teach me.

Teach me how to make your Clam Linguine!

I never knew it was this simple, boy oh boy is it good.

This recipe is easy and takes less than 20 minutes.

It’s absolutely one of my favorite pasta recipe, so follow along so I now teach you how to make the best Clam Linguine you have ever had. 

This pasta can be enjoyed pretty much any time of year and would sure work good as a romantic meal for two.

HOW TO MAKE LINGINE AND CLAMS

  • Bring a large pot of salted water to a boil and then add in the linguine. Cook according to package instructions, remove strain and set aside.
  • In the same pot add 4 tbsp of butter and the minced garlic, saute 1 minute before adding in the fresh spices then dry ones.
  • Saute one more minute before adding in the canned clams (juice) simmer 5 minutes before adding in the white wine.
  • Simmer on low heat for 7 minutes all the while allowing the stock to reduce.
  • Add in the clams along with the parmesan cheese and simmer all together for a remaining 5 minutes.
  • Serve with fresh squeezed lemon juice over top.

Want more delicious pasta recipes? 
Tomato and Basil Focaccia Bread

This Tomato and Basil Focaccia bread is simply delicious, and pretty easy to make. Give it a try, I promise you will never go back to the store bought kinds. 

Bake it in a dish like mine below, and you will have the most light and fluffy focaccia bread.  

Focaccia bread can be eaten alone or served alongside any Italian dish that you are to make.

This recipe is one of the more popular versions of focaccia bread, as it highlights the basil and cherry tomatoes so well. Nothing beats homemade bread, I hope you enjoy! 

HOW TO MAKE FOCACCIA BREAD

    1. Place the flour, salt into a large bowl and drizzle with a little olive oil.
    2. In another bowl prepare your yeast, empty your package into a bowl and slowly add in your warm water and give it a light stir. Let it sit for 5 minutes or until the yeast dissolves.
    3. Now add your yeast/water mixture to your bowl of four and mix together with a spatula till it comes all together. 
    4. When it gets to hard to mix with the spoon, add a bit of flour to your hands and place the dough on a clean surface and knead it for about 5-10 minutes. You can also use a dough mixer if you prefer, but I prefer this method. Basically you want to pull and put back a dozen or so times, and make it elastic in consistency as much as possible because you want to stretch the gluten in the dough.
    5. Once this is done, form into a light ball of dough and cover with a large bowl allowing it to rise underneath for 45 minutes. Drizzle the outside of the dough with more olive oil before covering!
    6. Now in the baking dish and add your Semolina to the bottom of the dish.
    7. Lifting your dough onto the baking dish, spread it along  the bottom of the dish to cover.  
    8. Make finger holes with your fingers all throughout the bread, just don’t pierce through to the bottom basil .
    9. Next place whole basil leaves and whole cherry tomatoes on top those leaves, stuffing the holes you created.
    10. Season with salt, and add 1 tablespoon of extra virgin olive oil all over the top of the bread. 
    11. Finish by drizzling over 1 tablespoon of extra virgin olive oil and sprinkling with a tiny sprinkling of sea salt.
    12. Cover with a clean tea damp towel and leave to prove again for a further 40 minutes.
    13. Lastly bake for around 20-25 minutes, you want it to be crispy on the outside soft on the inside.
    14. REMOVE from oven and drizzle once again with more olive oil (very important) now allot it to cool down for  at least 10 minutes before serving.

Notes: If your using dry herbs, soak them prior in olive oil and put them use them on the bread.

Also this goes amazingly well served with a plate of red wine vignette and olive oil, mixed together for serving.

If you want a thinner style focaccia, try using a baking pan rather than a dish.

So flavorful there really is nothing like fresh bread!

I’m thrilled you are reading one of my recipes, if you made this recipe i’d love to hear about it! Thank you and until next time see ya in the kitchen. Don’t want to miss a recipe? Sign up for our NEWSLETTER delivered right to your inbox!

Easy Pizza Ratatouille

This Easy Pizza Ratatouille with Mozzarella Cheese is so good you won’t believe it’s Vegetarian. 

I just love Ratatouille, it’s fresh, healthy and so good for you.

And is one of those excellent summer time recipes, since it utilizes all those fresh garden vegetables so well.

Not to mention very pretty, just look at the rainbow of colors.

Made with a few simple ingredients.

That being of eggplant, zucchini, tomatoes and mozzarella cheese it doesn’t get any fresher than this. Which is then smothered in a quality can of tomato based pizza sauce.

Your sure to impress anyone when serving this dish!

There are many recipes out there for this famous french dish called “Ratatouille” and plenty different ways to preparing it.

Traditional Ratatouille is made without cheese, however I like to add Mozzarella to mine, because it really enhances the recipe and makes it taste more like a pizza without the added carbs.

Lay upon layer of Tomato, Green Zucchini, Yellow Zucchini, Mozzarella Cheese and Eggplant!

Also be sure to cook it for a minimum of 2 hours as that sure helps to bring out all the vegetables flavors which happens through caramelization.

This recipe is sure to be a family favorite, and is gluten free.  I hope you like my version of this famous dish. “Bone Appetite”!

I am so thrilled you are reading one of my recipes, if you made this, I want to see! Follow Canadian Cooking Adventures Instagram, snap a photo, and tag and hashtag it with @canadiancookingadventures and #canadiancookingadventures

Stay connected and follow along on FacebookPinterest, and Instagram for all of my latest recipes!


Authentic Thai Red Curry Recipe

This Authentic Thai Red Curry Recipe also has orange peppers and asparagus in it and is absolutely delicious!  

This recipe is authentic because it has all the elements of a Red Thai Curry that you would find in your favorite Thai restaurant.

Now, your probably saying to yourself! Asparagus is not an authentic thai vegetable. And you would be right!

But the orange pepper is, so that mean’s you can omit the asparagus “but why would you” its delicious!

And use more peppers instead, such as yellow peppers. 

I felt like experimenting a little today and so instead using just peppers, I added the asparagus!

Being I adore Thai food, I had 3 bowls to myself this time so it worked out.

Over the course of two days that is and my partner had one the night I made it for dinner.

AUTHENTIC RED THAI CURRY

Is made up of a quality thick coconut milk and ingredaints such a“Kaffir lime leaves”, Lemongrass”, and “Galangal” among other special Thai spices.

Finding these ingredients can be hard if your in North America, so buying a pre-made paste is ideal.

That is because we are using a product that contains all those Thai ingredients already in it.

Such a the one you will see below and is the only brand I will use. It is the best I have found, others are either to sweet or to spicy!

The ONLY brand I will use!!

How to Make Authentic Thai Red Curry Recipe

  • Start by washing and cutting up your vegetables and slice all according to the size you want.
  • Wash the chicken breasts, and slice them into thin pieces.
  • In pot, wok or pan, heat up the oil on medium high and in your “RED THAI CURRY PASTE” saute for 2 minutes till blended.
  • Next add in the coconut milk and cook for another 2 minutes on medium-high.
  • Add in your ginger/garlic paste and cook for 2 minutes all together.
  • Next add in the Chicken and allow it to simmer all together on medium-high for 10 minutes.
  • Then add in your fish sauce, and simmer for another 2 minutes over low heat.
  • Add your remaining vegetables. “Asparagus first” then the “Orange Bell Pepper” cook to tender around 6 minutes over medium heat.
  • Serve with fresh lime juice and a sprig of fresh basil over jasmine rice if desired.

The nice thing about cooking Red Thai curry is how simple it really is. I’m confident that when you prepare it once, you will then have all the necessary ingredients and know how to prepare it again.

Before you know it you will be a TOP CHEF in your kitchen, cooking Thai dishes like a Pro. 

So you have two options when preparing this dish, either you can make the Red Thai Curry from scratch with the traditional Thai ingredients.

By crushing it all together in a mortar or you can buy the premade “Red Thai Curry Paste” which has all this in the paste, and is much easier.

This is the method we recommend, as it’s much easier. We hope you give it a try,  and let us know how it turned out for you

To make this popular curry you will want to get your hands on some fresh “Lemongrass”, “Galangal” and “Kaffir lime leaves” which can be found in most Asian stores.

Or purchase the pre made “Thai Red Curry Paste” which can also be found in most Supermarkets, Thai Red Curry paste has all the above ingredients in it needed to make this dish.

Then you will want to add in the lime last, you do not want to cook the lime because it will ruin the flavor.

Also if using fresh “Lemongrass”, “Galangal” and “Kaffir lime leaves” you will want to remove it before consuming the curry.

Want more heat, simply add in some Thai Bird’s eye chilies or Thai Chili Paste. Caution when preparing Bird’s Eye Chilies, these chilies are very hot and can burn the eyes.

Note: Want more heat, simply add in more Thai Red Curry Paste.

I’m thrilled you are reading one of my recipes, if you made this recipe id love to hear about it! Thank you and until next time see ya in the kitchen. Don’t want to miss a recipe? Sign up for our NEWSLETTER delivered right to your inbox!

Garden Tomato Pie

It’s that time of year, where our gardens are bursting with tomatoes. So why not make a tomato pie? I love tomatoes, don’t you? I also have a pre-made pie crust in the freezer, so I thought why not make this delicious pie and share it with my readers. You can make your pie crust of course, or just buy a pre-made one and have this on the dinner table in under 45 minutes. It’s great for breakfasts or dinner and you can add any kind of tomatoes you like. Looking for a more vegetarian type tomato pie, simply omit the eggs and add some sauté asparagus it will be just as good.  I hope you give it a try, I’d love to hear how you liked it in the comments below!!

What you will need:

To make the Garden Tomato Pie:

  1. In a mixing bowl, combine the cheeses, sour cream, eggs, chopped green onion, mayonnaise, and whisk together till blended.
  2. Next, on cutting board slice garden tomatoes, pat dry with a paper towl to remove excess moisture
  3. Season generously with salt, pepper, thyme, basil.
  4. Pre-heat oven to 425F.
  5. Sprinkle a little flour on the pie shell, to ensure the shell.
  6. Then pour your cheese mixture into the pie shell and then top with you garden tomatoes, drizzle a little olive oil on top and season lightly with salt and pepper.
  7. Bake for 30 minutes until crust has completely browned and the tomatoes have roasted.
  8. Serve immediately, enjoy!

Note: You can pre-cook some bacon and crumble it over the pie if desired.


I am so thrilled you are reading one of my recipes, if you made this recipe id love to hear about it! You can post a review, picture below or via Instagram and let me know how it turned out. And by doing so you will be automatically entered into our seasonal CONTEST to win one of our great prizes. Winner will be notified via email within a week after the contest closes. Thank you very much for reading and until next time see ya in the kitchen. Don’t want to miss a recipe? Sign up for our NEWSLETTER delivered right to your inbox every Month!


Passata Pizza Sauce

This Passata Pizza Sauce is my go to pizza sauce whenever I’m making a pizza from scratch. 

It’s very fresh and authentic tasting and most people don’t realize it but having a good tomato sauce for your pizza is key to making a great pizza.

You don’t want to just slap on tomato paste and hope for the best.

Because that will give it a plain raw flavor that even the best ingredients can’t mask.

What you want is a simple yet delicious homemade sauce that is versatile and goes great on any pizza and I have just the recipe for that.

This is by far my favorite way to make homemade pizza sauce, it’s so simple too.

This recipe makes enough for two large pizzas, cut the recipe in half if you’re cooking just one.

HOMEMADE LOW SODIUM PIZZA SAUCE

Is possible when you make it like this from scratch. Because Passata sauce has no salt in it, you really can omit the salt all together if you choose. 

Note: You can omit the anchovies paste if you like, but I encourage you to try it with. Stores in a airtight container up to 24 hours in the fridge.

I am so thrilled you are reading one of my recipes, if you made this recipe i’d love to hear about it! Thank you very much for reading and until next time see ya in the kitchen. Don’t want to miss a recipe? Sign up for our NEWSLETTER delivered right to your inbox!