Red Thai Scallop Curry

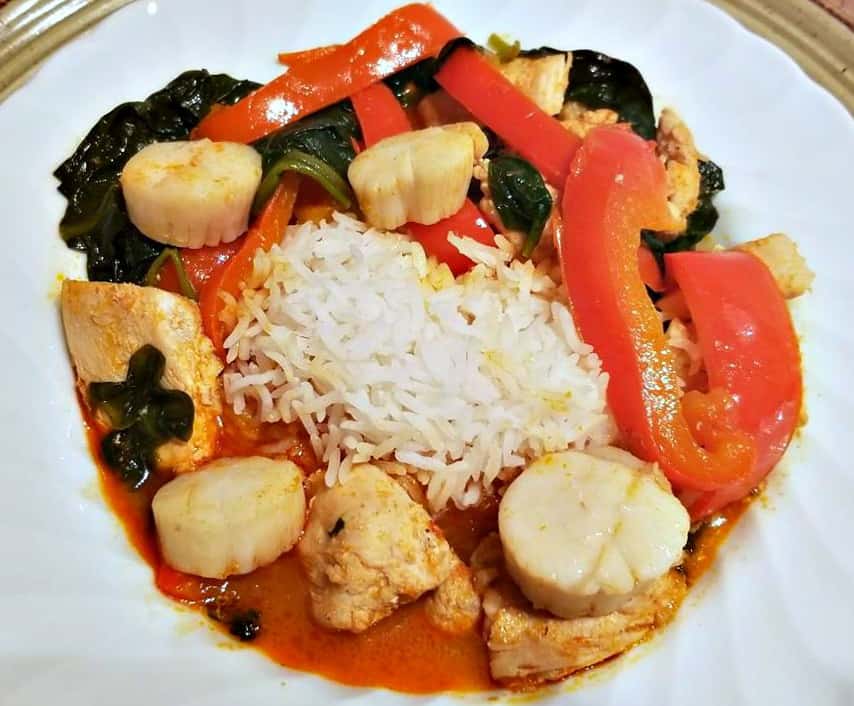
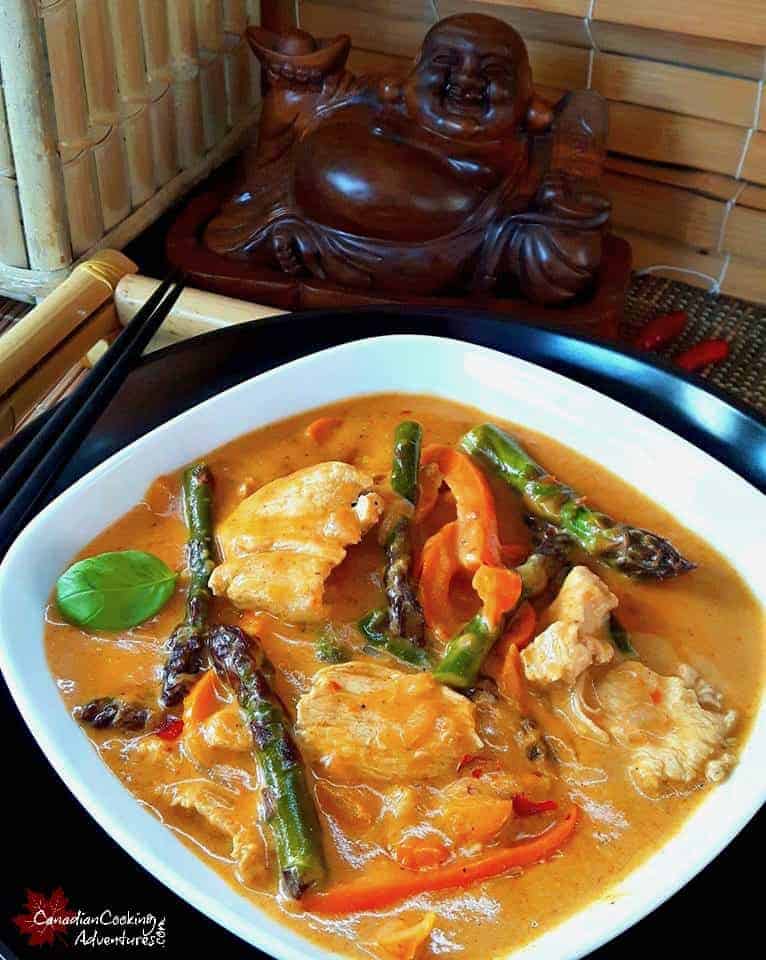
This Red Thai Scallop Curry is super simple to make and can be done in under 30 minutes flat. 

There are plenty of ways to make Red Thai Curry and if you follow this blog then you will know that I like to make this dish often and in many different ways.

The nice thing about Thai food is that you prepare it once and then you should have all the necessary ingredients and know how to prepare it again and again.

Before you know it you will be a TOP CHEF in your kitchen, cooking Thai dishes like a Pro.

The scallops still remain sweet in that spicy curry sauce, and work very well alongside the chicken and other ingredients. So if you have never given scallops in Red Thai Curry before, I encourage you to give it a try.

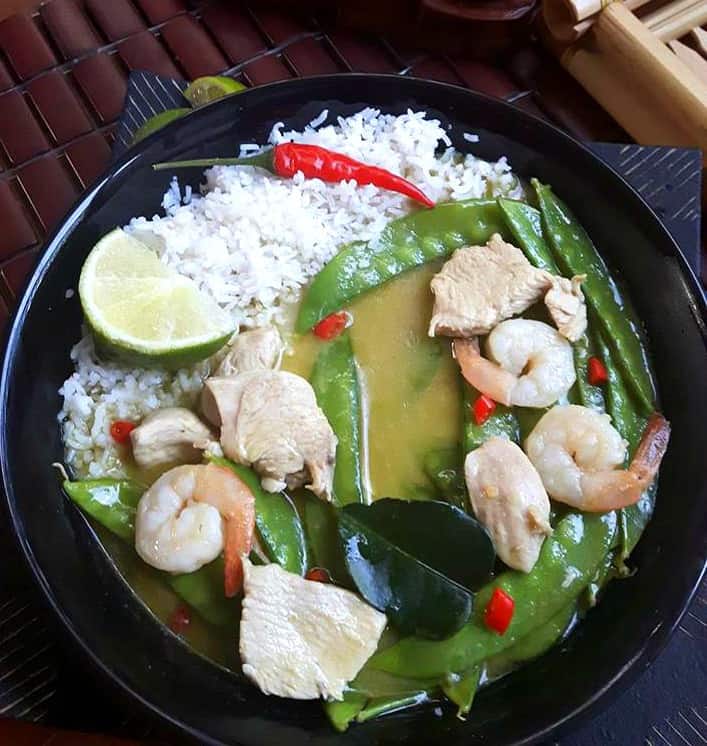
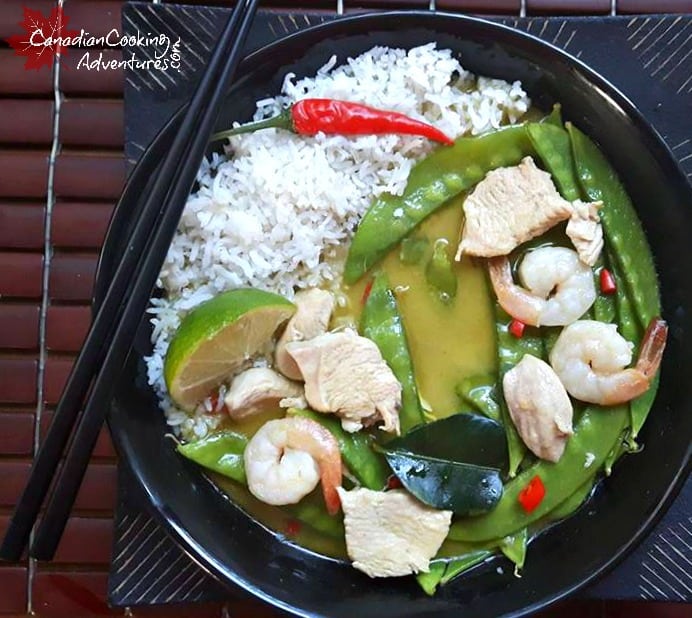
Red Thai Curry is just a bit milder than Green Thai Curry, however both taste similar. There are plenty different ways to make Thai curry, and that is because you can add just about any type of vegetable or meat protein to your dishes.

However the techniques are always the same and the main ingredients are always Coconut milk along with “Lemongrass”, “Galangal”, “Kaffir lime leaves”, “Red Thai curry paste” and for extra heat Bird’s Eye Thai chilies!

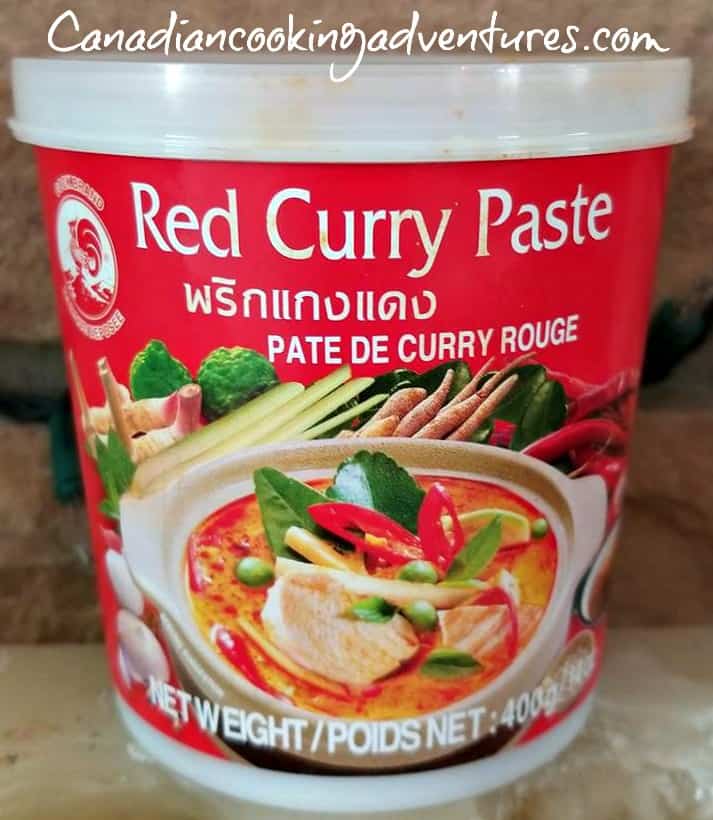
Just be careful to remove the seeds of the Bird’s eye chilies because they are very hot, if you decide to use them. I find they are not necessary in this dish, because the particular brand of Red Thai Curry paste that I use has enough heat to it.

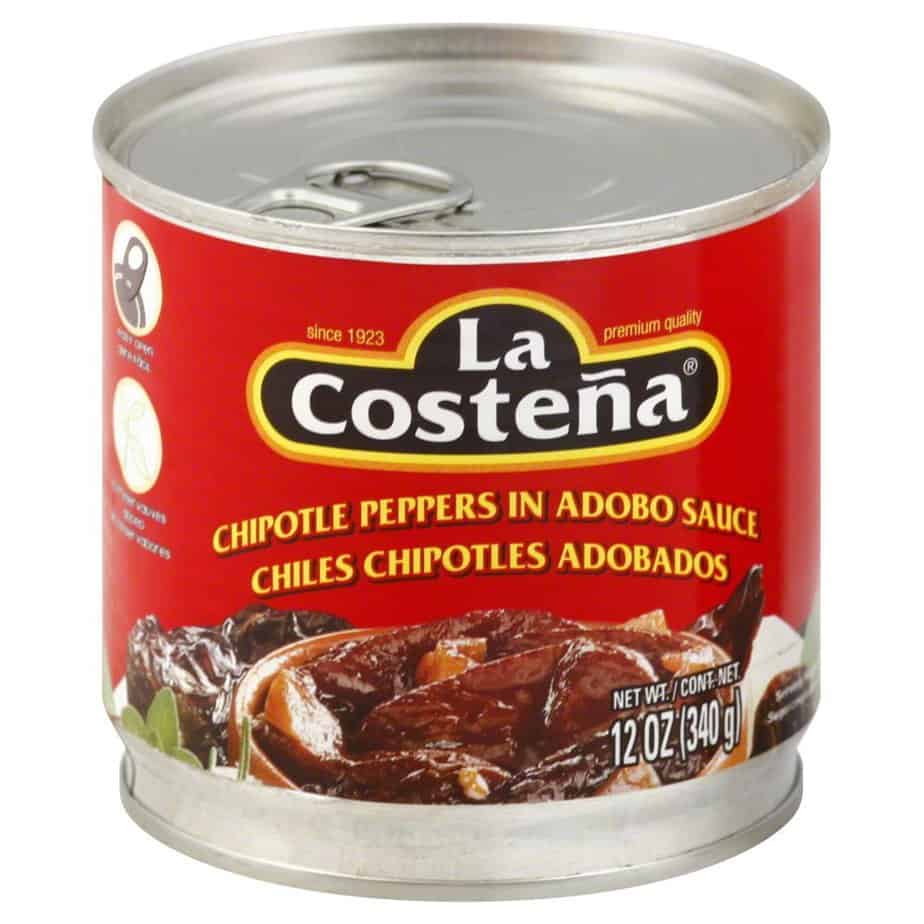
See my favorite brand here!

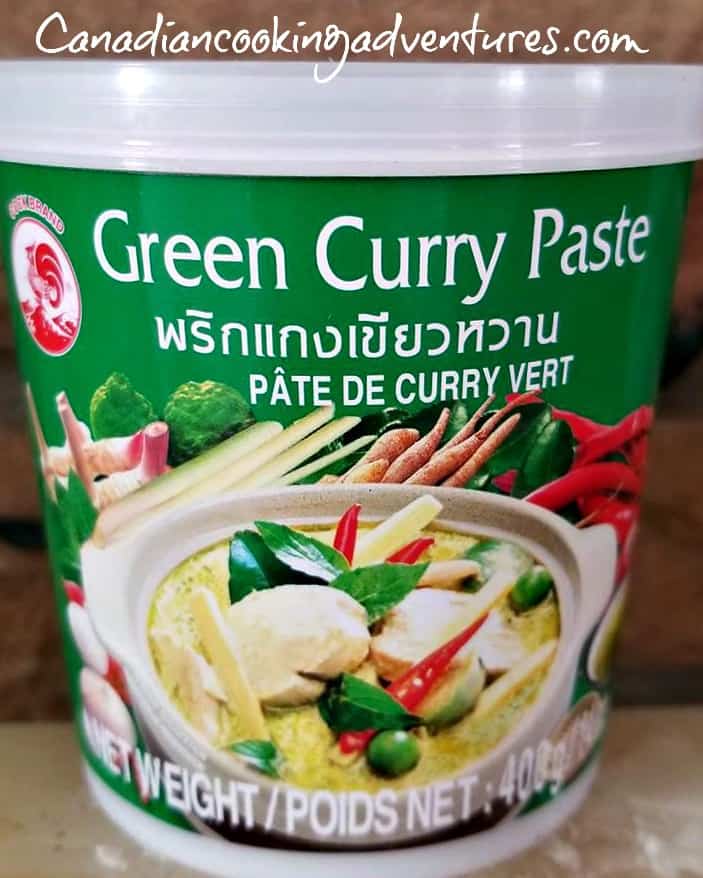
Now if you are not familiar with all those ingredients, Bubba says don’t fret, you can find them all at your local asian grocer or right in the international aisle at your local grocer which will sell it in packages and or jars (see picture) below of the “Red Thai Curry paste” we like to use.

Even though we use the premade “Red Thai Curry paste” in this recipe, we also like to use  fresh or frozen “Kaffir leaves” occasional too.

However you do not have to since they are in the “Red thai curry paste” already and the lime squeezed in afterwards does help give it the tang. Once you get all these basic ingredients, you will be shocked at how easy it is to prepare these Thai dishes at home.

Keep in mind a good coconut milk, will be half solid a half watery. One that is all watery does not work as well for this dish, typically organic varieties have the best products.

* Optional ~ for extra broth add 1/2 cup of chicken stock

*Optional ~ for extra heat add 1/2 a Bird’s eye chili to step 6.

*Optional ~ add one chopped roma tomato to step 8


Notes: 

  • “Lemongrass”, “Galangal” and “Kaffir lime leaves” can be found in most Asian stores. “Thai Red Curry Paste” can be found in most Supermarkets, Thai Red Curry paste has all the above ingredients in it needed to make this dish.
  • Add in the lime last, you do not want to cook the lime because it will ruin the flavor.
  • Do not eat the “Lemongrass”, “Galangal” and “Kaffir lime leaves” there just for flavoring, if you’re going to use these instead of the Thai Red Curry paste, make sure to bruise each item before adding to the pot.
  • Want more heat, simply add in some Thai Bird’s eye chilies or Thai Chili Paste. Caution when preparing Bird’s Eye Chilies, these chilies are very hot and can burn the eyes.

I’m thrilled you are reading one of my recipes, if you made this recipe i’d love to hear about it! Thank you and until next time see ya in the kitchen. Don’t want to miss a recipe? Sign up for our NEWSLETTER delivered right to your inbox!


Classic Creamy Coleslaw Salad

This Classic Creamy Coleslaw Salad goes well along any summer recipe you may be serving.

Some people like their coleslaw thick, creamy and sweet, while others prefer it light and tangy. 

This recipe leans more towards to thick, creamy sweet coleslaw that many grew up with.

If you’re looking for a lighter tangy slaw then check this recipe out for a Light and Tangy Coleslaw.

Both recipes are just as good, so it’s all about personal preference. 

HOW TO MAKE CREAMY COLESLAW 

  1. For the Coleslaw: In a large bowl, combine cabbage and carrots  (or empty your bag of cabbage carrot mixture into the bowl).
  2. For the Dressing: In a smaller bowl, make the dressing by combining your mayonnaise, apple cider vinegar, celery salt, garlic powder, lemon, sugar, salt and pepper to taste.
  3. Slowly add the dressing into cabbage mixture until you have the desired amount.
  4. Allow it to chill in the fridge up to one hour to let the dressing marinate.

You may need less dressing, depending on how much cabbage your using.

Taste for seasoning and adjust as needed. Serve alongside any summer dish and or double the recipe and make for a crowd.

I am so thrilled you are reading one of my recipes, if you made this, I want to see! Follow Canadian Cooking Adventures Instagram, snap a photo, and tag and hashtag it with @canadiancookingadventures and #canadiancookingadventures

Stay connected and follow along on FacebookPinterest, and Instagram for all of my latest recipes!

Chipotle Chicken (Slow Cooker)

I just love recipes that call for a little spice, don’t you? Impress yourself tonight with this no fuss recipe, which takes less than 10 minutes to prep. Simply allow it to cook in the slow cooker before shredding it with two forks before plating. While it’s cooking in your slow cooker, make some fresh homemade coleslaw and then simply let it sit in the fridge to cool before pairing with the shredded chicken. Serve with on a nice crusty bun and you have a great meal, can’t get any easier or delicious than that eh? This Chipotle Chicken recipe can be doubled and made for a larger crowd too, or stored in the fridge up to 3 days. I hope you enjoy it as much as we do! 


These are what Mexican Chipotles look like 


This is what you will be looking for, same stuff just in a can with some sauce.


To make the Creamy Chipotle Chicken:

  1. In a blender puree your 1 chipotles with (seeds removed) and set aside.
  2. Now. combine all your ingredients in your slow cooker, and then add in your chicken breast and stir till everything is well coated. Add in your pureed chipotle along with 1 tsp of the sauce.
  3. Slow Cooking: LOW for 5-6 hours
  4. Pressure Cooker: 35 minutes
  5. Stovetop: Add one cup of water and all your ingredients, minutes the yogurt to a saucepan and simmer on low covered for 30 minutes. Then stir in the yogurt, mix everything together and cook for the reamaning 30 mins on low till done.
  6. Once the chicken is tender, use two large forks to shred the chicken.
  7. Then let the Chicken sit with the lid off for 30 minutes before serving, this allows it to absorb the remaining sauce and thicken up.
  8. Serve on a crusted bun with a sweet or tangy coleslaw.


To make the Creamy Coleslaw Salad follow this simple recipe.

To make the Light and Tangy Coleslaw follow this recipe.


Note: Store leftovers in an airtight container in the fridge for up to 3 days.


I am so thrilled you are reading one of my recipes, if you made this recipe id love to hear about it! You can post a review and or picture below. And by doing so you will be automatically entered into our seasonal CONTEST to win one of our great prizes. Winner will be notified via email within a week after the contest closes. Thank you very much for reading and until next time see ya in the kitchen. Don’t want to miss a recipe? Sign up for our NEWSLETTER delivered right to your inbox!

Light and Tangy Coleslaw

This light and creamy coleslaw recipe is easy to make and goes well alongside almost any type of bbq or summer meal. 

If you’re anything like me, you prefer your coleslaw light. Not to say I don’t like those creamy coleslaw at all, cause I do. I just have to make it myself, because I find the store bought variety is way to sweet. 

There are a few ways to make coleslaw as you know, and this is one of my favorite varieties. If your looking for a more sweet and creamy coleslaw, then check out my Creamy Coleslaw Salad recipe. 

This recipe here is very similar to my Creamy coleslaw recipe, however has half the mayo with the addition of a little Horseradish, and Whole Grain Dijon Mustard . 

These extra two ingredients alone give a bit of ‘kick’ to the regular creamy type coleslaw salad. Coleslaw makes the perfect accompaniment to a meal or can be eaten as is.

In summer when I have fresh herbs in the garden, I like to add just a tiny bit of chopped parsley or chives too.

HOW TO MAKE COLESLAW 

  1. For the Coleslaw: In a large bowl, combine cabbage and carrots  (or empty your bag of cabbage carrot mixture into the bowl).
  2. For the Dressing: In a smaller bowl, make the dressing by combining your mayonnaise, horseradish, Dijon mustard, apple cider vinegar, celery salt, sugar, salt and pepper to taste.
  3. Slowly add the dressing into cabbage mixture until you have the desired amount, taste as you go. Let this chill in the fridge up to one hour to let the dressing marinate.

You may need less dressing, depending on how much cabbage your using.

Taste for seasoning and adjust as needed.

The key is to let it marinate in the fridge for a few hours BEFORE serving, this lets the slaw set. Serve along side any summer dish and or double the recipe and make for a crowd.


I am so thrilled you are reading one of my recipes, if you made this recipe id love to hear about it! You can post a review and or picture below. And by doing so you will be automatically entered into our seasonal CONTEST to win one of our great prizes. Winner will be notified via email within a week after the contest closes. Thank you very much for reading and until next time see ya in the kitchen. Don’t want to miss a recipe? Sign up for our NEWSLETTER delivered right to your inbox!


Authentic Thai Red Curry Recipe

This Authentic Thai Red Curry Recipe also has orange peppers and asparagus in it and is absolutely delicious!  

This recipe is authentic because it has all the elements of a Red Thai Curry that you would find in your favorite Thai restaurant.

Now, your probably saying to yourself! Asparagus is not an authentic thai vegetable. And you would be right!

But the orange pepper is, so that mean’s you can omit the asparagus “but why would you” its delicious!

And use more peppers instead, such as yellow peppers. 

I felt like experimenting a little today and so instead using just peppers, I added the asparagus!

Being I adore Thai food, I had 3 bowls to myself this time so it worked out.

Over the course of two days that is and my partner had one the night I made it for dinner.

AUTHENTIC RED THAI CURRY

Is made up of a quality thick coconut milk and ingredaints such a“Kaffir lime leaves”, Lemongrass”, and “Galangal” among other special Thai spices.

Finding these ingredients can be hard if your in North America, so buying a pre-made paste is ideal.

That is because we are using a product that contains all those Thai ingredients already in it.

Such a the one you will see below and is the only brand I will use. It is the best I have found, others are either to sweet or to spicy!

The ONLY brand I will use!!

How to Make Authentic Thai Red Curry Recipe

  • Start by washing and cutting up your vegetables and slice all according to the size you want.
  • Wash the chicken breasts, and slice them into thin pieces.
  • In pot, wok or pan, heat up the oil on medium high and in your “RED THAI CURRY PASTE” saute for 2 minutes till blended.
  • Next add in the coconut milk and cook for another 2 minutes on medium-high.
  • Add in your ginger/garlic paste and cook for 2 minutes all together.
  • Next add in the Chicken and allow it to simmer all together on medium-high for 10 minutes.
  • Then add in your fish sauce, and simmer for another 2 minutes over low heat.
  • Add your remaining vegetables. “Asparagus first” then the “Orange Bell Pepper” cook to tender around 6 minutes over medium heat.
  • Serve with fresh lime juice and a sprig of fresh basil over jasmine rice if desired.

The nice thing about cooking Red Thai curry is how simple it really is. I’m confident that when you prepare it once, you will then have all the necessary ingredients and know how to prepare it again.

Before you know it you will be a TOP CHEF in your kitchen, cooking Thai dishes like a Pro. 

So you have two options when preparing this dish, either you can make the Red Thai Curry from scratch with the traditional Thai ingredients.

By crushing it all together in a mortar or you can buy the premade “Red Thai Curry Paste” which has all this in the paste, and is much easier.

This is the method we recommend, as it’s much easier. We hope you give it a try,  and let us know how it turned out for you

To make this popular curry you will want to get your hands on some fresh “Lemongrass”, “Galangal” and “Kaffir lime leaves” which can be found in most Asian stores.

Or purchase the pre made “Thai Red Curry Paste” which can also be found in most Supermarkets, Thai Red Curry paste has all the above ingredients in it needed to make this dish.

Then you will want to add in the lime last, you do not want to cook the lime because it will ruin the flavor.

Also if using fresh “Lemongrass”, “Galangal” and “Kaffir lime leaves” you will want to remove it before consuming the curry.

Want more heat, simply add in some Thai Bird’s eye chilies or Thai Chili Paste. Caution when preparing Bird’s Eye Chilies, these chilies are very hot and can burn the eyes.

Note: Want more heat, simply add in more Thai Red Curry Paste.

I’m thrilled you are reading one of my recipes, if you made this recipe id love to hear about it! Thank you and until next time see ya in the kitchen. Don’t want to miss a recipe? Sign up for our NEWSLETTER delivered right to your inbox!

Green Thai Curry with Chicken, Shrimp and Snow Peas

Green Thai Curry is just a bit hotter than Red Thai Curry, however both taste similar. There are plenty different ways to make Thai curry, and that is because you can add just about any type of vegetable or meat protein to it.

However the techniques are always the same and the main ingredients always consists Coconut milk along with “Green Thai Curry Paste”, which already has the traditional ingredients of “Lemongrass”, “Galangal”, and“Kaffir lime leaves” and Bird’s Eye Thai chilies in it.

If you want more heat you can add more Bird’s eye thai chilies to the soup, however I recommend not to as it will be very hot. I just did in this dish for added color, and to make it pretty.

I like to also add a few frozen kaffir lime leaves to the curry, even though there is some in the paste I find it adds a nice touch. However if you prefer, you can squeeze the juice of half a lime in at the end instead.

So I will leave that up to you, frozen kaffir lime leaves can be purchased in bulk at many asian groceries. One bag typically lasts me well over 50 different curry meals, so it’s wise to pick up a frozen bag for whenever the thai curry craving hits.

Now if you are not familiar with all those ingredients, Bubba says don’t fret. You can simply find all these Thai ingredients at your local grocer right in the international aisle, typically sold in packages or jars (see picture) below for our favorite Green Thai Curry paste”.

Even though we use the premade “Green Thai Curry paste” in this recipe, which has crushed Kaffir lime leaves, I also like to add a few more kaffir leaves and I always keep them on hand in my freezer for whenever I am making anything Thai.

I find it really enhances the dish, however you do not have to since they are in the “Green thai curry paste” already and the lime squeezed in at the end adds that element of tang that is needed.

Once you get familiar with the basic ingredients of thai cooking, you will be shocked at how easy it is to prepare these Thai dishes at home. Literally you can have them on the table in under 30 minutes.

Feel free to add 1/2 a cup of chicken stock to create more of a broth if desired, otherwise just use the traditional coconut milk as listed in the directions/ingredients below.


Bubba recommends picking up this paste at your local grocer, it’s our favorite and goes a long way.

Keep in mind a good coconut milk, will be half solid a half watery. One that is all watery does not work as well for this dish, typically organic varieties have the best products. 

To make Green Thai Curry Chicken, Shrimp and Snow Peas.

  1. Start by washing your vegetables and set aside.
  2. Wash the chicken breasts, and slice them into thin pieces and season with salt and pepper
  3. In pot, wok or pan, heat up the coconut oil on medium high and in your “GREEN THAI CURRY PASTE” saute for 2 minutes till blended.
  4. Next add in your can of coconut milk and cook for another 5 minutes on medium-high.
  5. Add in your ginger/garlic paste, and cook for 2 minutes all together.
  6. Then add in your fish sauce, kaffir lime leaves, sugar and simmer for another 10 minutes over low heat.
  7. Add your “Snow Peas” and “Shrimp” and cook around 3 minutes over medium heat.
  8. Lastly, add in the juice of a whole lime.
  9. Serve with rice if desired.


*Optional ~ for more sauce add 1/2 cup of chicken stock.

*Optional ~ for extra heat add 1/2 a Bird’s eye chili to step 6.

*Optional ~ add one chopped roma tomato to step 8


Notes: 

  • Keep in mind a good coconut milk, will be half solid a half watery. One that is all watery does not work as well for this dish, typically organic varieties have the best products.
  • “Lemongrass”, “Galangal” and “Kaffir lime leaves” can be found in most Asian stores. “Thai Green Curry Paste” can be found in most Supermarkets, Thai Green Curry paste has all the above ingredients in it needed to make this dish.
  • Add in the lime last, you do not want to cook the lime because it will ruin the flavor.
  • Do not eat the “Lemongrass”, “Galangal” and “Kaffir lime leaves” there just for flavoring, if you’re going to use these for added flavor, make sure to bruise each item before adding to the pot.
  • Want more heat, simply add in some Thai Bird’s eye chilies or Thai Chili Paste. Caution when preparing Bird’s Eye Chilies, these chilies are very hot and can burn the eyes so proceed with caution.


I’m thrilled you are reading one of my recipes, if you made this recipe i’d love to hear about it! You can post a review, picture below or via Instagram and by doing so you will be automatically entered into our seasonal CONTEST to win one of our great prizes. Winner will be notified via email within a week after the contest closes. Thank you and until next time see ya in the kitchen. Don’t want to miss a recipe? Sign up for our NEWSLETTER delivered right to your inbox!


Pistachio Cheesecake

What better way to celebrate the holidays than with this Festive No Bake Pistachios Cheesecake that is topped with pomegranate fruit.

Just image serving this no bake pistachio cheesecake at your next Christmas gathering!

It is not only super festive its unique and sure to be a center at the dessert time.

It has a shortbread and graham cracker crust and is filled with pistachio pudding and heavy whipping cream and of course cream cheese. 

There really isn’t much to this recipe.

Simply  follow the basic steps below and you will have the most amazing pistachio cheesecake to serve your guests this year or every year.

This Cheesecake will have you and those who get a chance to have a slice wanting more, nice thing is this 8″ inch cake can serve 12 people.

And you won’t have to spend all day in the kitchen baking, because let’s be honest it’s the holidays and time is short.

Since this is a no bake cake, you are going to want to prepare it the day ahead, then allow it to set in the freezer for at least 6 hours prior to serving.

Indie, says make sure you defrost the cheesecake for anywhere from 20 – 30 minutes on the counter prior to slicing and serving. This way you will have a creamy cheesecake, she really likes it creamy. During the defrosting time, you can start to decorate it with the pistachios and pomegranate seeds.

Simply leave the cheesecake in the cheesecake pan on the countertop, and start by placing your seeds all around the outside covering the rims with seeds.

Then crush up the pistachios with a large knife, and sprinkle all over the top. Once the cake is defrosted fully, remove the cheesecake pan and slice to serve.

This frozen cheesecake is just one of those recipes that everyone should have in their freezer around the holiday season. Enjoy!

Everybody loves cheesecake so it’s always a dessert winner.

If you like Pistachios you are going to love the taste of this cheesecake!

Because it’s packed from within and without with Pistachio flavor.

The addition of pomegranate seeds creates the best combination of flavors.

I am so thrilled you are reading one of my recipes, if you made this recipe i’d love to hear about it! You can post a review, picture below or via Instagram and let me know how it turned out. Thank you very much for reading and until next time see ya in the kitchen. Don’t want to miss a recipe? Sign up for our NEWSLETTER delivered right to your inbox!

Cherry Cheesecake Cups (no bake)

These (no bake) Black Cherry Cheesecake Cups are absolutely delicious and easy to make. They are also the perfect dessert recipe for the holidays! Image serving these to your guests after dinner!

Ho ho ho! Keep calm they say the holidays are near. However with all this planning and preparing to get there it can be less than calm for some.

Would it not be nice to be able to prepare a dessert for 8 or so people in under 1 hour and have them thinking you spent all day? Well look no further, if you are short on time then you are going to love this recipe.


Now let me ask you a serious question, do you know anyone that doesn’t like cheesecake? Well I don’t. 

o trust me when I say, that these cheesecake cups are sure to put a smile on everyone’s face this Holiday Season.

These cups are so good that people may just ask for seconds, or thirds.

You serve them chilled, which allows you to skip on the baking part and saves you a whole lot of hassle.

Giving you plenty of time to do whatever else it is that may be on your to do list.

You will be shocked at how easy this recipe truly is and I promise you it does not skimp on flavor at all. People are going to be asking you how you did it? But let’s leave that little secret to us kitchen warriors.


A simple way to preparing these Cherry Cheesecake Cups 

With boiled down cherries or canned!

I am so thrilled you are reading one of my recipes, if you made this recipe id love to hear about it!  Thank you very much for reading and until next time see ya in the kitchen. Don’t want to miss a recipe? Sign up for our NEWSLETTER delivered right to your inbox!