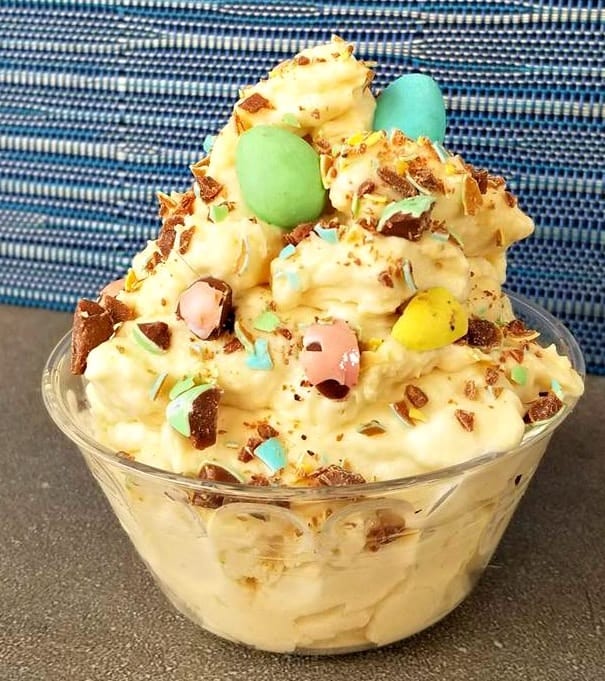
Mini Egg Cheesecake Cups

Spring is officially here and that means Easter is right around the corner. These (no bake) Mini Egg Cheesecake Cups are sure to bring some sweetness to your home this season.

Now let me ask you a serious question, do you know anyone that doesn’t like cheesecake? Well I don’t. 

So trust me when I say that these cheesecake cups are sure to put a smile on everyone’s face this Easter Season.

What I REALLY like about these Cheesecake cups is that their not heavy at all. And that’s because of the whip cream addition that makes them almost like a cheesecake mousse! YES, A Cheesecake Mousse!

My partner who lives, I mean loves cheesecake. Has already given it a 10 out of 10 and then asked is there more? 

Lucky for him, I am going to be making these again for Easter as I will be serving them to our guests.  

I had such a good time making these, I bet the kids would have a blast making them too!

This recipe here can easily serve 6 people. Also, since this is a no bake cheesecake recipe it can all be ready in less than 30 minutes! And like any of my recipes, you can adjust the ingredient ratio in the ingredient section and serve more people or less people if desired. 

You may have been thinking, aren’t Cadbury eggs Canadian?

Because I sure did, but after some research I learned their actually a milk chocolate created and produced by Cadbury UK. And are now also produced in Canada, so I decided to place this recipe under my England cuisines category. I hope that is okay with my Canadian readers!

These cups are so good that people may just ask for seconds or thirds. So if you are serving more than a few, I would definitely double up the recipe.

Also they are best served a bit chilled and can be stored in the fridge for up to 24 hours before serving if need be. 

Your going to be shocked at how easy and tasty this recipe is. People are sure to be asking how you made it? But let’s leave that little secret to us kitchen warriors.


DID YOU MAKE THIS RECIPE?

If you make this recipe, I would love to hear about it! You can leave a 5 star review in the comments below! Thank you very much for reading and until next time see ya in the kitchen. Don’t want to miss a recipe? Sign up for our NEWSLETTER delivered right to your inbox!

Mini Egg Chocolate Cheesecake Cups

These (no bake) Mini Egg Chocolate Cheesecake Cups are sure to bring some smiles to your table this Easter season! 

Spring is officially here and that means Easter is right around the corner.

I wanted to come up with a fun and cute recipe that the whole family would enjoy! 

I think I hit the nail on the head with this one, don’t you?

PHILADELPHIA MINI EGG CHEESCAKE RECIPE

What I REALLY like about these Cheesecake cups is that their not heavy at all.

And that’s because of the whip cream addition that makes them almost like a chocolate cheesecake mousse! YES, A Chocolate Cheesecake Mousse!

My partner who lives, I mean loves cheesecake. Has already given it a 10 out of 10 and then asked is there more? 

Lucky for him, I am going to be making these again for Easter as I will be serving them to our guests. 

I had such a good time making these, I bet the kids would have a blast making them too!

Absolutely delicious and Festive!

This recipe here will serve three to four people in “large cups” such as you see in these pictures. However if you want to have smaller portions, you could easily serve 6 people.

Also, since this is a no bake cheesecake recipe it can all be ready in less than 30 minutes!

And like any of my recipes, you can adjust the ingredient ratio in the ingredient section and serve more people or less people if desired. 

Now let me ask you a serious question, do you know anyone that doesn’t like cheesecake? Well I don’t. 

So trust me when I say that these cheesecake cups are sure to put a smile on everyone’s face this Easter Season.

You may have been thinking, aren’t Cadbury eggs Canadian?

Because I sure did, but after some research I learned their actually a milk chocolate created and produced by Cadbury UK. And are now also produced in Canada, so I decided to place this recipe under my England cuisines category. I hope that is okay with my Canadian readers!

These cups are so good that people may just ask for seconds or thirds. So if you are serving more than a few, I would definitely double up the recipe.

As they are best served a bit chilled and can be stored in the fridge for up to 24 hours before serving if need be. 

Your going to be shocked at how easy and tasty this recipe is. People are sure to be asking how you made it? But let’s leave that little secret to us kitchen warriors.

Wishing you a Delicious Easter!

DID YOU MAKE THIS RECIPE?

If you make this recipe, I would love to hear about it! You can leave a 5 star review in the comments below! Thank you very much for reading and until next time see ya in the kitchen. Don’t want to miss a recipe? Sign up for our NEWSLETTER delivered right to your inbox!

Homemade Fresh Cherry Pie

I’m baking up a delicious cherry pie today with a buttery flaky crust. I like to use the Dr. Oetker pie crust because it gives me a perfect crust every time. All you need is cold butter and water along with a rolling pin and you will be in business. 

One of my favorite summer desserts is cherry pie, I guess its to do with the fact that cherries are in the height of the season now and go so good in a pie.

My Galette cherry pie is very similar to this recipe in many ways, however the crusts are just different. I do not recommend using frozen cherries for this recipe as they hold way to much water and then you will end up with a watery pie.

Now I don’t know about you, but I was never a fan of the store bought cherry pie. Once I started making my own pies at home, I knew right away what i have been missing all along.

This pie has just the right amount of butter crust, cherries, lemon juice, egg, vanilla extract and powdered sugar to make anyone’s mouth water. I hope you give it a try, because it’s something special to be able to say I made this myself, enjoy! 

It’s ready to go into the oven, cant hardly wait!! 

Note: You can serve this along with ice cream or whip cream.

I am so thrilled you are reading one of my recipes, if you made this recipe id love to hear about it! You can post a review, picture below or via Instagram and let me know how it turned out. And by doing so you will be automatically entered into our seasonal CONTEST to win one of our great prizes. Winner will be notified via email within a week after the contest closes. Thank you very much for reading and until next time see ya in the kitchen. Don’t want to miss a recipe? Sign up for our NEWSLETTER delivered right to your inbox!


PIN IT FOR LATER


Cherry Cheesecake

This No Bake Cherry Cheesecake is simply my favorite way to eat a Cherry cheesecake. 

I have brought this cheesecake over to a few friends and family, and everyone says the same thing = YUM! 

I have had people begging me for the recipe, and believe me when I say.

There is no other Cherry Cheesecake that I have tried, that even compares to this nothing.

Maybe I am bias because I do love fresh cherries so much or maybe it’s true, I’ll let you be the judge of your creation.

Because you don’t live near a bakery doesn’t mean you have to go without cheesecake. ~ Hedy Lamarr

But let me tell you, no store bought or restaurant made has ever impressed me like this recipes does.

It probably has a whole lot to do with those cherries you see on top, as they do not come from a tin can.

That would be just wrong!

WHAT IS CHERRY CHEESECAKE

  • It is a basic cheescake that is topped with fresh cooked cherries. 

IS CHERRY CHEESECAKE GLUTEN FREE

No, the Graham Cracker crust has gluten. 

These cherries are fresh, making every bite unbelievably decadent.

Some people like a lot of cherries on their cheesecake, while others like very little.

I am on the “like a lot side”, I mean a lot!

HOW TO MAKE CHERRY CHEESECAKE 

If you are using frozen cherries, keep in mind that you will need to drain them well so you don’t get an overly watery topping.

As for the crust you can bake it or allow it to chill in the fridge prior to filling, both methods will be provided to you below in the recipe card. 

  • I use 3 cups of cherries for a 8 inch cheesecake.
  • if you’re wanting less cherries, then use 2 cups or you can use a 9 inch cake pan for a larger cake.
  • First, you will start by making the crust.
  • Then the cream cheese filling
  • Lastly, you will cook the cherries on the stovetop. Then allow it to cool down before topping the cheesecake with them. 

I hope you enjoy this dessert as much as we do.

Note: Place your cake back in the freezer or it will melt,this cheesecake is best chilled frozen.

I am so thrilled you are reading one of my recipes, if you made this recipe i’d love to hear about it! Thank you very much for reading and until next time see ya in the kitchen. Don’t want to miss a recipe? Sign up for our NEWSLETTER delivered right to your inbox!


Red Velvet Ice Cream

Are you as BIG of a Red Velvet Fan as me? Well then, you’re in for treat! I’m finally ready to share my family’s favorite recipe for Red Velvet ICE CREAM!! 

You cannot find this in stores guys, it only can be made in your kitchen. And your going to want to keep it under wraps, because it will be gone in no time.

Anyone who has ever tasted this ice cream has gone nuts. And rightfully so, it’s the BEST Red Velvet ice cream out there. And I’m so proud to say that I have come up with it. 

Because ice cream machines vary between 1 and 2 quarts capacity, I have create this recipe for my 2 quart machine. If your wanting only 1 quart of ice cream, just simply DIVIDE the recipe in half or use a 1 quart machine. 

The machine I used is listed below in my amazon picks, it’s the best. If you end up giving it a try I would love to know what you think, let me know in the comments below. 

If you’re having a gathering and would like to serve this to your guests, then why not bake an extra “Red Velvet Cake”. Serve each guest with one slice of cake and one scoop of ice cream. Makes about fourteen ½-cup servings.

I am so thrilled you are reading one of my recipes, if you made this recipe i’d love to hear about it! You can post a review/picture below or via Instagram and let me know how it turned out. Don’t want to miss a recipe? Sign up for our NEWSLETTER delivered right to your inbox!


Cherry Cheesecake Cups (no bake)

These (no bake) Black Cherry Cheesecake Cups are absolutely delicious and easy to make. They are also the perfect dessert recipe for the holidays! Image serving these to your guests after dinner!

Ho ho ho! Keep calm they say the holidays are near. However with all this planning and preparing to get there it can be less than calm for some.

Would it not be nice to be able to prepare a dessert for 8 or so people in under 1 hour and have them thinking you spent all day? Well look no further, if you are short on time then you are going to love this recipe.


Now let me ask you a serious question, do you know anyone that doesn’t like cheesecake? Well I don’t. 

o trust me when I say, that these cheesecake cups are sure to put a smile on everyone’s face this Holiday Season.

These cups are so good that people may just ask for seconds, or thirds.

You serve them chilled, which allows you to skip on the baking part and saves you a whole lot of hassle.

Giving you plenty of time to do whatever else it is that may be on your to do list.

You will be shocked at how easy this recipe truly is and I promise you it does not skimp on flavor at all. People are going to be asking you how you did it? But let’s leave that little secret to us kitchen warriors.


A simple way to preparing these Cherry Cheesecake Cups 

With boiled down cherries or canned!

I am so thrilled you are reading one of my recipes, if you made this recipe id love to hear about it!  Thank you very much for reading and until next time see ya in the kitchen. Don’t want to miss a recipe? Sign up for our NEWSLETTER delivered right to your inbox!

Easy Key Lime Pie

This Easy Key Lime Pie contains only 4 ingredients and no eggs.  

If you have never tried this delicious pie that hails from Sunny Seaside Florida, then you are in for a treat! It’s super fresh tasting, tangy and sweet.

And if you knew it was this easy to make, I’m certain you would be making it more often.

This is one of my favorite pies, next to some other berries kinds.

And with only 4 ingredients such as sweetened condensed milk, sour cream, key lime juice, and whip cream. This pie is easy to make.

And takes less than 30 minutes from start to finish! 

HOW TO MAKE KEY LIME PIE

  • Some people like to add 2 cans of condensed milk, so if you prefer you can do that too.
  • Personally I prefer it made with one can because it gives more of that tangy taste that I love.
  • Plus if you add 2 cans, you will find it makes to much filling.
  • So if you decide to do so, be prepared for some extra filling on the side. Which I guess isn’t so bad right? 

This is my favorite KEY LIME JUICE!

For my all time favorite pie recipe!

Key Lime Pie is always best the next day, so allow it to sit in the fridge overnight for the best flavor.

When your read to serve, add your whipped cream on-top otherwise it will melt all over the place.

LOVE KEY LIME PIE? Then you will want to try my other recipe below!


I am so thrilled you are reading one of my recipes, if you made this recipe i’d love to hear about it! Thank you very much for reading and until next time see ya in the kitchen. Don’t want to miss a recipe? Sign up for our NEWSLETTER delivered right to your inbox!
Rhubarb & Strawberry Cheesecake Frozen Yogurt

Hello Summer Fresh Rhubarb, i have been waiting all year for you. The trick to making the perfect Rhubarb and Strawberry Frozen Yogurt is to puree your Rhubarb. This is done by cooking down the Rhubarb in a saucepan with a little water and sugar till tender and then you simply mash it with a fork and or blend in a food processor if its stringy. And don’t forget, this freezes a lot quicker than store-bought frozen yogurt. Because it contains no extra fillers, so if your going to freeze overnight you can add in some corn starch or vodka to make scooping easier. Also, if you want more tart frozen yogurt, feel free to decrease the sugar in step 3!” 

What you will need:

To make the Rhubarb and Strawberry Frozen Yogurt:

  1. In a saucepan add in your cubed Rhubarb, with 3tbsp of sugar. Cook on medium/high heat for 15 minutes or until fork tender, and mash. If you find it easier you can transfer it to your food processor to puree to a smoother consistency once its been cooked down.
  2. Once your Rhubarb is done transfer it to the fridge for 2 hours to cool.
  3. Next lets make the Yogurt, if your yogurt if its not GREEK, you will need to strain the water out. If its GREEK omit this step. “In a strainer lined with 2 coffee filters allow your plain yogurt to strain by placing it in the fridge for 2 hours, you should get about 1/2 cup of water and discard of that.
  4. Now, lets prepare that delicious cream cheese mixture. In a food processor add your cream cheese icing, and powdered sugar. MAKE sure your food processor is cleaned out because you will be pulsing your strawberries in it next. Once the cream cheese is smooth “light and fluffy”, set aside on the counter so it reaches room temperature.
  5. Now in the same food processor, chop up 3 cups of frozen strawberries and then whisk them into your Greek yogurt. Then add in your rhubarb, condensed milk, milk, vanilla extract, maple syrup, and red food coloring and whisk till everything is combined.
  6. Now, pour your yogurt mixture into your “frozen ice cream maker” and process for 20 minutes or according to manufacturer’s instructions.
  7. Now comes the fun part, grab a large plastic container will a lid (you will be using this to freeze your frozen yogurt in) after letting it sit for 20 minutes in the (Cuisinart machine to make it easier to remove) you then can start by pouring half your “Rhubarb & Strawberry mixture” in your container and then add in all of your room temperature cream cheese icing (To fill the middle of the container). Top with the remaining “Rhubarb & Strawberry mixture”. You also can mix the cream cheese directly into the ice cream if you desire, it will just look different then the picture.
  8. You can eat it soft as is or put in the freezer to allow it to freeze more for about 2 hours before serving
  9. Before scooping, remove from the freezer for about 10 minutes to scoop.

Note: This can store in the freezer up to one month.

I am so thrilled you are reading one of my recipes, if you made this recipe id love to hear about it! You can post a review, picture below or via Instagram and let me know how it turned out. And by doing so you will be automatically entered into our seasonal CONTEST to win one of our great prizes. Winner will be notified via email within a week after the contest closes. Thank you very much for reading and until next time see ya in the kitchen. Don’t want to miss a recipe? Sign up for our NEWSLETTER delivered right to your inbox every Month!