Pulled Pork Adobo Carnitas

These Pulled Pork Adobe Carnitas (Mexican Tacos) are so darn delicious, and are similar to the popular Pulled Pork Carnitas that we have come to know and love. The only difference here is that we are adding “adobe peppers” which give this pork a little sweet heat along with Pasilla Molido Chile, which is flavorful but not overly hot and has earthy tones that go well when paired with fruit = orange and lime juice.

So when you add the whole orange into the slow cooker along with these chiles something amazing happens. This recipe can feed roughly 7 people, so if it’s just the two of you dining tonight. Then you can certainly enjoy this the next day and probably have a few meal preps to pack also for the week ahead if you like.

The nice thing about mexican food is that you can make a lot of it in a short period of time, and then enjoy fresh tacos all throughout the week. Not to mention it’s super easy to make, all you are doing is a little prep that takes less than 5 minutes and then placing everything inside your slow cooker for the day. Then you simply will be coming home to just shred the pork and placing it under the broiler for a few minutes to crisp it up.

Then you will be ready to have a feast fit for a Mexican Queen or King. I love the ingredients in this recipe, everything tastes so fresh. Adding fresh lime juice along with a fresh orange juice really makes the flavors pop.

Also the addition of the the raw onions surprisingly work so well here too, trust me or I should say the Mexicans! So be sure not to skip on those very important ingredients. Serve this up on some corn tortillas along with some avocados and sour cream if desired. I hope you enjoy, ARRIBA MEXICO!


To make the “Pulled Pork Adobo Carnitas” (Mexican Tacos):

  1. Start by heating rinsing and pat drying the pork.
  2. Then heat 1 tbsp of olive oil in your slow cooker and sear your pork on all four sides, you can also cut your pork into four pieces if desired.
  3. Once lightly browned, turn off heat and make sure the pork is fat side up.
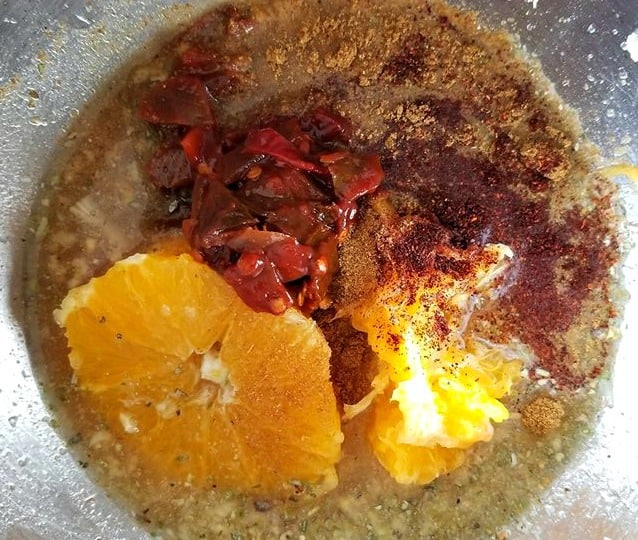
  4. Take out four adobo chiles from the can and chop them finely, then add to a small mixing bowl along with 1 tbsp of the adobo sauce, lime juice and water. 

  1. Next chop the garlic and onion finley add add to the bowl along with all the spices.
  2. Squeeze the juice from one orange into the bowl and then cut the orange inside out.
  3. Then pour everything over the pork.
  4. Place the leftover orange core around the pork also. 
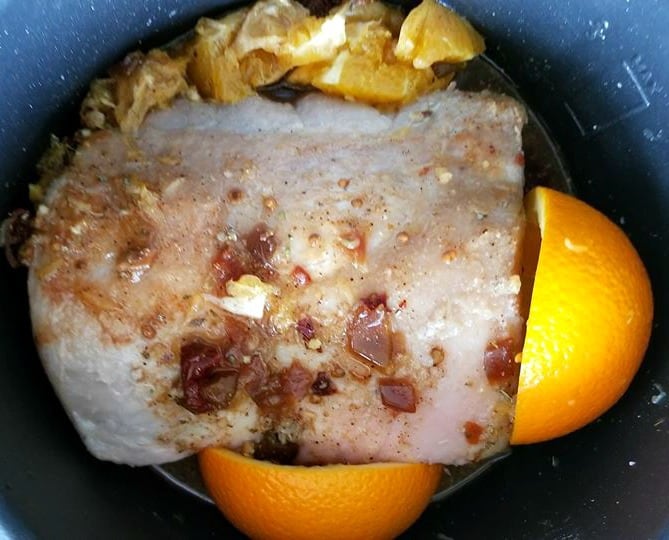
  5. Cover and cook on LOW for 6-8 hours or until pork is tender.
  6. Once tender, take the pork out (keep the remaining juices in the pot) and shred your pork on a cutting board with two forks. 
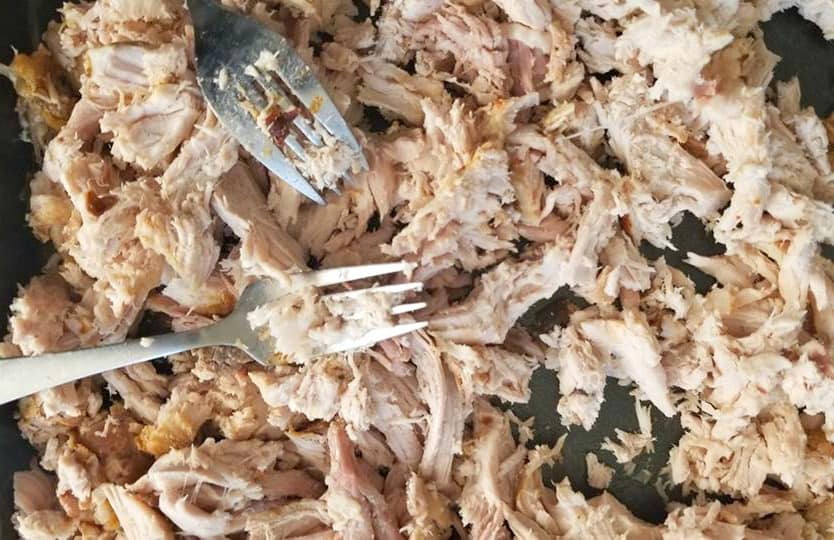
  7. Add the pork back into the slow cooker and toss in the juices.
  8. Next place your pulled pork on a large non stick baking sheet and drizzle half a cup of the remaining juices from the crock pot over top.
  9. Turn your oven on the *(broil setting) and broil on a large non stick baking sheet for 5 minutes, turn over your shredded pork and broil another 5 minutes till desired crispness.
  10. Pour another half cup of sauce over the broiled pork. 
  11. Serve warm in tortillas, and add your  favorite toppings such as avocado, pico de gallo, onions cilantro etc
  12. Enjoy!


NOTE: Don’t forget to broil the pork once it’s been shredded, this ensures the meat is crispy just like they serve in Mexico. Just make sure you are pouring half a cup of the sauce overtop the shredded pork before and after broiling.  This shredded pork can be served in burritos, tacos, quesadillas, enchiladas and or over rice.

Looking for an awesome recipe for Mexican Salsa? Check out my recipe for Pico De Gallo this goes great with these Carnitas also.


Looking for some MEAL PREP inspiration? Well this recipe is great for that. You can have dinner for two and then create four meal prep bowls for the week ahead. Simply make some rice on the side, and add them to each bowl along with a torn up corn tortilla. Top with onions and cilantro and drizzle the sauce from the slow cooker directly overtop. ENJOY!


I am so thrilled you are reading one of my recipes, if you made this recipe i’d love to hear about it! You can post a review, picture below or via Instagram and let me know how it turned out. And by doing so you will be automatically entered into our seasonal CONTEST to win one of our great prizes. Winner will be notified via email within a week after the contest closes. Thank you very much for reading and until next time see ya in the kitchen. Don’t want to miss a recipe? Sign up for our NEWSLETTER delivered right to your inbox!


PIN IT FOR LATER

Green Chile Chicken Bean Soup

I absolutely love this Green Chile Chicken Bean Soup. It’s clean, fresh and healthy for you, not to mention super delicious! 

You can add black beans or white beans to this soup, I much prefer black beans myself so that is what I used.

Black beans are a good source of antioxidants making this one of the healthiest beans around. Also I  like to use “Better than Bouillon” Chicken stock in replace of liquid stock. We buy ours from Costco, so instead of using 7 cups of liquid Chicken Stock, we use 2 tbsp of that instead.

So if your interested in trying it out, the link is below in my amazon picks. The key to making this soup extra special is using two different types of chiles.

Both in powder form, “Pasilla Chile powder”, which it is a mild to medium-hot chile that is rich in flavor. And “California Chile Powder” which is has a nice mild heat to it. The combination of these two spices will add a great taste to this soup.

Most people are surprised at how filling it is also, typically most people get full just off half a bowl. Because one cup of Black Beans has packed 15.2 grams of protein adding that chicken breasts to that and you are sure to be satisfied for dinner with this soup.

This recipe really goes a long way, so you can feed a family of 6 and easily stores for leftovers. I like to make a big batch, and then I will freeze a few meal prep bowls for another day.

Leaving out the avocado and cilantro of course, those foods don’t taste as  good reheated.

I like to soak my black beans the night prior, however you can always use canned if you prefer.

So this recipe goes a long way, and can feed a family of 6 and easily stores for leftovers. I like to make a big batch, and then I will freeze a few meal prep bowls for another day. Leaving out the avocado and cilantro of course, those foods don’t taste as  good reheated.

I like to soak my black beans the night prior, however you can always use canned if you prefer. I made this soup in my crock pot, took less than 5 minutes to throw together.

Then I placed it on low for 8-10 hours, or you can place it on high for 5. And of course this also can be done on the stove top, or on the browning setting in the slow cooker as well. Just make sure you are simmering it long enough to tenderize the chicken breasts, you may need to add more water if your following the last two methods.


Did you know that the fiber in black beans actually helps lower the total amount of cholesterol in the blood and decrease the risk of heart disease? Well if that is not more reason enough to eat more of these beans, then I don’t know what is! I like to serve it with fresh chunks of avocado and sometimes a spoonful or two of sour cream. You can cook this on the stove top as well, both methods work great. I hope you give this a try because it’s super delicious!

Our favorite Tomatillo Sauce


Note: Also try adding in some sour cream, to make it more creamy.


I am so thrilled you are reading one of my recipes, if you made this recipe i’d love to hear about it! You can post a review, picture below or via Instagram and let me know how it turned out. And by doing so you will be automatically entered into our seasonal CONTEST to win one of our great prizes. Winner will be notified via email within a week after the contest closes. Thank you very much for reading and until next time see ya in the kitchen. Don’t want to miss a recipe? Sign up for our NEWSLETTER delivered right to your inbox every Month!

Garlic Lime Shrimp

This Garlic Lime Shrimp is pan seared with some lime butter along with a garlic cilantro sauce. It is such a quick and healthy recipe to make for when you are in a hurry or just craving some shrimp.

For this dish we are serving alongside a fresh avocado, but there are so many ways to enjoy this shrimp.

Think in a tortilla, over rice or over a bed of cooked pasta.

I have always favored my shrimp with lemon garlic butter and  though that is just as good.

I also like to use lime too, adding in fresh cilantro with that gives this dish a mexican feel and really enhances all the other flavors.

Once you try this shrimp, you will be hooked, just be careful to not overcook the shrimp or it will become rubbery.

You are going to want to cook it on medium low heat till it turns pink in color then you will want to remove it immediately from the heat and serve.

Nothing beats fresh shrimp like this, drizzle with extra lime juice if desired and enjoy!

Buen provecho!

HOW TO MAKE GARLIC LIME SHRIMP

  • In a large skillet, heat your butter over over medium – low heat.
  • Add minced garlic and chopped cilantro and saute for 1 minute.
  • Add in the shrimp and season with salt and pepper along with garlic powder, saute till it turns to pink and is cooked.
  • Turn off the heat and squeeze in the juice from one lime.
  • Serve immediately.

I am so thrilled you are reading one of my recipes, if you made this recipe i’d love to hear about it!Thank you very much for reading and until next time see ya in the kitchen. Don’t want to miss a recipe? Sign up for our NEWSLETTER delivered right to your inbox every Month!


Red Thai Scallop Curry

This Red Thai Scallop Curry is super simple to make and can be done in under 30 minutes flat. 

There are plenty of ways to make Red Thai Curry and if you follow this blog then you will know that I like to make this dish often and in many different ways.

The nice thing about Thai food is that you prepare it once and then you should have all the necessary ingredients and know how to prepare it again and again.

Before you know it you will be a TOP CHEF in your kitchen, cooking Thai dishes like a Pro.

The scallops still remain sweet in that spicy curry sauce, and work very well alongside the chicken and other ingredients. So if you have never given scallops in Red Thai Curry before, I encourage you to give it a try.

Red Thai Curry is just a bit milder than Green Thai Curry, however both taste similar. There are plenty different ways to make Thai curry, and that is because you can add just about any type of vegetable or meat protein to your dishes.

However the techniques are always the same and the main ingredients are always Coconut milk along with “Lemongrass”, “Galangal”, “Kaffir lime leaves”, “Red Thai curry paste” and for extra heat Bird’s Eye Thai chilies!

Just be careful to remove the seeds of the Bird’s eye chilies because they are very hot, if you decide to use them. I find they are not necessary in this dish, because the particular brand of Red Thai Curry paste that I use has enough heat to it.

See my favorite brand here!

Now if you are not familiar with all those ingredients, Bubba says don’t fret, you can find them all at your local asian grocer or right in the international aisle at your local grocer which will sell it in packages and or jars (see picture) below of the “Red Thai Curry paste” we like to use.

Even though we use the premade “Red Thai Curry paste” in this recipe, we also like to use  fresh or frozen “Kaffir leaves” occasional too.

However you do not have to since they are in the “Red thai curry paste” already and the lime squeezed in afterwards does help give it the tang. Once you get all these basic ingredients, you will be shocked at how easy it is to prepare these Thai dishes at home.

Keep in mind a good coconut milk, will be half solid a half watery. One that is all watery does not work as well for this dish, typically organic varieties have the best products.

* Optional ~ for extra broth add 1/2 cup of chicken stock

*Optional ~ for extra heat add 1/2 a Bird’s eye chili to step 6.

*Optional ~ add one chopped roma tomato to step 8


Notes: 

  • “Lemongrass”, “Galangal” and “Kaffir lime leaves” can be found in most Asian stores. “Thai Red Curry Paste” can be found in most Supermarkets, Thai Red Curry paste has all the above ingredients in it needed to make this dish.
  • Add in the lime last, you do not want to cook the lime because it will ruin the flavor.
  • Do not eat the “Lemongrass”, “Galangal” and “Kaffir lime leaves” there just for flavoring, if you’re going to use these instead of the Thai Red Curry paste, make sure to bruise each item before adding to the pot.
  • Want more heat, simply add in some Thai Bird’s eye chilies or Thai Chili Paste. Caution when preparing Bird’s Eye Chilies, these chilies are very hot and can burn the eyes.

I’m thrilled you are reading one of my recipes, if you made this recipe i’d love to hear about it! Thank you and until next time see ya in the kitchen. Don’t want to miss a recipe? Sign up for our NEWSLETTER delivered right to your inbox!


Thai Seafood Soup (Tom Yum Talay)

One of Thailand’s most popular soups is this Thai Seafood Soup also known as (Tom Yum Talay). This sour soup is packed with amazing flavors that you’re sure to love.

I had a bit of a hard time finding the traditional ingredients of lemongrass, galangal and kaffir lime leaves that make up this delicious Soup.

However, he managed to track down an old friend who now works close to this new Asian market.

Who directed him to all those ingredients we needed there.

You can try cooking this soup the traditional way with “Galangal”, “Lemongrass”, and Kaffir Leaves which most Asian markets carry.

Otherwise you can simply purchase a bottle of “Tom Yum paste” which most major groceries stores carry and create the same soup.

The Thai word talay or taleh means ‘sea’ and refers to the seafood in the soup. You can use a combination of seafood if you like, however in this recipe we will be using SOLE fish.

Either way this soup will turn out great whichever method you choose. We recommend that if your wanting to cook it from scratch then you should  buy all the Thai ingredients if possible frozen. 

Because they can be stored in the freezer for the next time your going to make this soup. So if you like Thai food as much as we do, don’t be afraid to make it yourself.

Once you do it once or twice it becomes like second nature. And  tastes just as good as those from your favorite restaurant, if not better. 

One of my favorite thai soups of all time

Lemongrass, Galangal and Kaffir lime leaves, along with Thai Red Chili Paste can be found in most Asian grocery Tom Yum Soup Paste can be found in almost any Supermarket.

What I do is buy my “Lemongrass”, “Galangal” and “Kaffir lime leaves” in frozen packs that my Asian grocery carries. This lasts much longer, and enables me to make many different Thai dishes before I need to restock.

Notes:

  • Add in the lime last, you do not want to cook the lime because it will ruin the flavor.
  • Do not eat the “Lemongrass”, “Galangal” and “Kaffir lime leaves” there just for flavoring
  • Want more heat, simply add in more Thai Bird’s eye chilies or Thai Chili Paste.
  • Caution when preparing Bird’s Eye Chilies, these chilies are very hot and can burn the eyes.
  • You can use brown/white button, cremini, and oyster mushrooms for this recipe.
  • You can use Sole, Shrimp or Tilapia fish for this soup.


I am so thrilled you are reading one of my recipes, if you made this recipe i’d love to hear about it! Thank you very much for reading and until next time see ya in the kitchen. Don’t want to miss a recipe? Sign up for our NEWSLETTER delivered right to your inbox!


Creamy Thai Pumpkin Soup

This Creamy Pumpkin soup is healthy and easy to make. If is also sure to fill the air and kitchen with a nice aroma too. 

Just make sure before making this soup that you are using “Pumpkin puree” not “filling” for this one as there is a BIG difference in how this will turn out.

Also you can use any type curry for this kind of soup, however we do recommend this brand of “Thai Red Curry paste” below.

Because it has the flavorful spices of lemongrass, galangal and kaffir leaves in it that puts this soup into the Thai cuisines category.

Red Thai Curry paste can be found in pretty much any asian aisle in your local grocery store. So if you have not cooked with it before, we encourage you to give it a try.

The pumpkin works so well in this recipe, not to mention Looking for a purely vegetarian soup, just omit the chicken stock and use vegetable. Easy eh 🙂 Enjoy

I am so thrilled you are reading one of my recipes, if you made this recipe i’d love to hear about it! You can post a review, picture below or via Instagram and let me know how it turned out. Thank you very much for reading and until next time see ya in the kitchen. Don’t want to miss a recipe? Sign up for our NEWSLETTER delivered right to your inbox every Month!

Blueberry Frozen Yogurt

Ohhhh Blueberries i love you. I must admit, when i was a kid i hated fruit. But now that i am an adult i love it. Maybe it is because almost all my desserts are made with it!! Or maybe its because i finally have found an excuse to eat frozen yogurt and ice-cream more often. When making Frozen Yogurt i often choose one with a fruit base, and this is certainly one of my favorites. Plus it’s super easy to make and is so healthy for you its very hard for my guests to say NO to even if on a diet. Because once i tell them whats in it and that Blueberries are the King of Antioxidants, which are packed full of fiber, potassium, folate, vitamin C, vitamin B6 and more there sold. And for me its more than enough reasons alone to eat this every night.


Kitchen Essentials:


To make 2 quarts of Blueberry Frozen Yogurt:

  1. Add your frozen blueberries to your food processor, pulse till blended.
  2. Now lets make the frozen yogurt base, start by adding your cold yogurt, milk, condensed milk, lime juice and blueberries into a large bowl and mix with a spatula till blended.
  3. Once your mixture is blended, pour the mixture into your frozen Cuisinart maker and process for 25 minutes or according to manufacturer’s instructions.
  4. Now comes the fun part, grab a large plastic container will a lid (you will be using this to freeze your frozen yogurt in) after letting it sit for 30 mins in the (Cuisinart machine which makes it easier to remove) then you can start by pouring all of your frozen yogurt mixture in your container.
  5. Freeze for 2 hours and serve.
  6. Before scooping, enjoy!

If you don’t have an Cuisinart frozen yogurt maker, check this post out

Note: Set outside the freezer 10-20 minutes prior to scooping.


I am so thrilled you are reading one of my recipes, if you made this recipe id love to hear about it! You can post a review, picture below or via Instagram and let me know how it turned out. And by doing so you will be automatically entered into our seasonal CONTEST to win one of our great prizes. Winner will be notified via email within a week after the contest closes. Thank you very much for reading and until next time see ya in the kitchen. Don’t want to miss a recipe? Sign up for our NEWSLETTER delivered right to your inbox!

Cilantro and Jalapeno Hummus

YOU won’t believe how fresh this Cilantro and Jalapeno Hummus tastes!! If you’re tired of those expensive store bought varieties and thought that was the stuff! Well your in for a pleasant surprise!

I always like to make a fresh batches of hummus early in the. So that I can then store it in an airtight container for the unlimited guilt free munching!

Which usually happens at night, watching the food network or something! Enjoy this Hummus with tortilla chips or pita bread, super healthy and delicious.

HOW TO MAKE HUMMUS

  • Preparing Beans from Dry: Cover you garbanzo beans in water and allow to soak over night. The next day cook your garbanzo beans in a pot with 2 inches of water to cover, and bring to a boil. Cook for 1 1/2 hours or until they are soak. Drain and place in your blender or food processor Add your Cilantro, jalapeno, greek yogurt, garlic, olive oil, tahini and lime juice and purée. Then add in your garbanzo beans and blend till combined. Add in all your seasoning, and pulse for a few more seconds.
  • Preparing the Beans from the Can: Drain and rinse your chickpeas, add to your blender or food processor.  Add your Cilantro, jalapeno, greek yogurt, garlic, olive oil, tahini and lime juice and purée. Then add in your garbanzo beans and blend till combined. Add in all your seasoning, and pulse for a few more seconds.

For best results chill it in an airtight container for up to 2 hours or more before serving.

The longer it chills in the fridge the thicker it becomes and the flavors really set in.

Serve this with some Homemade Pita Bread and enjoy!

I am so thrilled you are reading one of my recipes, if you made this recipe i’d love to hear about it! Thank you very much for reading and until next time see ya in the kitchen. Don’t want to miss a recipe? Sign up for our NEWSLETTER delivered right to your inbox!